Advertisement
Owner's Manual & Safety Instructions
Save This Manual
operating, inspection, maintenance and cleaning procedures. Write the product's serial number in the
back of the manual near the assembly diagram (or month and year of purchase if product has no number).
Keep this manual and the receipt in a safe and dry place for future reference.
Using a generator indoors CAN
KILL YOU IN MINUTES.
Generator exhaust contains carbon monoxide.
This is a poison you cannot see or smell.
NEVER use inside
a home or garage,
EVEN IF doors and
windows are open.
When unpacking, make sure that the product is intact
and undamaged. If any parts are missing or broken,
please call 1-888-866-5797 as soon as possible.
©
Copyright
2020 by Harbor Freight Tools
No portion of this manual or any artwork contained herein may be reproduced in
any shape or form without the express written consent of Harbor Freight Tools.
Diagrams within this manual may not be drawn proportionally. Due to continuing
improvements, actual product may differ slightly from the product described herein.
Tools required for assembly and service may not be included.
Keep this manual for the safety warnings and precautions, assembly,
Only use OUTSIDE
and far away from
windows, doors,
and vents.
®
. All rights reserved.
Visit our website at: http://www.harborfreight.com
Email our technical support at: predator@harborfreight.com
Email our engine support at: predator@harborfreight.com
Read this material before using this product.
Failure to do so can result in serious injury.
SAVE THIS MANUAL.
21d
Advertisement

Subscribe to Our Youtube Channel
Summary of Contents for Vulcan-Hart OUTLAW 195
- Page 1 Owner’s Manual & Safety Instructions Save This Manual Keep this manual for the safety warnings and precautions, assembly, operating, inspection, maintenance and cleaning procedures. Write the product’s serial number in the back of the manual near the assembly diagram (or month and year of purchase if product has no number). Keep this manual and the receipt in a safe and dry place for future reference.
-
Page 2: Table Of Contents
table of contents Specifications ............2 Welding Tips .............28 Safety ................3 Maintenance and Service .........32 Setup ................11 Parts Lists and Diagrams .........38 Operation ..............18 Warranties ..............43 Specifications 120 / 2 40 V AC, 60 H z Output 6,000 Running Watts (6,500 Max. Starting Watts) Generator Battery for electric start 12 ... - Page 3 WaRning SyMBOlS and dEFinitiOnS This is the Safety alert symbol. It is used to alert you to potential personal injury hazards. Obey all Safety messages that follow this symbol to avoid possible injury or death. Indicates a hazardous situation which, if not avoided, will result in death or serious injury.
- Page 4 10. Improper connections to a building electrical system 11. Do not operate the Generator before grounding. can allow electrical current from the Generator The Generator must be earth-grounded to backfeed into the utility lines. Such backfeed in accordance with all relevant electrical may electrocute utility company workers or others codes and standards before operation.
- Page 5 17. gFci pREcaUtiOnS 28. Do not operate in explosive atmospheres, Test Ground Fault Circuit Interrupter (GFCI) such as in the presence of flammable receptacles before each use as follows: liquids, gases, or dust. Gasoline-powered engines may ignite the dust or fumes. a.
- Page 6 Service precautions 1. Before service, maintenance, or cleaning: gFci protection: a. Unplug all devices from the generator. This Generator is equipped with two 3-Prong, b. turn the engine switch to its “OFF” position. duplex 120 V ground fault circuit interrupter (GFCI) receptacles.
-
Page 7: Safety
Welder Safety instructions SaVE tHESE inStRUctiOnS – this manual contains important instructions that should be followed during installation, use, and maintenance of the welder. general Safety pROtEct yourself and others. Read and understand this information. 1. Before use, read and understand 5. - Page 8 arc Ray Safety aRc RayS can injure eyes and burn skin. 1. Wear anSi-approved welding eye protection 4. Wear an approved head covering to protect featuring at least a number 10 shade lens rating. the head and neck. Use aprons, cape, sleeves, shoulder covers, and bibs designed and 2.
- Page 9 6. do not weld or cut on materials having 9. do not apply heat to a container that has held a combustible coating or combustible an unknown substance or a combustible internal structure, as in walls or ceilings, without material whose contents, when heated, an approved method for eliminating the hazard.
- Page 10 Symbology Revolutions Per Minute Single, Dual AC or DC Power Horsepower Electrode Holder WARNING marking concerning Single Phase AC Power Supply Risk of Eye Injury. Wear Frequency: 60 H z ANSI-approved safety goggles with side shields. Volts Alternating Current Read the manual before Amperes set-up and/or use.
-
Page 11: Setup
Setup/assembly Read the EntiRE iMpORtant SaFEty inFORMatiOn section at the beginning of this manual including all text under subheadings therein before set up or use of this product. tO pREVEnt SERiOUS inJURy: Operate only with proper spark arrestor installed. Operation of this equipment may create sparks that can start fires around dry vegetation. a spark arrestor may be required. - Page 12 grounding The Welder/Generator must be properly grounded WaRning! gFci receptacles will not protect from before use. Have the unit grounded by a qualified electric shock if generator is not grounded. electrician if you are not qualified to do so. nOticE: This Generator is not intended to power To ground the Generator, connect a #12 AWG sensitive electronic equipment without the addition or larger grounding wire (not included) from...
- Page 13 assembly 1. With assistance, lift main Frame approximately 6. Fasten the bracket near the top of the Right 12 inches off the ground and place on supports. Handle Assembly to the upper right side of Secure the unit to prevent it from falling. the Frame using two M6 ...
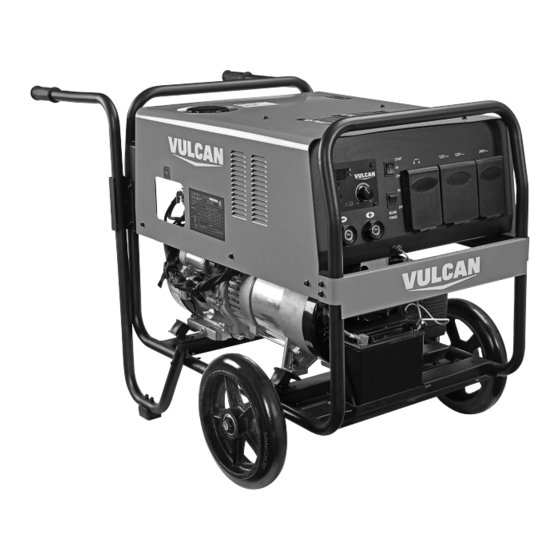
- Page 14 components and controls tank auxiliary Welding Power / C ircuit Switch Breaker Engine Switch 240 V amperage amperage Receptacle control Knob Fuel 120 V GFCI Valve Receptacles positive negative Output Output put Socket Socket Engine grounding generator terminal Battery The following are descriptions of the 3.
- Page 15 circuit Breakers: The circuit breaker protects the Generator from overloading. The rating of the breaker and the load it protects are marked near the breaker. Should any of the Circuit Breakers trip, the Generator will stop the electricity output. If this 7.
- Page 16 High altitude Operation above 3000 feet WaRning! tO pREVEnt SERiOUS inJURy FROM FiRE: Follow instructions in a well-ventilated area away from ignition sources. If the engine is hot from use, shut the engine off and wait for it to cool before proceeding. Do not smoke. nOticE: Warranty void if necessary adjustments are not made for high altitude use.
- Page 17 High altitude Kit installation 1. Turn off the Engine. nuts 2. Close the fuel valve. deflecting plate 3. Move the air cleaner housing aside to access the carburetor as follows: Foam Filter a. Loosen the knob and remove air cleaner cover. b.
- Page 18 Operating instructions Read the EntiRE iMpORtant SaFEty inFORMatiOn section at the beginning of this manual including all text under subheadings therein before set up or use of this product. inspect tool before use, looking for damaged, loose, and missing parts. if any problems are found, do not use tool until repaired.
- Page 19 Using the generator Before Starting the Engine 4. Turn the Auxiliary Power Switch ON to turn on auxiliary power to the 120 V and 240 V receptacles. Before starting the Engine: a. Follow the Set Up instructions 5. Turn the Amperage Control Knob to the to prepare the generator.
- Page 20 Starting the Engine 1. To start a cold Engine, move the Choke to the START position. To restart a warm Engine, leave the Choke in the RUN position. 2. Open the Fuel Valve. For ElEctRic StaRt For ManUal StaRt Turn the Engine Switch to START. a.
- Page 21 Stopping the Engine in an Emergency 1. To stop the Engine in an emergency, turn the Engine Switch OFF. StaRt nOticE: Generator shut-off under load may damage the Generator and attached equipment. Stopping the Engine Under normal conditions Stopping when using generator 1.
- Page 22 connecting Electrical loads Familiarize yourself with the Engine controls, power panel and how to start the Engine before using the Generator. Calculate the wattage of the products you will use with the Generator and verify that the Generator can handle the total load. WaRning! Connect only properly wired plugs to the Generator.
- Page 23 calculating total Wattage of devices Used with the generator Before using the Generator, check that the products Wattage Estimate charts you want to plug into the unit are below the rated and maximum wattage ratings of the Generator. Use the note: Wattages listed below are estimates for that type of equipment only.
- Page 24 Basic Welding Read the EntiRE iMpORtant SaFEty inFORMatiOn section at the beginning of this manual including all text under subheadings therein before set up or use of this product. tO pREVEnt SERiOUS inJURy: protective gear must be worn when using the Welder; minimum shade number 10 full face shield (or welding mask), ear protection, welding gloves, sleeves and apron, NIOSH-approved respirator, and fire resistant work clothes without pockets should be worn when welding.
- Page 25 Setting up the Weld 2. Use clamps (not included) to hold the workpieces clamps in position so that you can concentrate on workpieces proper welding technique. The distance (if any) between the two workpieces must be clean surfaces controlled properly to allow the weld to hold to bare metal.
- Page 26 Basic Stick Welding tO pREVEnt SERiOUS inJURy and dEatH: do not weld without grounding clamp. When the operator is not holding the Electrode Holder, it must be sitting on a nonconductive, nonflammable surface. 1. Place the Welder on a level surface that Set amperage according to Stick can bear its weight near the work area.
- Page 27 WaRning! tO pREVEnt SERiOUS inJURy: 8. Turn the Welding Power Switch ON. protective gear must be worn when using the WaRning! tO pREVEnt SERiOUS inJURy and Welder; minimum shade number 10 full face shield dEatH: When the Engine is running and the Welding (or welding mask), ear protection, welding gloves, power Switch is turned On, Welder is energized and sleeves and apron, niOSH-approved respirator,...
-
Page 28: Welding Tips
Welding tips A good way to test welding technique is to examine a weld’s appearance after it has cooled and the slag has been removed. Then, better welding can be learned by adjusting your weld technique to remedy any problems found. after practice welding a couple of welding beads, StOp and examine your weld using... - Page 29 Weld Diagnosis – W orkpiece Heat Control / Weld Penetration EXcESS pEnEtRatiOn OR inadEQUatE pEnEtRatiOn pROpER pEnEtRatiOn BURn-tHROUgH not hot enough ideal heat too hot How to increase workpiece heat How to reduce workpiece heat and increase penetration: and limit penetration: (to weld tHicKER workpieces properly) (to weld tHinnER workpieces properly) a.
- Page 30 Weld Penetration (Workpiece Heat Control) EXcESS pEnEtRatiOn OR pROpER pEnEtRatiOn inadEQUatE pEnEtRatiOn BURn-tHROUgH Weld is visible underneath and Weld does not contact the joint Weld droops on top and bulges slightly on top. fully, just on the surface. underneath or falls through entirely, making a hole.
- Page 31 coat of Slag Over Weld Slag is a necessary part of a stick weld. it shields the weld from impurities. clean off the slag with the chipping Hammer and Wire Brush after welding. VIEW PARTIALLY CHIPPED AWAY TO SHOW WELD porosity —...
-
Page 32: Maintenance And Service
Maintenance and Service WaRning tO pREVEnt SERiOUS inJURy FROM accidEntal StaRting: turn the power Switch of the equipment to its “OFF” position, wait for the Engine to cool, and disconnect the spark plug cap before performing any inspection, maintenance, or cleaning procedures. tO pREVEnt SERiOUS inJURy, FiRE and BURnS: turn the Welding power Switch to its “OFF”... - Page 33 checking and Filling Fuel note: do not use gasoline that has been stored in a WaRning! tO pREVEnt SERiOUS metal fuel container or a dirty fuel container. it can inJURy FROM FiRE: cause particles to enter the carburetor, effecting Fill the fuel tank in a well-ventilated area engine performance and/or causing damage.
- Page 34 Spark plug Maintenance 4. When installing a new spark plug, adjust the plug’s gap to the specification on the Spark Specifications chart. Do not pry against the plug electrode, the spark plug can be damaged. 5. Install the new spark plug or the cleaned spark plug into the Engine.
- Page 35 troubleshooting problem possible causes probable Solutions Engine will not start FUEL RELATED: FUEL RELATED: 1. No fuel in tank or fuel valve closed. 1. Fill fuel tank with fresh 87+ octane stabilizer treated unleaded gasoline and open fuel valve. do not use gasoline with more than 10% ethanol (E15, E20, E85, etc.).
- Page 36 problem possible causes probable Solutions Engine misfires 1. Spark plug cap loose. 1. Check cap and wire connections. 2. Incorrect spark plug gap or 2. Re-gap or replace spark plug. damaged spark plug. 3. Defective spark plug cap. 3. Replace spark plug cap. 4.
- Page 37 problem possible causes likely Solutions No Welder Output 1. Tripped thermal protection device. 1. Reduce duration or frequency of welding periods to help reduce wear on the welder. Refer to When Switched On Duty Cycle (Duration of Use) on page 25. 2.
-
Page 38: Parts Lists And Diagrams
parts lists and diagrams plEaSE REad tHE FOllOWing caREFUlly THE MANUFACTURER AND/OR DISTRIBUTOR HAS PROVIDED THE PARTS LIST AND ASSEMBLY DIAGRAM IN THIS MANUAL AS A REFERENCE TOOL ONLY. NEITHER THE MANUFACTURER OR DISTRIBUTOR MAKES ANY REPRESENTATION OR WARRANTY OF ANY KIND TO THE BUYER THAT HE OR SHE IS QUALIFIED TO MAKE ANY REPAIRS TO THE PRODUCT, OR THAT HE OR SHE IS QUALIFIED TO REPLACE ANY PARTS OF THE PRODUCT. - Page 39 Main assembly diagram Item 57167 For technical questions, please call 1-888-866-5797. Page 39...
- Page 40 Engine parts list part description part description Hex Flange Bolt 42A Valve Oil Seal Cylinder Head Cover Assembly 43A Valve Spring Seat Breather Tube 44A Valve Kit Cylinder Head Cover Gasket 45A Push Rod Rocker Shaft Bumper 46A Valve Lifter Air Deflector 47A Camshaft Assembly Hex Flange Bolt...
- Page 41 Engine assembly diagram Item 57167 For technical questions, please call 1-888-866-5797. Page 41...
- Page 42 Wiring Schematic Page 42 For technical questions, please call 1-888-866-5797. Item 57167...
-
Page 43: Warranties
Warranties Limited 90 Day Warranty (Retail) Harbor Freight Tools Co. makes every effort to assure that its products meet high quality and durability standards, and warrants to the original purchaser that this product is free from defects in materials and workmanship for the period of 90 days from the date of purchase. - Page 44 Emissions control System Warranty The California Air Resources Board and Harbor Freight Tools (HFT) are pleased to explain the emissions control system warranty on your 2020 Small Off-Road Engine, in addition to the Retail Warranty above. In California, new equipment that uses small off-road engines must be designed, built, and equipped to meet the State’s stringent anti-smog standards.
- Page 45 ManUFactURER’S WaRRanty cOVERagE This emissions control system is warranted for two years. If any emission-related part on your engine is defective, the part will be repaired or replaced by HFT. OWnER’S WaRRanty RESpOnSiBilitiES As the engine owner, you are responsible for the performance of the required maintenance listed in your Owner’s Manual.
- Page 46 gEnERal EMiSSiOnS WaRRanty cOVERagE a) The warranty period begins on the date the engine or equipment is delivered to an ultimate purchaser. The warranty period is two years. b) HFT warrants to the initial owner and each subsequent owner that the engine is: 1.
- Page 47 d) Emission Warranty Parts List. 1. Fuel Metering System 4. Catalyst System (if so equipped) a. Carburetor and its internal parts (and/or a. Exhaust pipe stud/exhaust manifold. pressure regulator or fuel injection system). b. Thermal reactor. b. Fuel tank. c. Catalytic converter (if so equipped). c.
- Page 48 26541 Agoura Road • Calabasas, CA 91302 • 1-888-866-5797...
Need help?
Do you have a question about the OUTLAW 195 and is the answer not in the manual?
Questions and answers
What's the part name in the manual number 15
I would like to order some Vulcan outlaw parts how can I go by
why does the auto idle only work when the welder is switched off