Table of Contents
Advertisement
Available languages
Available languages
Quick Links
Advertisement
Table of Contents

Subscribe to Our Youtube Channel
Related Manuals for MOLINO MolinoKitchen Air Fryer Mini


Summary of Contents for MOLINO MolinoKitchen Air Fryer Mini
- Page 1 Manual Gebruikershandleiding Mode d’emploi Bedienungsanleitung Manuale di istruzioni Manual de instrucciones 2020-03-31 OCG MolinoKitchen Mini Airfryer Manual.indd 1 2020-03-31 OCG MolinoKitchen Mini Airfryer Manual.indd 1 28-04-20 09:08 28-04-20 09:08...
-
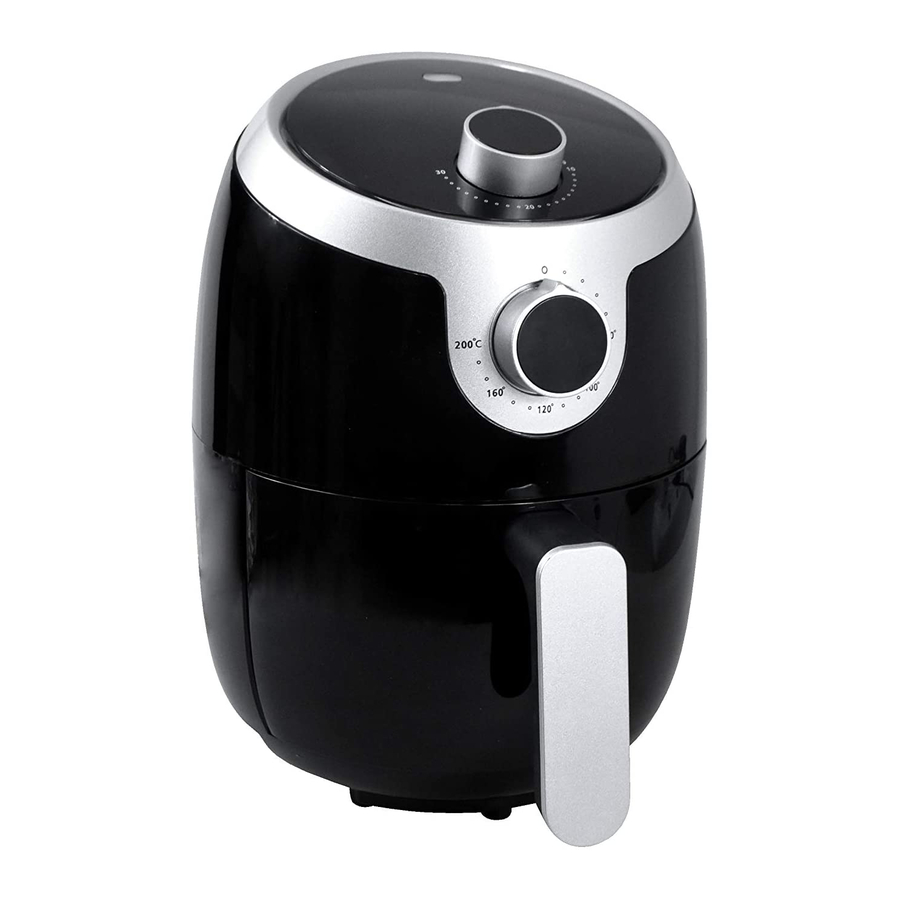
Page 2: Product Structure Diagram
Product Structure Diagram: 1. Handle bar 2. Pot 3. Air inlet 4. Heating Indicator lamps 5. Temperature controller (80~200) P l e a s e c a r e f u l l y r e a d t h e 6. - Page 3 3 | E N Cautions Please carefully ready the instruction manual, before using the • product. Keep the manual for reference in future. The product contains electronic elements and heating elements. • Do not put it in water or wash by water. •...
- Page 4 4 | M A N U A L • Do not allow children to contact with the socket and plug to avoid electric shock; • Keep the product away from children to avoid scald, electric shock and/or other damages; • Do not place the product on or near the flammable or explosive material, such as tablecloths, curtains and others, to avoid fire hazard;...
-
Page 5: Care And Maintenance
5 | E N Instruction: Insert power cable into the earthed power socket; Turn the Temperature Controller to desired temperature (80~200 Turn the Timer to 3 minutes for preheating. When the Green Light off, carefully pull the fry drawer out from the appliance, place the food material inside the fry basket (Attention: do not exceed the maximum line);... -
Page 6: Troubleshooting
6 | M A N U A L Troubleshooting: Problem Possible Cause Solution Power cord has not been Closely insert the power cord Does not work inserted into the power into the grounded power socket socket. Did not set the timer Set the timer to desired cooking time, then product able to connect with... - Page 7 7 | E N This marking indicates that this product should not be disposed with other household wastes throughout the EU. To prevent possible harm to the environment or human health from uncontrolled waste disposal, recycle it responsibly to promote the sustainable reuse of material resources.
- Page 8 Onderdelen: Handgreep Lade / mand Luchtinlaat Warmtelampjes Temperatuurregelaar ~ L e e s e e r s t d e (80-200 °C) g e b r u i k s a a n w i j z i n g v o o r d a t Timer (0-30 minuten) Luchtuitlaat u h e t a p p a r a a t g e b r u i k t .
- Page 9 9 | N L Let op: Lees eerst de gebruiksaanwijzing voordat u het apparaat gebruikt. • Bewaar de handleiding goed, zodat u die in de toekomst nog eens kunt raadplegen. Dit apparaat bevat elektronische onderdelen en • verwarmingselementen. Dompel het apparaat niet onder in water en reinig het niet met water.
- Page 10 1 0 | M A N U A L • Houd de stekker goed schoon. • Personen met een fysieke of mentale beperking en personen die niet weten hoe ze het apparaat moeten bedienen, mogen het alleen gebruiken onder toezicht van iemand die ervaring heeft met het apparaat en verantwoordelijk is voor hun veiligheid.
-
Page 11: Gebruik En Onderhoud
1 1 | N L Gebruiksaanwijzing: Steek de stekker in een geaard stopcontact. Zet de temperatuurregelaar op de gewenste temperatuur (80-200 °C). Zet de timer op 3 minuten om het apparaat voor te verwarmen Wanneer het groene lampje uit gaat, haalt u de lade uit het apparaat, doet u het eten in de mand (niet hoger dan het aangegeven maximumniveau) en plaatst u de lade terug in het apparaat. - Page 12 1 2 | M A N U A L Problemen / storingen oplossen: Probleem Mogelijke oorzaak Oplossing De stekker zit niet in het Steek de stekker goed in het Het apparaat functioneert stopcontact. stopcontact. niet. De timer is niet ingesteld. Stel de timer in op de gewenste bereidingstijd om het apparaat in te schakelen.
- Page 13 1 3 | N L Milieuvriendelijk afvoeren: Dit symbool geeft aan dat dit apparaat nergens in de EU bij het restafval mag worden weggegooid. Om mogelijke schade aan het milieu of voor de volksgezondheid door ongecontroleerde afvalverwerking te voorkomen, dient het apparaat op een verantwoorde wijze te worden gerecycled, ter bevordering van duurzaam hergebruik van materialen.
- Page 14 1 4 | Pièces : Poignée Tiroir / panier Entrée d’air Voyants indicateurs de chaleur Contrôle de la température V e u i l l e z l i r e a t t e n t i v e m e n t (80-200 °C) l e m o d e d ’e m p l o i a v a n t Minuteur (0-30 min)
- Page 15 1 5 | F R Attention : Veuillez lire attentivement le mode d’emploi avant d’utiliser • cet appareil. Conservez ce mode d’emploi pour le consulter ultérieurement. L’appareil contient des éléments électroniques et des éléments • chauffants. Ne pas immerger dans l’eau ou laver à l’eau. Ne pas ouvrir le tiroir durant l’utilisation de l’appareil.
- Page 16 1 6 | M o d e d ’e m p lo i • Les personnes à capacités mentales ou physiques réduites et les personnes n’ayant pas l’expérience et les connaissances nécessaires pour l’utilisation de l’appareil doivent être guidées par des personnes ayant cette expérience pour une utilisation responsable de l’appareil.
-
Page 17: Entretien
1 7 | F R Mode d’emploi : Insérez le câble d’alimentation dans une prise mise à la terre. Réglez le contrôle de la température sur la température souhaitée (80-200 °C). Réglez le minuteur sur 3 minutes pour préchauffer l’appareil. Lorsque le voyant vert s’éteint, retirez le tiroir de l’appareil avec soin, placez les aliments dans le panier en ne dépassant pas la ligne maximale. - Page 18 1 8 | M o d e d ’e m p lo i Dysfonctionnements : Problème Causes possibles Solution Le câble d’alimentation n’a Insérez fermement le câble L’appareil ne fonctionne pas. pas été inséré dans la prise. d’alimentation dans une prise mise à la terre. Minuteur non paramétré.
- Page 19 1 9 | F R Élimination correcte de l’appareil: Cette marque indique que l’appareil ne doit pas être jeté avec les autres déchets ménagers sur le territoire de l’Union européenne. Pour éviter de nuire à l’environnement ou à la santé humaine, en raison de l’élimination incontrôlée de déchets, recyclez cet appareil de manière responsable afin d’optimiser une réutilisation durable des ressources matérielles.
- Page 20 2 0 | Einzelteile: Griff Schublade / Korb Lufteinlassöffnungen Anzeigeleuchten für Aufhei- zung L e s e n S i e d i e A n w e i s u n g e n v o r Temperaturschalter (80-200 C) d e m G e b r a u c h d e s P r o d u k t s Timer (0-30 Min) Luftaustrittsöffnungen...
- Page 21 2 1 | D E Vorsichtsmaßnahmen: Lesen Sie die Anweisungen vor dem Gebrauch des Produkts • sorgfältig durch. Bewahren Sie die Bedienungsanleitung für eine spätere Verwendung auf. Das Produkt enthält elektronische Teile und Heizelemente, die nicht • in Wasser getaucht oder mit Wasser gereinigt werden dürfen. Ziehen Sie die Schublade während der Verwendung des Geräts •...
- Page 22 2 2 | B e d ie n u n g s a n le it u n g • Den Stecker sauberhalten, um Probleme zu vermeiden. • Personen mit einer körperlichen oder geistigen Behinderung oder Personen, die keine Erfahrung und Kenntnisse mit der Nutzung des Produkts besitzen, müssen von Personen angeleitet werden, die wissen, wie das Produkt auf verantwortungsbewusste und sichere Weise verwendet wird.
-
Page 23: Pflege Und Wartung
2 3 | D E Bedienungsanleitung: Stecken Sie das Stromkabel in eine geerdete Steckdose. Stellen Sie mit dem Temperaturschalter die gewünschte Temperatur ein (80- 200 °C). Stellen Sie den Timer zum Vorheizen auf 3 Minuten ein. Wenn die grüne Leuchte erlischt, können Sie die Frittierschublade vorsichtig aus dem Gerät ziehen und die gewünschten Zutaten in den Korb füllen. -
Page 24: Fehlerbehebung
2 4 | B e d ie n u n g s a n le it u n g Fehlerbehebung: Problem Mögliche Ursache Lösung Das Netzkabel wurde nicht in Stecken Sie das Netzkabel die Steckdose gesteckt. ordnungsgemäß in eine Das Gerät funktioniert nicht geerdete Steckdose. - Page 25 2 5 | D E Ordnungsgemäße Entsorgung dieses Produkts: Dieses Kennzeichen weist darauf hin, dass dieses Produkt innerhalb der EU nicht über den Hausmüll entsorgt werden darf. Um mögliche Umwelt- oder Gesundheitsschäden durch unkontrollierte Abfallentsorgung zu vermeiden, sollten Sie das Gerät verantwortungsbewusst recyceln, damit die darin enthaltenen Rohstoffe nachhaltig wiederverwertet werden können.
- Page 26 2 6 | Componenti: Manico Cassetto / cestello Entrata aria Indicatore luminoso riscaldamento L e g g e r e a t t e n t a m e n t e Indicatore temperatura (80- i l m a n u a l e d i i s t r u z i o n i 200 °C) Timer (0-30 minuti) p r i m a d i u s a r e i l p r o d o t t o .
- Page 27 2 7 | I T Attenzione Leggere attentamente il manuale di istruzioni prima di usare il • prodotto. Conservare il manuale per futuro riferimento. Il prodotto contiene parti elettroniche ed elementi riscaldanti. Non • immergere in acqua o lavare con acqua. Non estrarre il cassetto quando il prodotto è...
- Page 28 2 8 | M a n u a le d i is t r u z io n i • Inserire bene la spina; in caso contrario si crea pericolo di scosse elettriche, corto circuito, fumo, scintille ed altri fenomeni pericolosi. •...
-
Page 29: Pulizia E Manutenzione
2 9 | I T Istruzioni: Inserire il cavo di alimentazione nella presa di alimentazione collegata a terra. Regolare l’indicatore di temperatura alla temperatura desiderata (80-200 °C). Regolare il timer su 3 minuti per il preriscaldamento. Quando la luce verde si spegne, estrarre con cura il cassetto dei fritti dall’apparecchio, porre il cibo da friggere nel cestello (fare attenzione a non superare la linea di riempimento massima) e reinserire il cassetto. -
Page 30: Risoluzione Problemi
3 0 | M a n u a le d i is t r u z io n i Risoluzione problemi: Problema Possibile causa Soluzione Il cavo di alimentazione non Inserire bene il cavo di è inserito nella presa. alimentazione nella presa. L’apparecchio non funziona. - Page 31 3 1 | I T Smaltimento corretto del prodotto: Questo simbolo indica che nell’Unione Europea il prodotto non può essere smaltito insieme ai normali rifiuti domestici. Ad evitare possibili danni alla salute o all’ambiente causati dallo smaltimento incontrollato, riciclare il prodotto in modo responsabile per promuovere il riutilizzo sostenibile delle risorse materiali.
- Page 32 3 2 | Piezas Cajón / cesta Entrada de aire Pilotos indicadores de calor Control de temperatura L e a d e t e n i d a m e n t e e l (80 °C-200 °C) m a n u a l d e i n s t r u c c i o n e s Temporizador (0-30 min) Salida de aire a n t e s d e u s a r e s t e a p a r a t o .
- Page 33 3 3 | E S Precauciones: Lea detenidamente el manual de instrucciones antes de usar este • aparato. Guarde el manual para poder consultarlo en el futuro. Este aparato contiene elementos electrónicos y calefactores. No • los sumerja en agua ni los lave con agua. No abra el cajón mientras el aparato esté...
- Page 34 3 4 | M a n u a l d e in s t r u c c io n e s • Inserte bien la toma en el enchufe porque, de lo contrario, se podrían producir descargas eléctricas, cortocircuitos, humo, chispas y otras situaciones peligrosas.
-
Page 35: Cuidados Y Mantenimiento
3 5 | E S Instrucciones: Conecte el aparato a un enchufe con toma de tierra. Lleve el control de temperatura hasta el valor deseado (entre 80 °C y 200 °C). Lleve el temporizador a 3 minutos para precalentar el aparato. Cuando se apaga la luz verde, saque con cuidado el cajón del aparato, coloque los alimentos en la cesta (cuidado: no supere la línea que indica el máximo) y vuelva a meter el cajón de freír en el aparato. -
Page 36: Resolución De Problemas
3 6 | M a n u a l d e in s t r u c c io n e s Resolución de problemas: Problema Causa posible Solución No se ha insertado el cable Conecte bien el cable a un No funciona. - Page 37 3 7 | E S Eliminación correcta de este aparato: Esta imagen indica que, en la UE, este aparato no se debe tirar a la basura con otros residuos domésticos. Para evitar posibles daños al medio ambiente o a la salud humana por la eliminación descontrolada de residuos, recíclelo de manera responsable para promover la reutilización sostenible de los recursos materiales.
- Page 38 3 8 | 2020-03-31 OCG MolinoKitchen Mini Airfryer Manual.indd 38 2020-03-31 OCG MolinoKitchen Mini Airfryer Manual.indd 38 28-04-20 09:08 28-04-20 09:08...
- Page 39 3 9 | 2020-03-31 OCG MolinoKitchen Mini Airfryer Manual.indd 39 2020-03-31 OCG MolinoKitchen Mini Airfryer Manual.indd 39 28-04-20 09:08 28-04-20 09:08...
- Page 40 Distributed by OCG Retail Eemnesserweg 11-10 1251 NA Laren the Netherlands 2020-03-31 OCG MolinoKitchen Mini Airfryer Manual.indd 40 2020-03-31 OCG MolinoKitchen Mini Airfryer Manual.indd 40 28-04-20 09:08 28-04-20 09:08...
Need help?
Do you have a question about the MolinoKitchen Air Fryer Mini and is the answer not in the manual?
Questions and answers