Advertisement
Quick Links
Model/Modelo/Modèle
85780▲
Series/Series/Seria
Siderna
®
Write purchased model number here.
Escriba aquí el número del modelo comprado.
Inscrivez le numéro de modèle ici.
▲Specify Finish / Especifíque el Acabado / Précisez le Fini
You may need / Usted puede necesitar / Articles dont vous pouvez avoir besoin:
For easy installation of your
Brizo
®
faucet you will need:
•
READ ALL the instructions completely
To
before beginning.
•
READ ALL warnings, care, and maintenance
To
information.
Para instalación fácil de su llave
Brizo
®
usted necesitará:
• LEER TODAS las instrucciones completamente
antes de empezar.
• LEER TODOS los avisos, cuidados, e
información de mantenimiento.
Pour installer votre robinet
Brizo
facilement, vous devez:
®
• LIRE TOUTES les instructions avant
de débuter;
• LIRE TOUS les avertissements ainsi que toutes
les instructions de nettoyage et d'entretien;
www.brizo.com
86593
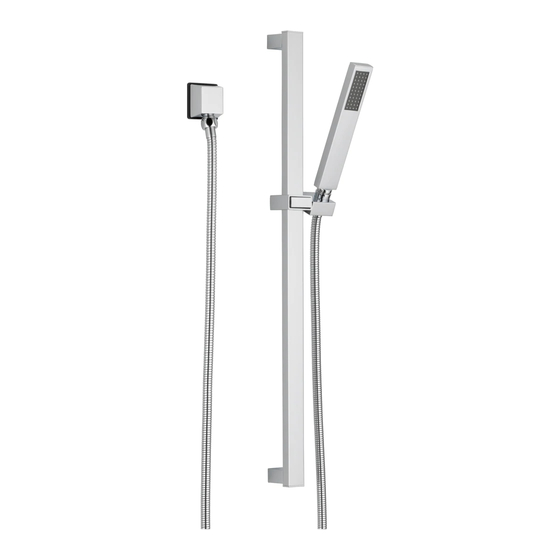
Parts Included / Piezas incluidas / Pièces incluses
1. Wall Outlet
2. 60" Shower Hose with Gaskets
3. Complete Slide Bar with
Mounting Parts / Posts,
Screws & Anchors
4. Adjustable Shower Mount
(attached to slide Bar)
5. Hand Held Shower
1. Codo de pared para
el suministro
2. 60" Manguera con Empaques
3. Barra para la Pared con
Sujetadores de poste,
Anclas y tornillos
4. Montaje adjustable
de la regadera
(unido a la barra de diapositiva)
5. Regadera de Mano
1. Sortie de douche de mur
2. Tuyau de douche de 60 po
avec les joints
3. Accomplissez la barre
coulissante avec des pièces/
poteaux, des vis et des ancres
de support
4. Support de douchette réglable
(attaché à la barre coulissante)
5. Douche à main
86593
1
®
BRIZO
SHOWER SLIDE BAR
WITH HAND HELD SHOWER
BARRA PARA LA REGADERA
DESLIZABLE BRIZO
REGADERA DE MANO
COULISSE DE DOUCHE BRIZO
AVEC DOUCHE À MAIN
CON
®
®
8/25/14 Rev. A
Advertisement

Related Manuals for Brizo Siderna 85780 Series


Summary of Contents for Brizo Siderna 85780 Series
- Page 1 WITH HAND HELD SHOWER BARRA PARA LA REGADERA DESLIZABLE BRIZO ® REGADERA DE MANO Model/Modelo/Modèle 85780▲ COULISSE DE DOUCHE BRIZO ® Series/Series/Seria AVEC DOUCHE À MAIN Siderna ® Write purchased model number here. Escriba aquí el número del modelo comprado.
- Page 2 3/16" (4.8mm) Max. 3/16 po (4.8mm) Max. SUPPLY ELBOW INSTALLATION PLACEMENT OF THE SLIDE BAR Apply plumber tape to threaded ends of 1/2" (13 mm) iron pipe nipple (not supplied) Select a convenient height to place the shower rail and thread into shower riser elbow so that nipple extends past the finished wall no based on your personal needs. Be sure to leave more than 3/16" (4.8 mm) and no less than 1/16" (1.6 mm). Place the supplied enough slack for the hose of the hand shower to installation gasket (1) behind the elbow (2). Screw the supply elbow onto the nipple operate freely when the hand shower is placed in the extreme up or down positions. NOTE: If possible it making sure that the supply elbow outlet is in a downward facing position. Minimum diameter for hole is 1" (25 mm) with a maximum of 1 1/2" (38 mm). CAUTION: To is recommended that the slide bar brackets be avoid damage to the supply elbow or hose finish during installation, wrap with a secured into the wall studs. For ceramic tile cloth or tape and use only a smooth-jawed wrench.
- Page 3 25 11/16" 25 11/16 po (653 mm) WALL BAR INSTALLATION Note: Hole size will be determined by your use of just the screw or anchor and Mark the place for drilling the hole for the lower post. screw for installation. Drill hole for mounting of bottom post. Start with a smaller drill bit Mark using a level, in a vertical line from the lower size, 1/8" is recommended, and drill hole. If you hit a wall stud, go to next step. If you do hole, the placement of the upper post hole. Distance not hit a wall stud, change to a drill bit size suitable for the anchors, 1/4" is approximately 25 11/16" (653 mm). recommended, and re-drill hole. Anchors are for use on drywall or tile. For fiberglass, acrylic and flat plastic surfaces, use toggle bolts (not included). Before drilling top mounting hole, it is recommended that you place the assembled slide bar and post assembly (1) on its side next to the hole locations you have marked. Make sure posts are pressed fully onto bar. Align center of bottom post with bottom hole that was just drilled and make sure center of top post aligns with mark for top hole. If not, re-mark top hole location. If it aligns, drill top hole in location as marked. INSTALACIÓN DE LA BARRA EN LA PARED Nota: el tamaño del agujero se determinará...
- Page 4 INSTALLATION OF THE SHOWER SET Insert anchors (1) into drilled holes. Slide covers (2) over Connect the shower hose to the wall outlet (1) and the hand held piece (2), ensur- brackets (3), and insert screws (4) into bracket/cover assembly. ing that the internal gaskets (3) are present in the shower hose nuts. Normal 1/2” Secure assembly to wall with screws. rubber gaskets can be used. Place the conical nut of the hose (4) that is connected to the hand held piece, in the slide bar holder (5) and turn it to desired position. Slide the slide mechanism (1) and elbow (2) onto the wall To slide the mechanism up or down, push in on the button (6) of the mechanism bar (3). Slide wall bar over bracket tabs (4) and secure the and slide it on the bar. wall bar unit with screws (5) provided. Install caps (6) into ends of wallbar. Lower elbow (7) & screw (8) was pre-installed prior to shipping, tighten screw (9) if you find it is sliding inside bar. INSTALACIÓN DEL CONJUNTO DE REGADERA Inserte las anclas (1) en los agujeros perforados. Deslice las Conecte la manguera de la regadera a la salida en la pared (1) y la pieza de tapas de cubierta (2) sobre los soportes (3) e inserte los mano (2), asegurando que los empaques internos (3) están presentes en las tornillos (4) en el ensamble del soporte/tapa. Fije el ensamble tuercas de la manguera de la regadera. Se puede utilizar empaques corrientes a la pared con tornillos. de goma de 1/2". Coloque la tuerca cónica en la manguera (4) que está conectada a la pieza de mano, en el sujetador de la barra para deslizar la regadera (5) y gire a la Deslice el mecanismo de deslizamiento (1) y code (2) en la posición deseada. barra del apared (3). El mecanismo de deslizamiento debe estar en la barra antes de montarlos en los soportes (4). Para deslizar el mecanismo hacia arriba o hacia abajo, oprima el botón (6) del Deslice la barra de la pared sobre las lengüetas del soporte mecanismo y deslice la regadera en la barra.
- Page 5 RP63768s RP62600s Hand Held Shower Wall Elbow Regadera de Mano Codo de pared Douche à main para el suministro Sortie de douche de mur RP49645s Hose & Gaskets Manguera con Empaques Tuyau avec joints RP77094s Mounting Hardware (1 set only) Herraje de Instalación RP77093s (1 sistema solamente) Slide Bar Assembly Pièces de montage Ensamble De Barra De (1 ensemble seulement) Diapositiva De Barre coulissante sSpecify Finish / Especifíque el Acabado / Précisez le Fini 86593 Rev. A...
- Page 6 55 E. 111th Street 350 South Edgeware Road Indianapolis, IN 46280 St. Thomas, Ontario, Canada N5P 4L1 Electronic Parts and Batteries (if applicable) Electronic parts (other than batteries), if any, of this Brizo ® faucet are warranted to the original 1-877-345-BRIZO (2749) 1-877-345-BRIZO (2749) customerservice@deltafaucet.com customerservice@mascocanada.com consumer purchaser to be free from defects in material and workmanship for 5 years from the date of purchase or, for commercial users, for one year from the date of purchase. No warranty...