Advertisement
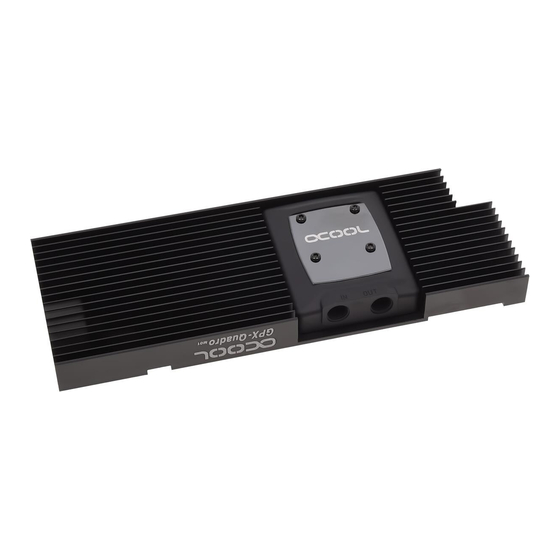
NexXxoS GPX-Quadro M01 (12GB)
Hinweise
1. Überzeugen Sie sich bitte von der Funktion Ihrer Hardware, sowie des Kühlsystems (Dichtheit, Pumpenfunktion und Lüfter)
den Aufwand bei der Suche möglicher Fehlerquellen. Alphacool übernimmt nicht die Garantie des Herstellers der elektronischen
den Aufwand bei der Suche möglicher Fehlerquellen. Alphacool übernimmt nicht die Garantie des Herstellers der elektronischen Bauteile und Komponenten. Die
Montage des Kühlsystems erfolgt auf eigenes Risiko.
2. Die Schrauben sollten nicht zu fest angezogen werden. Wenn Sie die Schrauben übermäßig fest angezogen haben, können sich die Haltebolzen lösen und es ist keine
gleichmäßige Auflage des Kühlers mehr gewährleistet.
3. Wir empfehlen, keine Verwendung von Werkzeug, wie z.B. Schraubenschlüssel, zum Befestigen der Anschlüsse. bei Anschlüssen mit
Wir empfehlen, keine Verwendung von Werkzeug, wie z.B. Schraubenschlüssel, zum Befestigen der Anschlüsse. bei Anschlüssen mit 8 mm Gewindelänge kann es zur
Durchflussminimierung kommen.
4. Wir empfehlen einen Dichtigkeitstest vor Montage / Einbau des Kühlers. Der Wasserd
5. Überzeugen Sie sich, das der Kühler alle zu kühlenden Bauteile mit Wärmeleitpaste und Wärmeleitpad
ie sich, das der Kühler alle zu kühlenden Bauteile mit Wärmeleitpaste und Wärmeleitpad´s berührt. Im Bild ist es gezeigt wie der Abdruck einer GPU
aussehen muss.
Instructions
1. If you have not done so yet, please check your hardware and cooling system (tightness, pump function and fan
problems. Alphacool accepts no liability on the warranty of the manufacturer of the electronic components. The assembly of the cooling system takes place at your own
risk.
2. The screws should not be tightened too firmly. If you tighten the screws excessively, the knurled nuts can loosen and the coo
The screws should not be tightened too firmly. If you tighten the screws excessively, the knurled nuts can loosen and the cooler´s uniform pressure is no longer
guaranteed.
3. Fasten the connections of your choice to the cooler. Do not use tools such as wrenches for fastening the connecti
flow.
4. We recommend a tightness test before assembling/installing the cooler. The water pressure in the loop of water cooling can be maximum of 0.
tools on the connectors.
5. Convince yourself that the cooler touches all components to be cooled with
Convince yourself that the cooler touches all components to be cooled with thermal grease and thermal pad's. The picture shows what the imprint of a GPU must look
like.
Indications
1. Au cas où vous n´avez pas encore fait, s´il vous plait assurez-vous vous-même de la fonction de votre hardware ainsi que du système de refroidissement (étanchéité,
fonction de la pompe et ventilateur). Vous réduisez ainsi la dépense de temps recherchent possible sources d´erreur. Alphacool ne prend pas de la garantie du fabrica
des éléments et composantes électroniques. L'assemblage du système de refroidissement s´effectue a vous risques et périls.
des éléments et composantes électroniques. L'assemblage du système de refroidissement s´effectue a vous risques et périls.
2. Les vis ne devraient pas être serrées trop fermement. Si vous avez serré les vis excessivement, les vis peuvent se décaler et le refroidisseur ne reste plus positionné
uniformément alors son fonctionnement parfait ne peu plus être garanti.
3. Fixez les raccordements de votre choix au refroidisseur. Pour les connexions avec 8 mm filetée longueur peut
pas l´utilisation d'outil comme p. ex.des clefs, pour la fixation des raccordements.
pas l´utilisation d'outil comme p. ex.des clefs, pour la fixation des raccordements.
Nous recommandons un essai d'étanchéité avant assemblage/installation du refroidisseur.
jusqu'à 0,8 bar.
4. Laissez-vous convaincre que les touches fraîches tous les composants à refroidir avec de la graisse thermique et de tampon thermique.
vous convaincre que les touches fraîches tous les composants à refroidir avec de la graisse thermique et de tampon thermique. Sur la photo, il est montré que
l'empreinte d'un GPU doit ressembler.
Schraubensatz
10x
Screw set
M3x12
Jeu de vis
1
2
3
4
5
6
5
sowie des Kühlsystems (Dichtheit, Pumpenfunktion und Lüfter). Falls noch nicht erfolgt. Sie minimieren so
ie die Schrauben übermäßig fest angezogen haben, können sich die Haltebolzen lösen und es ist keine
Der Wasserdruck im Kreislauf der Wasserkühlung darf maximal 0,8 Bar sein.
your hardware and cooling system (tightness, pump function and fans). This will minimize time spent searching for possible
manufacturer of the electronic components. The assembly of the cooling system takes place at your own
tools such as wrenches for fastening the connections. Connectors with 8mm long threads may stop the
The water pressure in the loop of water cooling can be maximum of 0.8 bar. DO NOT use
même de la fonction de votre hardware ainsi que du système de refroidissement (étanchéité,
us réduisez ainsi la dépense de temps recherchent possible sources d´erreur. Alphacool ne prend pas de la garantie du fabricant
Si vous avez serré les vis excessivement, les vis peuvent se décaler et le refroidisseur ne reste plus positionné
Pour les connexions avec 8 mm filetée longueur peut-être conduire à un flux moins. Nous ne recommandons
anchéité avant assemblage/installation du refroidisseur. La pression d'eau dans le cycle de refroidissement de l'eau peut être
4x
2x
x
5x
SW2 & SW2,5
SW2 & SW2,5
M3x8
25x
1x
15mm x 15mm x 1mm
30mm x 30mm x 1mm
Montage: Legen Sie die Hardware auf eine antistatische Unterlage.
ie die Hardware auf eine antistatische Unterlage. Beginnen Sie mit der Demontage des Original-Kühlers. Je
nach Aufbau des Kühlers sind zuerst die Schrauben des Lüfters zu entfernen und die Blenden zu lösen. Bei aufgeklebten Kühlern ist
nach Aufbau des Kühlers sind zuerst die Schrauben des Lüfters zu entfernen und die Blenden zu lösen.
äußerste Sorgfalt geboten. Es können leicht Bauteile abgerissen werden. Heben Sie alle Einzelteile sorgfältig auf. Reinigen Sie
äußerste Sorgfalt geboten. Es können leicht Bauteile abgerissen werden.
anschließend die Hardware von Resten der Wärmeleitpaste oder Pad 's mit einem Lösemittel (z.B. Spiritus).
anschließend die Hardware von Resten der Wärmeleitpaste oder Pad 's mit einem Lösemittel (z.B. Spiritus).
Assembly: Put the hardware on an antistatic mat. Start with the dismantling of the original cooler. Depending
the hardware on an antistatic mat. Start with the dismantling of the original cooler. Depending on the structure of
the cooler remove the screws at the back of the card and carefully unhook
at the back of the card and carefully unhook the fan connector. If the original cooler uses thermal glue
extreme care should be taken. As you can easily damage parts. Pick up all the items carefully. Then clean the hardware
paste or pad residues with a solvent (eg alcohol ).
Assemblage : Insérez le matériel sur un tapis antistatique . Commencez par le démantèlement du refroidisseur d'origine . En
fonction de la structure du radiateur est de retirer les vis de fixation du ventilateur pour retirer et régler l'ouverture. Lorsque
fonction de la structure du radiateur est de retirer les vis de fixation du ventilateur pour retirer et régler l'ouverture. L
refroidisseurs collés soin extrême doit être exercé . Il peut facilement être déchiré parties . Ramassez tous les articles soigneusement .
Ensuite, nettoyer le matériel de résidus de la pâte thermique ou de tampon avec un solvant (alcool ).
Ensuite, nettoyer le matériel de résidus de la pâte thermique ou de tampon avec un solvant (alcool ).
Tragen Sie nun unter Zuhilfenahme eines Plastikstreifens oder ähnlich
ie nun unter Zuhilfenahme eines Plastikstreifens oder ähnlichem, eine gleichmäßige Schicht Wärmeleitpaste auf die zu
kühlenden GPU auf. Die Schicht sollte weniger als einen Millimeter dick sein, da sonst die umliegenden Bauteile unnötig verun
kühlenden GPU auf. Die Schicht sollte weniger als einen Millimeter dick sein, da sonst die umliegenden Bauteile unnötig verunreinigt
werden können.
With the help of a plastic strip or thermal paste spreader make a
less than a millimeter thick, otherwise the surrounding components can be contaminated
, otherwise the surrounding components can be contaminated unnecessarily.
Porter les maintenant à l'aide d'une bande de matière plastique ou analogue, une couche uniforme de pâte thermique à la GPU
Porter les maintenant à l'aide d'une bande de matière plastique ou analogue,
à refroidir. La couche doit être inférieure à un millimètre d'épaisseur, faute de quoi les composants environnants peuvent êt
à refroidir. La couche doit être inférieure à un millimètre d'épaisseur, faute de quoi les composants environnants peuvent être
contaminés inutile.
Entfernen Sie die Schutzfolie der
legen diese auf die Speicherbausteine. Die
legen diese auf die Speicherbausteine. Die blau dargestellten 30mm x 30mm x 1mm Wärmeleitpad für
die Spannungswandler müssen zugeschnitten werden. Vergessen sie auch hier nicht die Schutzfolie
die Spannungswandler müssen zugeschnitten werden. Vergessen sie auch hier nicht die Schutzfolie
zu entfernen.
Remove the protective film from the
The 15mm x 15mm x 1mm thermal pad's go
suitable for the voltage converters but
protective film on both sides!
Retirer le film protecteur de la bleu montre 15mm x 15mm x 1
mettre sur les puces de mémoire. Le orange
tension doit être coupé. Ne pas oublier également d'enlever le film de protection.
pas oublier également d'enlever le film de protection.
Montieren Sie nun den zusammen gebauten Kühler auf die Grafikkarte wie im Bild zu sehen. Falls eine Schutzfolie auf dem
ie nun den zusammen gebauten Kühler auf die Grafikkarte wie im Bild zu sehen. Falls eine Schutzfolie auf dem
Kühlerboden vorhanden ist, entfernen Sie bitte jetzt die Schutzfolie. Reinigen
ie bitte jetzt die Schutzfolie. Reinigen Sie die Kontaktflächen auf der Bodenseite des Kühlers
mit Spiritus oder ähnlichen Mitteln. Die Fläche muss frei von Verunreinigungen sein.
Die Fläche muss frei von Verunreinigungen sein.
Place the assembled cooler on the graphics card as in the picture. If
the assembled cooler on the graphics card as in the picture. If a protective film on the cooler exists, please remove the
protective film now. Clean the contact surfaces on the bottom side of the cooler with alcohol or similar. The surface must be free of
protective film now. Clean the contact surfaces on the bottom side of the
contaminants.
Assemblez maintenant le refroidisseur monté sur la carte graphique comme dans l'image pour voir. Si un film protecteur sur le
Assemblez maintenant le refroidisseur monté sur la carte graphique comme dans l'image pour voir. Si un film protecteur sur le
sol plus frais existe, s'il vous plaît enlever le film protecteur maintenant. Nettoyer les surfaces de contact sur la face inférieure du
sol plus frais existe, s'il vous plaît enlever le film protecteur maintenant. Nettoyer les surfaces de contact sur la face in
dispositif de refroidissement avec de l'alcool ou des moyens similaires.
dispositif de refroidissement avec de l'alcool ou des moyens similaires. La surface doit être exempte de contaminants.
sehen ist, zu. Diese werden auf die Rückseite der Spannungswandler und der GPU gelegt.
Vergessen Sie auch hier nicht die Schutzfolie zu entfernen.
locker in den Kühler einschrauben. Achtung: nicht festziehen.
locker in den Kühler einschrauben.
the voltage converter and the GPU. Do not forget to remove the protective film on both sides.
the voltage converter and the GPU.
Then you can take the screws and the washer and turn them into the card (not tighten only fix ).
Then you can take the screws and the washer and turn them into the card (not tighten only fix ).
ci sont placés sur le côté arrière du convertisseur de tension et la GPU. Ne pas oublier
ci sont placés sur le côté arrière du convertisseur de tension et la GPU.
également d'enlever le film de protection. Ensuite, vous pouvez prendre les vis et la rondelle et
également d'enlever le film de protection.
les transformer en la carte (pas serrer seule solution).
les transformer en la carte (pas serrer seule solution).
Legen Sie Backplate wie in dem Bild gezeigt auf die Grafikkarte
Backplate, Kühler und Grafikkarte.
Put the backplate on as shown in the picture. A slight pressure ensures optimal contact between the backplate cooler and
graphics card.
Mettez la plaque arrière comme montré sur la photo de la carte graphique. Une légère pression assure un contact optimal entre
Mettez la plaque arrière comme montré sur la photo de la carte graphique. Une légère pression assure un contact optimal entre
le refroidisseur de plaque arrière et la carte graphique.
Schrauben Sie den Kühler zusammen. Die Schrauben dabei kreuzweise mit je eine
ie den Kühler zusammen. Die Schrauben dabei kreuzweise mit je einer Umdrehung anziehen.
Beachten Sie dabei die Hinweise.
Drehen Sie nach ca. 12 Stunden Benutzung der Grafikkarte
ie nach ca. 12 Stunden Benutzung der Grafikkarte nochmals alles Schrauben fest.
Screw the cooler together. Finger-tighten the screws it with one turn. Pay attention to the pertinent instructions.
Tighten the screws after about 12 hours use of the graphics card.
about 12 hours use of the graphics card.
Visser le radiateur. Serrer les vis avec une seule tour. Faites attention aux instructions pertinentes.
Visser le radiateur. Serrer les vis avec une seule tour. Faites attention aux instructions pertinentes.
Tournez après environ 12 heures d'utilisation de la carte graphique vis de tout nouveau fixes.
Tournez après environ 12 heures d'utilisation de la carte graphique vis de tout nouveau fixes.
Anleitung - Instructions manual - Instructions de service
false
Kein Kontakt,
schlechter Abdruck.
No contact, bad
footprint.
Pas de contact,
mauvaise impression.
1x
2x
15mm x15mm x 2mm
30mm x 30mm x
30mm x 30mm x 2mm
. Pick up all the items carefully. Then clean the hardware of thermal
Commencez par le démantèlement du refroidisseur d'origine . En
facilement être déchiré parties . Ramassez tous les articles soigneusement .
a thin layer of thermal paste on the GPU. The layer should be
ie die Schutzfolie der blau dargestellten 15mm x 15mm x 1 Wärmeleitpad 's und
protective film from the thermal pads and place them in the areas shown in blue.
mm thermal pad's go on the memory chips. The 30mm x 30mm x 1mm are
must be trimmed to size. Do not forget also to remove the
la bleu montre 15mm x 15mm x 1mm de tampon thermique et les
Le orange montre 30mm x 30mm x 1mm pour le convertisseur de
Schneiden Sie die orange
orange dargestellten Wärmeleitpad 's für die Rückseite, wie im Bild zu
die Rückseite der Spannungswandler und der GPU gelegt.
ie auch hier nicht die Schutzfolie zu entfernen. Schrauben mit Unterlegscheiben
Cut the orange thermal pad
thermal pad as shown in the picture. These are placed on the rear side of
Couper à l'arrière comme sur la photo pour voir le pad thermique
Couper à l'arrière comme sur la photo pour voir le pad thermique orange montré 's. Ceux-
gezeigt auf die Grafikkarte. Ein leichter Druck sorgt für optimalen Kontakt zwischen
A slight pressure ensures optimal contact between the backplate cooler and
tighten the screws it with one turn. Pay attention to the pertinent instructions.
right
Guter Kontakt, Gut
verteilte Wärmeleitpaste
Good contact, good
distributed thermal paste.
Bon contact, la pâte
thermique bien distribué.
1x
Advertisement
Table of Contents

Related Manuals for Alphacool NexXxoS Series


Summary of Contents for Alphacool NexXxoS Series
- Page 1 (tightness, pump function and fans). This will minimize time spent searching for possible problems. Alphacool accepts no liability on the warranty of the manufacturer of the electronic components. The assembly of the cooling system takes place at your own manufacturer of the electronic components.
- Page 2 électroniques. L´assemblage du refroidisseur s´effectue a vos risques et périls. 9. Alphacool International GmbH does not take over the warrantee of the manufacturer of the electronic construction units 9. Alphacool International GmbH does not take over the warrantee of the manufacturer of the electronic construction units Veuillez prendre contact avec nous and components.
Need help?
Do you have a question about the NexXxoS Series and is the answer not in the manual?
Questions and answers