
Related Manuals for Raptor R00187


Summary of Contents for Raptor R00187
- Page 1 DUAL INPUT K TYPE THERMOMETER USER MANUAL R00190 R00187 Before using the instrument, please read this manual carefully and save for future reference.
- Page 2 Safety information Safety Information. In order to use the thermometer correctly, please read the instructions carefully before use, noting any safety information. It is recommended that you keep this instruction manual safe for future reference. Warning. A Warning identifies conditions and actions that pose hazards to the user.
- Page 3 Safety information 3. Do not use the thermometer if it operates abnormally. When in doubt, have the thermometer serviced/checked by an approved service engineer. 4. Do not operate the thermometer around explosive gas, vapour, or dust. 5. Do not use the thermometer and probes on or near live apparatus.
- Page 4 Maintenance Maintenance Information. • The unit may be cleaned using a dry soft cloth, do not use a wet or abrasive cloth, solvents or detergents. • For extra protection always store the instrument in the case provided when not in use. Important Information.
- Page 5 Maintenance Calibration. To maintain the integrity of measurements, Wolseley recommends that the thermometer is calibrated annually at an approved Calibration Laboratory. Wolseley can offer this service, please contact calibration@raptortool.co.uk or call 0344 292 7060 to arrange.
- Page 6 Features Accessories. • Storage pouch. • 2 x 1m K Type wire thermocouple. • 3 x AAA batteries (included). • User instructions. Features. • LCD screen. • Back Light. • °C /°F / K (kelvin) functions. • Data hold function. •...
-
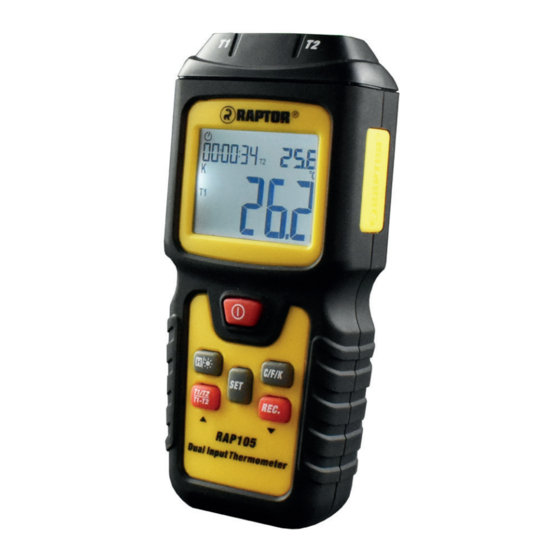
Page 7: Physical Appearance
Features Physical Appearance. Thermocouple ports Built in cold compensation (NTC) Settings Power Hold & Back Light Unit °C /°F / K (Kelvin) Record Max / T1/T2 Port Min /Avg Selection Height - 127mm Weight - 108g Width - 58mm Depth - 30mm... - Page 8 Measurement Method Connect Thermocouple/Probe. Press the power button to turn on the thermometer and insert K Type into T1 or T2 port, or both for dual readings. Always ensure + and - pins of the K Type plug are inserted into the correct thermometer ports. Failure to do this will result in an inaccurate reading.
- Page 9 Measurement Method If no thermocouples/probes is inserted or the thermocouples/probes are faulty the LCD will read “----” (Fig.2). Fig.1 Fig.2 Differential Temperature. On initial set up T1 will always be on main screen (Fig.3). Press T1/T2 button once to switch to T2 (Fig.4) on main screen. By pressing T1/T2 again this will show the differential temperature between T1 &...
- Page 10 Measurement Method Fig.3 Fig.4 Fig.5 View MAX, MIN and AVG Readings. Press REC button to view MAX, MIN or AVG temperature. On pressing the REC button, the timer will automatically start at 00.00. When using only one port, use the T1/T2 button to get the the port required on main screen and press the record button to scroll through Max, Min, Avg, this will show top right of screen.
- Page 11 Measurement Method Use REC button to scroll through Max, Min, Avg functions. This will also show recorded time. • Press T1/T2 once more this will show actual current differential of T1/T2 in main screen, and Max, Min, Avg top right of T1/T2. Use record button to scroll through Min, Max, Avg functions.
- Page 12 Measurement Method Data Hold. Press the Hold button to keep the temperature readings on the screen. The “ ” symbol appears on the screen (Fig.8) Press the Hold button again to turn off the hold function and restore to the measurement status. Fig.8 Back Light.
- Page 13 Settings Set Options. Press the set button to enter the settings mode, by pressing the set button again the settings option menu can be scrolled through. Long press the set button to exit. Auto Power Off Setting (P). Enter the power off setting mode, the thermometer will display P - 10 (Fig.9), use the keys to select the setting...
- Page 14 Settings Offset Setting (0.0). User can adjust the display value of the thermometer to compensate for the error of a thermocouple. The range of permissible adjustment is ±6 °C. After selecting the OFFSET function change T1 offset deviation by pressing &...
-
Page 15: Battery Replacement
Battery Replacement Battery Replacement. In order to avoid inaccurate temperature readings, always replace the batteries when the appears on the top right of LCD screen. Always remove any thermocouple/probe before changing the batteries. When the instrument is not in use for a long time, please take out the batteries to prevent damage caused by leakage. - Page 16 Battery Replacement NOTE: When the batteries are too low the LCD screen can also show random readings (fig.12). Fig.12...
- Page 17 Technical Handset Temperature Measuring -200°C ~ 1372°C Range -328°F ~ 2501°F Accuracy Range T1± (0.15% +1°C) T2± (0.15% +1°C) T1-T2± (0.5% +1°C) Resolution <1000°C = 0.1°C >1000°C = 1°C Working Temperature & 0°C ~ 40°C Humidity (<80% RH,< 10°C non-condensing) Storage Temperature &...
- Page 18 Limited warranty 1 year warranty against any manufacturing defects or faulty workmanship. This warranty does not cover fuses, disposable batteries or damage from accident, neglect, misuse, alteration, contamination or abnormal conditions of operation or handling. WEEE Directive 2012/19/EU At the end of the product life, dispose of the instrument &...
Need help?
Do you have a question about the R00187 and is the answer not in the manual?
Questions and answers