Table of Contents
Advertisement
Quick Links
Advertisement
Table of Contents

Related Manuals for ELTEC CyBox GW-P

Summary of Contents for ELTEC CyBox GW-P
- Page 1 CyBox GW-P wireless Gateway installation manual...
- Page 2 GW-P installation manual REVISION Revision Changes Date Initial version 22.01.2019 Safety Information extended 24.04.2019 Order in Figure 3 changed. 18.09.2020...
- Page 3 The complete risk inherent in the utilization of this document or in the results of its utilization shall be with the user; to this end, ELTEC Elektronik AG shall not accept any liability. Regardless of the applicability of respective copyrights, no portion of this...
- Page 4 GW-P installation manual Canadian department of communications statement This digital apparatus does not exceed the Class B limits for radio noise emissions from digital apparatus set out in the Radio Interference Regulations of the Canadian Department of Communications. This class B digital apparatus complies with Canadian ICES-003.
- Page 5 GW-P installation manual Operation safety WARNING The device can become very hot during operation (> 80 ° C). Make sure it is protected from accidental contact. The device must be installed so that it is not accessible to children.
-
Page 6: Table Of Contents
Correspondence Front plate / Software LED Indicators 3.5.1 Power LED Status 3.5.2 Status LEDs 1 3.5.3 Status LEDs 2 3.5.4 Modules 1-5 Status 3.5.5 LAN LEDs Reset Switch SIM Cards Mounting the CyBox GW-P Connecting an Earthing Cable Electrical Connection... - Page 7 GW-P installation manual LIST OF TABLES Table 1 Pin Assignment of the Power Supply Connector (PWR) Table 2 Pin Assignment of M12 Ethernet Connectors (LAN 1, 2) Table 3 Pin Assignment of the M12 service connector Table 4 Front plate antenna description overview...
- Page 8 GW-P installation manual LIST OF FIGURES Figure 1 Front Panel LED Indicators Figure 2 Dimensions of the CyBox GW-P housing Figure 3 Earth cabel mounting on Earth Stud...
-
Page 9: About This Document
GW-P installation manual About This Document This installation manual is intended only for system developers and integrators; it is not intended for end users. It describes the hardware functions of the product, connection of peripheral devices and integration into a system. -
Page 10: Overview
Ethernet and / or to the internet via several available LTE / GSM modems onboard a passenger train or a long distance bus for example. CyBox GW-P is capable of hosting up to 5 independent WLAN radios and up to 5 independent LTE / GSM modems, allowing operation of flexible wireless network configurations, including different frequency bands. -
Page 11: Hardware Description
Supply Voltage, negative terminal 3.1.2 Ethernet Connectors The two LAN-ports of the CyBox GW-P are utilizing X-coded (CAT-6A) M12 connectors with the pin- assignment as shown in Table 2. Mating connectors are available from several manufacturers. Table 2 Pin Assignment of M12 Ethernet Connectors (LAN 1, 2) -
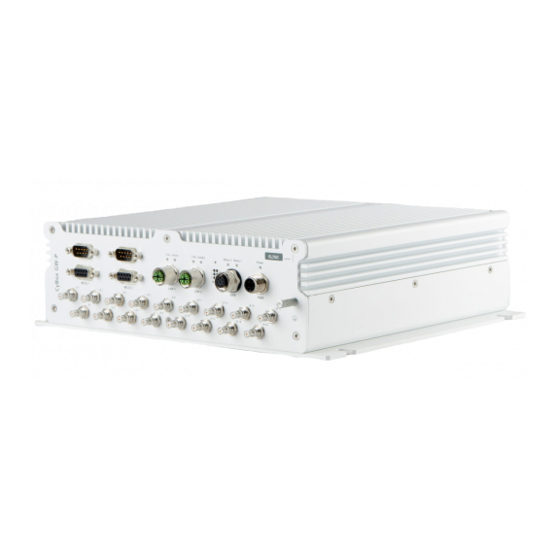
Page 12: Antenna Connectors
The up to 17 QLS antenna connectors are located at bottom part of the front panel of the access point. The connectors labeled from A1 to A17. Their functionalities depend on the CyBox GW-P model (see 3.4.1 Correspondence Front plate / Software). -
Page 13: Power Supply
Table 1. The nominal input voltage can vary between 24 V and 110 VDC. M12 service interface (USB and serial ports) CyBox GW-P is equipped with USB and serial ports. The USB port can be used to attach a memory device to update the firmare or configuration of the wireless gateway. -
Page 14: Front Plate And Module To Antenna Distribution
GW-P installation manual Front plate and module to antenna distribution The figure below provides an overview of the front plate. Figure 1 Front Panel LED Indicators 3.4.1 Correspondence Front plate / Software The ports and LEDs “LAN 1” & “LAN 2” correspond respectively to the interfaces “eth0” & “eth1”... -
Page 15: Led Indicators
A6 – A8 Slot 4 Wlan AC Wave 2 A2 – A5 LED Indicators The LEDs on the front panel of CyBox GW-P provide quick indication of the device status. 3.5.1 Power LED Status Table 5 Power LED Status LED Color... -
Page 16: Lan Leds
Remove custom configuration then reset SIM Cards To install SIM cards, the back panel of the CyBox GW-P has to be removed using suitable torx screwdriver. The indexing of SIM slots is software dependent; more information is available in the... -
Page 17: Mounting The Cybox Gw-P
For optimal heat dissipation, the connectors should face down. The CyBox GW-P housing provides four mounting holes for fixation. Use M6 screws. The drawing in Figure 2 shows the outer dimensions of the CyBox GW-P housing, including the position of the mounting holes. Figure 2... -
Page 18: Connecting An Earthing Cable
GW-P installation manual Connecting an Earthing Cable A M6 earthing stud on the right side of the device (also refer to Figure 2) for protective earth connection is essential for the device security. Carry out the following steps to connect an earthing cable: Take an earthing cable with a cross section of at least 0.75 mm²... - Page 19 GW-P installation manual Power supplies have to be grounded. The device itself has no on / off switch, it starts as soon as it is supplied with power...
Need help?
Do you have a question about the CyBox GW-P and is the answer not in the manual?
Questions and answers