
Related Manuals for PrepPal PPM 60

Summary of Contents for PrepPal PPM 60
- Page 1 OWNER /OPERATOR MANUAL ...
- Page 2 Safety Reminding These precautions should be followed at all times. Failure to follow these precautions could result in injury to yourself and others or damage the equipment. Plug only into grounded electrical outlets matching the nameplate rated voltage. Do not modify or tamper with safety switches. Do not operate unattended. Do not operate equipment in public areas and/or around children. Do not use an extension cord with this equipment. Do not plug this equipment into a power strip or multi‐outlet power cord. Non‐PrepPal attachments are not recommended. They will not work properly and will void the warranty. Check equipment before each use to insure the equipment is clean. Do not use a hose to clean mixer. Use a damp cloth to wipe down the exterior of the mixer. Wear proper apparel! Do not wear loose fitting or hanging garments while operating this equipment. Have equipment installed by a qualified personnel in accordance with local codes and ordinances. Use equipment in a flat, level position. Unplug equipment, turn off and let it cool before cleaning or moving. Do not spray controls or outside of equipment with liquids or cleaning agents. Do not clean the equipment with steel wool. Keep equipment and power cord away from open flames, electric burners or excessive heat. Do not operate if equipment has been damaged or is malfunctioning in any way. ...
-
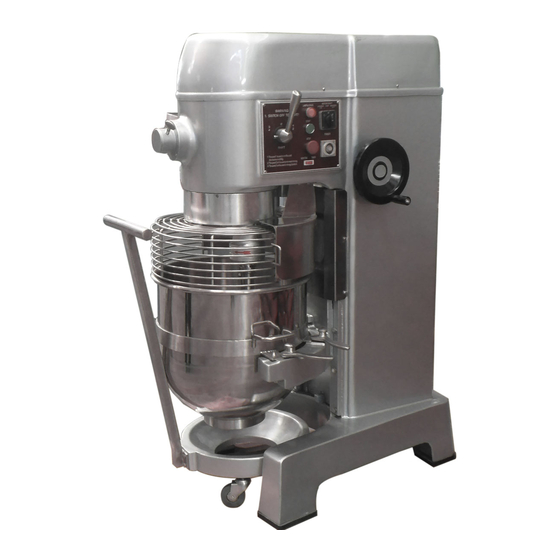
Page 3: Product Description
Product Description ... -
Page 4: Technical Specifications
Technical Specifications Note: Select speed according to specified accessory mode Dough Hook ‐ suitable for mixing flour and bread dough on the low speed mode Note: Mix should equal 45% to 50% of the flour weight (See Figure H) Flat Beater ‐ suitable for mixing crushed, powdered and pasty food, such as stuffing on medium speed mode (See Figure I) Wire Whip ‐ suitable for mixing liquid food, such as cream, egg on high speed mode (See Figure J) Model Bowl Voltage Frequency Power Mixing Speed Maximum Dimensions Net Capacity Kneading (LXWXH) Weight Capacity 240V 73/109/143/216 PPM‐60 60 qt. 60 Hz 3.75 hp 40 lbs 41”x28”x57” 1080 lbs 3 Phase rpm ... -
Page 5: Installation
Installation Unpacking and Initial Setup: Immediately after unpacking the mixer, check for possible shipping damage. If this machine is found to be damaged after unpacking, save the packaging material and contact the carrier within 15 days of delivery. Safety unpacking step as below photos: Step 01: Carefully remove the package material from equipment. Step 02: Take away the trailer. Step 03: Anticlockwise rotate the handle to low down the bowl and unlock it. Step 04: Take away the bowl. Step 05: Find the wrench for the M12 bolt. Step 06: Unscrew the M12 bolts inside the four legs. Step 07: Put two forks into the bottom of machine and protect the bottom. Step 08: Slowly lift the mixer machine up about 4” from the pallet . Step 09: Pull pallet away from the bottom of mixer feet. Step 10: Decline forklift, stand mixer on the ground. Place the mixer on a solid, level surface with sufficient space around mixer to allow for the safe cleaning and service. Plug only into grounded electrical outlets matching the nameplate rated voltage. Note: Do not plug mixer into a power strip or multi‐outlet power cord. ... - Page 6 Check the Planetary Shaft Rotate Direction Make sure there is not anything in bowl, and no mixer tool on the shaft, put speed lever on one speed and turn on the mixer. Observe the shaft rotate direction is comply with the arrow showed on the planetary shaft or not. If shaft rotates in the wrong direction, have a licensed electric technician switch the electrical connection and reset. Operation Instruction DO NOT operate the mixer before reading the instruction first; ALWAYS disconnect or unplug electrical power before leaning, servicing or adjusting any parts or attachments; ALWAYS keep hands, hair, and clothing away from moving parts. Attaching the Agitator to the Mixer Shaft(Beater, Hook, Whip) Rotate the bowl guard to the left so it rests in the open position. Excessive force used to open and close the bowl guard may damage the spring lock and bowl guard micro switch, and will void the warranty. Slide the agitator slowly upwards onto the planetary shaft fitting the shaft pin through the slot in the agitator . Rotate the agitator clockwise to secure it onto the planetary shaft. ...
- Page 7 Setting Speeding Select the appropriate speed setting by rotating the speed control lever. Four fixed speeds are available for use: First (1), Second (2), Third (3) and Fourth(4). Speed setting by different type of food and ingredient as following: Gear Speed Product Type/ingredient The position of the speed control lever and knob 1 (Low) Heavy: mixing pizza, bread, pasta and Handle to (1/2) donut dough’s, waffle/cake batter, Knob to 1 mashing potatoes 73 rpm 2 (Medium) Medium: 2nd stage of mixing for Handle to (1/2) donut dough, etc. Knob to 2 109rpm ...
- Page 8 CRAWL for speed handle switch If it is difficult to switch the speed handle at right position, you can press the button of (LAMP&CRAWL) transitorily. Press the button of (LAMP&CRAWL) transitorily can let the planetary shaft rotate by a little angle, so gears can occlude. Can press the button of (LAMP&CRAWL) transitorily for several times until the speed handle can be switch to right position. Setting Timer Timed Operation: Press the red button to the TIMER side. To set the time for the appropriate mixing time, turn the timer knob in a clockwise direction at the position between “0” to “30”, to get mixing time between 0 mins to 30mins. Non‐Timed Operation: Press the red button to the NON‐TIME side to set the mixer for non‐timed operation. NOTE: Heavy loads should not be mixed longer than fifteen (15) minutes at this setting without an equal amount of rest time for the mixer. failure to adhere to these instructions may cause the mixer to automatically shut ...
-
Page 9: Cleaning And Maintenance Instructions
Cleaning & Maintenance Instructions ALWAYS disconnect or unplug the electrical power from the mixer before cleaning. The entire mixer, including removable parts, must be thoroughly cleaned and sanitized using the procedures identified by your local health department and the ServSafe Essentials published by the National Restaurant Association Educational Foundation (NRAEF). NEVER use a scrubber pad, steel wool, or abrasive material to clean the mixer. Recommended Cleaning Action as: PART REQUIRED ACTION FREQUENCY Agitators hand‐wash using mild soap and water, rinse, dry and Clean after each use. sanitize. Removable bowl hand‐wash using mild soap and water, rinse, dry and Clean after each use. Guard sanitize or place in dishwasher. Bowl using a sponge or cloth, mild soap and water, apply Clean after each use. pressure to ensure the bowl is clean, rinse, dry, and sanitize. The bowl can also be placed in a dishwasher. Rear Splash Guard hand‐wash using mild soap and water, rinse, dry and Clean after each use. sanitize. bowl cradle hand‐wash using mild soap and water, rinse, dry and Daily sanitize. Planetary Shaft Wipe with clean damp cloth, dry and sanitize. apply a light Clean after each use. ... -
Page 10: Mixing Capacity Chart
Mixing Capacity Chart PPM‐60 Product Agitator Speed 60Quart Bread and Roll Dough‐60% AR Dough Hook speed only 90 lbs. Heavy Bread Dough‐55% AR Dough Hook speed only 70 lbs. Pizza Dough, Thin‐40% AR Dough Hook speed only 40 lbs. Pizza Dough,Medium‐50% AR Dough Hook speed only 60 lbs. Pizza Dough, Thick‐60% AR Dough Hook speed only 70 lbs. Raised Donut Dough‐65% AR Dough Hook speed only 40 lbs. Pie Dough Flat Beater All Speeds 60 lbs. Mashed Potatoes ... -
Page 11: Troubleshooting
Troubleshooting Problem Possible Causes Action Required bowl guard not in closed rotate guard to the right until fully closed. position. Mixer will not run. bowl not raised. raise bowl to highest position. Timer is not engaged. Turn timer to desired time or set time to the “on” position. Power not connected properly. check all power connections. Plug into a live socket.(Do not use extension cord!) Test socket with another item building circuit breaker is off. check breaker box. internal overload tripped. Press stop button then press reset button. (If overload continues to trip, reduce batch size and/or adjust recipe!) Gear not engaged. Switch gear fully into position. (Mixer will not operate if the speed control lever is positioned in between speeds) internal overload tripped. Press stop button then press reset button. Mixer stops during (If overload continues to trip, reduce batch size mixing . and/or adjust recipe!) Motor temperature is too high Voltage is too low, or use wrong agitator or set incorrect speed. ... -
Page 12: Service Parts
Service Parts ... - Page 13 ...
- Page 14 ...
Need help?
Do you have a question about the PPM 60 and is the answer not in the manual?
Questions and answers