Advertisement
Holley Sniper EFI
Pre-Programmed Startup Guide
***** IMPORTANT!!!! *****
***** Your Holley Sniper System has been Pre-Programmed, Tested, Tuned
Specifically to your Engine. Starting a New Global Configuration File or Startup
Wizard may accidentally overwrite existing fIles and delete valuable learned
information from your Dyno Testing. *****
Please proceed as follows to upload your Engine's Specific File
***
***
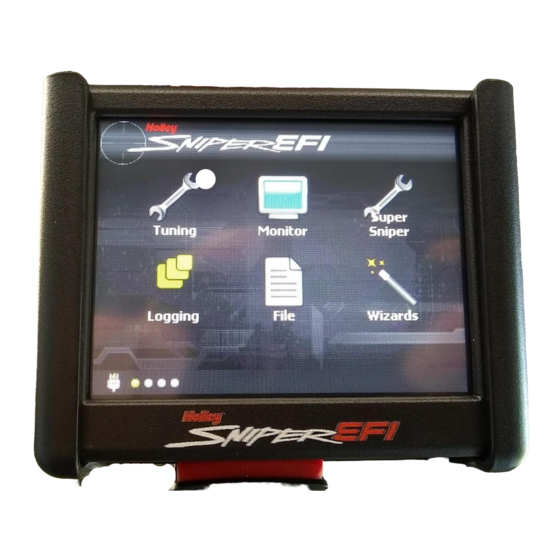
1. Upon powering up Sniper EFI will automatically show Home Screen Menu
on Handheld Controller. From here you will select the "FILE" option.
2. After opening "FILE" you will then select "Global Configs"
Advertisement
Table of Contents

Related Manuals for Holley Sniper EFI


Summary of Contents for Holley Sniper EFI
- Page 1 Dyno Testing. ***** Please proceed as follows to upload your Engine’s Specific File 1. Upon powering up Sniper EFI will automatically show Home Screen Menu on Handheld Controller. From here you will select the “FILE” option. 2. After opening “FILE” you will then select “Global Configs”...
- Page 2 3. From the “Global Configs” menu you will then select your Engine’s File (example: BLUEPRINT 347.sniper) and click “Upload to ECU”. *****NOTE***** ***Global Configuration File labeled (Ex: 4150_4_ZBA.sniper) is the initial startup file used to start your engine but contains no learned values from testing.
- Page 3 5. Select “OK” again and then Turn off Ignition for a Minimum of 4 seconds before Powering back on. 6. After powering back up Holley Sniper Handheld will then display “Saved Global Configs” Screen. From here select “Home” in the bottom left corner of the display and proceed below...
- Page 4 8. Then Select “Multi-Guage” 9. Select “Sensors” 10. Congratulations!! With the “Multi-Guage” Monitor Display on the Handheld, You are now ready to START YOUR ENGINE!!!
- Page 5 CD Box, Alternator, etc.) Remote Relay may be required for some applications. 3. Be sure to Keep all Sniper EFI wiring routed away from any High Current Components. Especially Spark Plug Wires and Alternator!! (High Draw Components tend to give off Radio Frequency Interference when in operation and can cause interference in the Sniper Systems Communication with the Engine Sensors.) Shielded loom may be used to...
Need help?
Do you have a question about the Sniper EFI and is the answer not in the manual?
Questions and answers