Table of Contents
Advertisement
Quick Links
User Manual
HEALTH FRYER 2.4L
DHFRYER
TABLE OF CONTENTS
5) Product specifications
6) Storage & transportation
Advertisement
Table of Contents

Subscribe to Our Youtube Channel
Related Manuals for Daewoo DHFRYER


Summary of Contents for Daewoo DHFRYER
- Page 1 User Manual HEALTH FRYER 2.4L DHFRYER TABLE OF CONTENTS 1) Package contents 2) Safety instructions 3) Installing and using the device 4) Cleaning and maintenance 5) Product specifications 6) Storage & transportation...
- Page 2 1) PACKAGE CONTENTS • Health Fryer 2.4 L • User manual 2) SAFETY INSTRUCTIONS The following precautions must always be taken in consideration before using the “Health Fryer 2.4 L”, hereinafter referred as the “device”. WARNING ! General information • Keep the instructions safe and read carefully before use.
- Page 3 Electricity and heat • Before use, check that the mains voltage is the same as the mains voltage stated on the rating plate of the device. • Make sure your hands are dry before touching the device, power cord or plug.
- Page 4 • Remove the power plug from the power socket during lightning storms or if unused for long periods of time. • Use a 10-amp cable if an extension cable is required. Cables with a lower amp rating may burn out. •...
- Page 5 • Do not attempt to disassemble or repair the device or modify it in any manner. • The device must be serviced if it has been damaged in any way, i.e. the power supply cord/plug is damaged; liquid has been spilled; objects have fallen into it; it has been exposed to rain or moisture;...
- Page 6 • Parts of the device can become hot. Do not touch these parts to avoid burning yourself. • Only hold the frying basket by its plastic handles. The metal section with which the handles are attached to the inner basket can become very hot. •...
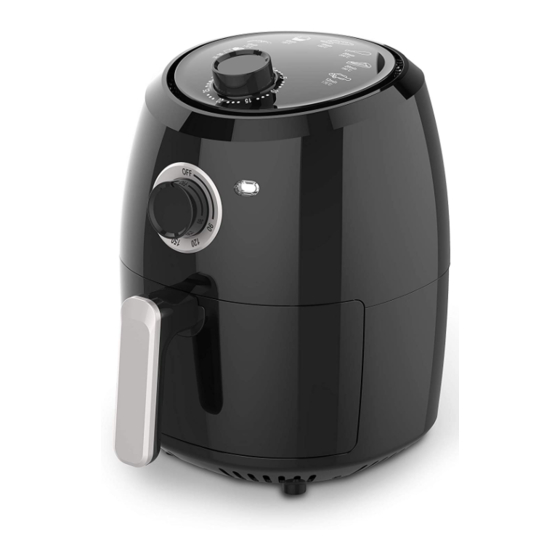
- Page 7 Notice: 1) The timer knob indicates 0-30 minutes, and the max time is 30 minutes. 2) The temperature control knob indicates (OFF) and 90-200 degrees, and the max. temp. is 200 degree 3) The direction adjustment is the same for the time and temp knob, turning in clockwise direction will set timer longer/temperature higher...
- Page 8 To power on the device, turn the timer knob to the desired cooking time. Once to timer is set, the power LED indicator lights up. When the timer reaches its set time, you will hear a bell, and the device will automatically switch off and the power LED indicator will no longer light up.
- Page 9 • Place the device on a flat, stable surface, in a place where it cannot fall over. • PRE-HEATING: Set the time to 3 minutes; to start the pre-heating session and allow the device to warm up. • After pre-heating, use the handle to remove the frying basket from the device and place it on a stable, horizontal and flat surface.
- Page 10 • Pull the basket out of the appliance. • It is recommended to occasionally remove the frying basket during cooking, so food items can be shaken. This means all items will be evenly browned on all sides. Once the frying basket is removed from the device, the device stops working and the power LED indicator switches off.
- Page 11 • Excess food residues, oil and liquids are collected in the bottom of the frying basket. They must be removed immediately after use, so they do not remain until the device is next used. • Switch OFF the device if you are not going to continue using it and remove the plug from the power socket.
- Page 12 5) SPECIFICATIONS • Voltage input: 220-240 V~, 50/60 Hz, Class I • Power: 1000 W • Temperature range: 90°C - 200 °C • Timer range: 1-30 min • Capacity: 2.4 L • Dimensions: 30.5 x 20.5 x 26 (H x W x D) •...
Need help?
Do you have a question about the DHFRYER and is the answer not in the manual?
Questions and answers