
Subscribe to Our Youtube Channel
Related Manuals for Wisper SW102

Summary of Contents for Wisper SW102
- Page 1 Page 1 SW102 Display technical specifications Product Name: Intelligent OLED display Part Number:SW102 Amps Electric bike Ltd, A7 Chaucer Business Park, Kemsing, Kent, TN15 6PW Wisperbikes.com...
-
Page 2: Table Of Contents
Page 2 Content Introduction……....................4 1 Product name and model ..................4 2 Product Introduction ....................4 3 Range of application ....................4 4 Appearance and size....................4 5 Display coding rules....................5 B. Product manual.......................6 1 Specifications.......................6 2 Functional overview .....................6 3 Installation ......................7 4 Interface......................7 4.1 Boot interface can be customized as required..........7 4.2 Basic interface .....................8 4.2 Function interface(I)................8... - Page 3 Page 3 6.4 Walk assist mode..................12 6.5 Headlight on/off ..................12 6.6 Power indicator..................13 7 User settings ...................... 13 7.1 Enter setting status..................13 7.2 Unit setting ....................14 7.3 On/off password setting ................14 7.4 Wheel diameter information ..............15 7.5 Speed limitation information..............
-
Page 4: Introduction
Page 4 A. Introduction 1 Product name and model Intelligent OLED display, model:SW102 2 Product Introduction Minimalist design, process without screw assembly Super contrast 1.3-inch monochromatic OLED screen Excellent outdoor design with IP65 waterproof Micro USB serial communication port, convenient for maintenance services... -
Page 5: Display Coding Rules
Page 5 Display coding rules As shown as above picture, C1 is the manufacture factory code 1701 is the manufacture year and week Number is the hardware version 001 is the firmware version number 0001 is the product serial number... -
Page 6: Product Manual
Page 6 B. Product manual 1 Specifications ①Power supply: DC 24V/36V/48V ②Rated current: 12mA ③Shutdown leakage current: <1uA ④Screen specification: 1.3”OLED(64*128 dots) ⑤Communication method: UART(default) ⑥Operating temperature: -20°C ~ 60°C ⑦Storage temperature: -30°C ~ 80°C ⑧Waterproof level: IP65 2 Functional overview ①Four buttons, easy to operate ②... -
Page 7: Installation
Page 7 3 Installation ① Open the display lock clip and set the display in the left handlebar (standard handlebar size: Φ22.2). Adjust to a required position, tighten and fix the screw with an M3 hex key. Tightening torque: 0.8N.m.*Note: Damage caused by excessive torque is not covered by the warranty. 4 Interface 4.1 Boot interface can be customized as required ①... -
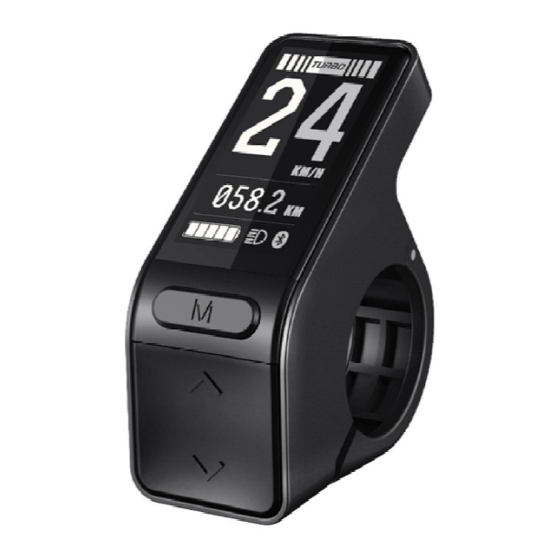
Page 8: Basic Interface
Page 8 4.2 Basic interface Assist level Speed Distance trip Bluetooth icon Battery icon Headlight icon ① Power assist level and walk mode: 0-4 files assist level, power from low to high are: OFF, ECO, TOUR, SPORT, TURBO and WALK mode. ②... -
Page 9: Function Interface(Ii
Page 9 ① The riding time shows the ride duration. The rest of the information is the same as basic interface. 4.3 Function interface (II) Assist level Average speed Max speed Distance trip Bluetooth icon Battery icon Headlight icon ① Average speed (AVG) shows the average speed of the ride ②... -
Page 10: Definition Of Buttons
Page 10 ③ Unit Settings: unit settings of speed and mileage ④ Wheel diameter information: wheel diameter information adapted for the display ⑤ This password Settings: user’s password function can change the password, shut down the operation or turn off the defaulted setting. ⑥... -
Page 11: Operation
Page 11 6 Operation 6.1 Turn on/off Hold down the Power button when the display is off. Display shows the boot interface and enters the basic interface to start. Hold down the power button for 2 seconds when the display is turned on to power down the interface. If the bike is not operated within 5 minutes the display will automatically power down. -
Page 12: Walk Assist Mode
Page 12 6.4 Walk assist mode Hold the down arrow for 2 seconds, the bike will enter the walk assist mode. When is shown The bike is in walk assist mode. Walk assist mode icon as below. 6.5 Headlight on/off Long press of the button for 1 second, this will activate the operation of the headlight. -
Page 13: Power Indicator
Page 13 6.6 Power indicator When the battery works normally the battery power shows 5 levels according to the battery capacity. When the battery power reaches the under-voltage warning value, only the frame of the battery icon is displayed and will flash to remind the user to charge immediately. The battery power is shown as below: Percentage of battery power ©... -
Page 14: User Settings
Page 14 7 User settings Setting items: unit, turn on password, wheel diameter, battery information, auto shut off time, system information, reset factory settings. (Information, *battery information, time period of automatically shut down, *system information, reset to factory setting. ( * means fixed items, do not provide user option to change) 7.1 enter setting status 1. -
Page 15: Wheel Diameter Information
Page 15 7.4 Wheel diameter information In wheel information interface, 26 inches means the current display is set for a bike with a 26-inch wheel diameter. Return to the setting interface by a brief press of the M button. interface by short press Wheel diameter value can be set to 16’’, 18’’, 20’’, 22’’, 24’’, 26’’, 700c, 28’’... -
Page 16: Speed Limitation Information
Page 16 7.5Speed limitation information Speed limitation information indicates the maximum speed allowed in the current system (only show the changes through the serial port) Default allowed maximum speed: 25KM/H Interface shown as below: 7.6 Battery information Return to setting interface in the battery information screen by a brief press of the M button. information interface by short press BAT %:battery power;... -
Page 17: Automatic Shutdown Time
Page 17 7.7Automatic shutdown time Press the up and down arrow to choose the automatic shutdown time, the default setting is 5 mins, in auto Off interface. Press M to save and return to the setting interface. Interface shown below 7.8 System information Press to return to setting screen in system information interface. -
Page 18: Reset
Page 18 7.9 Reset Reset, press the up and down arrow to choose setting, switch to YES option, a Brief press on the M button to restart the display. The parameters will reset to the factory state. Press Exit to exit the page and return to previous level. -
Page 19: Error Information
Page 19 9 Error information The display can alert the bike failure, if failure detected, the display interface will show the error code. Interface shown as below: Error code definition Error code table: Fault description Checking method Error code "04" shown at speed throttle doesn't turn back to zero position Check if the throttle return to zero position "05"... -
Page 20: Wire Definition
Page 20 10 Wire definition Wires out of the display wires connect to the display connector to controller Table 1 wires definition Color Function Red(VCC) Blue(Kp) Power control wire of the controller Black (GND) GND of display Green(RX) Data receive of the display Yellow(TX) Data transmit of the display C.
Need help?
Do you have a question about the SW102 and is the answer not in the manual?
Questions and answers