
Related Manuals for MKS MKS TFT28

Summary of Contents for MKS MKS TFT28
- Page 1 Guangzhou Qian Hui Information Technology Co., Color touch screen MKS TFT28/32 instruction Mail:Shelly@makerbase.com.cn Document version: 1.0 Published date: 2017.9.19...
- Page 2 1.Fixed the socket of “auto-off after printing”. V2.0.1 2017.5 2.Available to choose “manual leveling” or “auto-leveling”. 3.Compatible with “MKS TFT WIFI” , “MKS HLK-WIFI” and the latest version phone APP “MKSCloud”. 4.Added “cloud service” and “mobile transfer files” functions. 5.Added Windows style.
-
Page 3: Table Of Contents
Contents Overview ............................4 Main Features ..........................4 III. Connection and Dimension ......................4 Function Instruction ........................7 Special Function Button Customization ..................21 Themes Interface Display ......................22 VII. Booting Logo and Button Pictures Customization Fuction ............24 VIII. Assurance ..........................32... -
Page 4: Overview
MKS-TFT28/32 is color touch screen, researched and developed by Makerbase developers, which is suitable for open sourced 3D printers. It can work with MKS Base, MKS Gen, MKS Sbase and so on. Compared to TFT32, TFT28 supports external DC 12V and works with Ramps1.4. - Page 5 2.MKS TFT28 Installation Dimensional Drawing 3. MKS TFT32 Installation Dimensional Drawin 4. MKS TFT28 Interface Diagram WIFI module B4 MKS PWC interface module interface disk interface Power interface B0 power outage detection SD card module interface interface filament outage detection module interface...
- Page 6 6.1.2. The power option jumps to 12V. 6.1.3. The power of TFT display inputs 12V. 6.2. Connect to MKS Gen Connect the TFT display to the Aux-1 of MKS Gen. The TFT display is not necessary to connect external 12V power supply...
-
Page 7: Function Instruction
6.3. Connect to MKS Base,MKS GEN-L, MKS MINI and MKS Base Connect the TFT display to the Aux-1 of MKS series controller board. The TFT display is not necessary to connect external 12V power supply. IV. Function Instruction 1. The way to get the latest firmware 1.1. - Page 8 Notice: 3.1. For communicaion, the baud rate of the TFT display must be same as the controller board. 3.2. To avoid the conflict with the USB interface, it is not advisable to connect the USB and TFT display at the same time. 3.3.
- Page 9 Remember to delete the upgrated file from the SD card to avoid upgrating firmware again when booting next time, otherwise, it can’t print from the power outage point.) 9. Power Outage to Continue(only above MKS TFT28 V1.1 can support this function) 9.1. Don’t connect UPS power supply...
- Page 10 10. Filament Outage Detection function(only above MKS TFT28 V1.1 can support the function) One end of MKS DET connects to the PB1, another end connects to the “-“ or “+” of the PB1.( If Low Level effective, it connects to “-“, if High Level effective, it connects “+”.) Choose the Low Level effective or High Level effective in the configuration.
- Page 11 11. Auto-off after Printing Finishes Function (only above MKS TFT28 V1.1 can support the function) With MKS PWC module, enable the auto-off after printing finishes function on config. grey cable –V power supply 220V reset switch ( Note that do not reverse the zero wire and FireWire )...
- Page 12 WIFI module. That you can powerful control your printers by APP or MKS Cloud platform from anywhere around the world. Certainly, it is capable to monitor printers by LAN on host-software, such as Printrun, proterface.
- Page 13 2. Cloud Mode 2.1 WIFI Config 2.1.1 MKS TFT-WIFI Please configure wifi firmware as follow: mks_config.txt #wifi type(0: MKS TFT-WIFI 1:MKS HLK- Select : MKS TFT-WIFI WIFI >cfg_wifi_type:0 #wifi mode(0:sta;1:ap) Select : STA >cfg_wifi_mode:0 #wifi name Set the WIFI name as the same >cfg_wifi_ap_name:TP-LINK_C944...
- Page 14 2.2 Firmware Upgrade 2.2.1 Copy latest firmware to root of SD card, include: MksWiFi.bin MKS TFT mkstft28.bin mks_config.txt mks_pic 2.2.2 Notes on Upgrade a. Document names are not allowed to edit. Or will fail to upgrade. b. The document names will get changed after update successfully.
- Page 15 2.3 MKS APP...
- Page 16 3. LAN Print Mode 3.1 WIFI Config 3.1.1 MKS TFT-WIFI mks_config.txt #wifi type(0: MKS TFT-WIFI 1:MKS HLK- Select : MKS TFT-WIFI WIFI) >cfg_wifi_type:0 #wifi Mode(0:sta;1:ap) Select : STA >cfg_wifi_mode:0 #wifi name Set the WIFI name as the same >cfg_wifi_ap_name:TP-LINK_C944 as the router required.
- Page 17 4.1 Software Upgrade 4.2.1 Copy latest firmware to root of SD card, includes: MksWiFi.bin mkstft28.bin mks_config.txt mks_pic Notes on Upgrade a. Document names are not allowed to edit. Or will fail to upgrade. b. The document names will get changed after update successfully. c.
- Page 18 4. AP Print Mode...
- Page 19 Feature: The WIFI will generate a open hotspot “MKSWIFI-XXXX” which is no password required, can be connected directly. WIFI 4.1.1 MKS TFT-WIFI mks_config.txt #wifi type(0: MKS TFT-WIFI 1:MKS HLK- Select : MKS TFT-WIFI WIFI >cfg_wifi_type:0 #wifi mode(0:sta;1:ap) Select AP mode, and take WIFI >cfg_wifi_mode:1...
- Page 20 4.4 APP 4.5 Printrun ①Here is “IP+:8080”,which is essy to find in WIFI setting.
-
Page 21: Special Function Button Customization
For example: 192.168.0.114:8080. ②Baudrate: 115200 ③Connect. ④It means that get connected successfully when the icons can control. ⑤Print from SD card or PC are available. ⑥Check out the responds from printer. VI. Special Function Button Customization... -
Page 22: Themes Interface Display
VII. Themes Interface Display Three themes SMALL LOGO Simple Classic Retro Blue style... - Page 23 “Hello and thank you for downloading my modified version of the MKS TFT User Interface. Instructions- 1. copy the contents of the firmware folder to an SD card then insert the card into the readeron the MKS TFT Display. I am using the 3.2"...
-
Page 24: Booting Logo And Button Pictures Customization Fuction
VIII. Booting Logo & Button Pictures Customization Fuction 1.Convention: 1.1 Customization range 1.1.1 Booting interface logo. 1.1.2 Button pictures (Figure 1 and 2), Include button picture and text. 1.1.3 The screen background color (Figure 3, the default color is black). 1.1.4 The title text color (Figure 4, the default color is white). - Page 25 2.2 Copy “mks_config.txt” and ”mks_pic” to SD card root, plug the SD card to MKS TFT, restart, then the system will update automatically 3. Name the pictures of LOGO and buttons 3.1. Booting cover LOGO Booting Logo bmp_logo.bin...
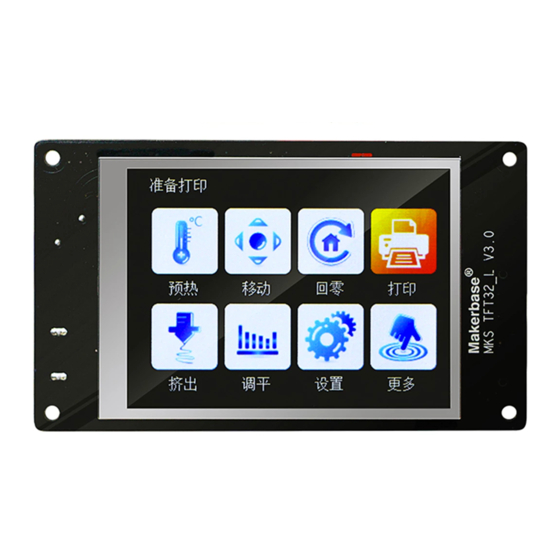
- Page 26 3.2. Small LOGO(Simple version) SMALL LOGO bmp_iconlogo.lg (The suffix is named .lg) 3.3. “ReadyPrint” Interface bmp_printin bmp_pre bmp_mo bmp_ze Heat.bin v.bin ro.bin g.bin bmp_ext bmp_lev bmp_se bmp_more.bi ruct.bin eling.bin t.bin 3.4. Preheat” Interface bmp_Add.bi bmp_Dec.bi bed: step: close: back: ℃ :...
- Page 27 3.5. “Extruder”interface bmp_in.bin bmp_out.bin extrue (E) : Move step: speed: bmp_return. E1: 1mm: slow: bmp_extru bmp_step1_m bmp_speed_slo 1.bin m.bin w.bin 5mm: normal: bmp_extru bmp_step5_m bmp_speed_nor 2.bin m.bin mal.bin 10mm: high: bmp_step10_m bmp_speed_hig m.bin h.bin 3.6. ”Move” Interface Move step: bmp_xA bmp_y bmp_zAdd.
- Page 28 3.8. “Leveling” Interface bmp_autol bmp_level bmp_level bmp_lev eveling.bin ing1.bin ing2.bin eling3.bi bmp_leveli bmp_level ng4.bin ing5.bin 3.9. ”Set” Interface bmp_fileS bmp_wifi.bi bmp_fan.bi bmp_abo ys.bin ut.bin bmp_brea bmp_functi bmp_functi bmp_retu kpoint.bin on1.bin on2.bin rn.bin 3.10. ” Fan” Interface bmp_Add bmp_Dec.bin .bin bmp_spe bmp_sp bmp_sp bmp_return.
- Page 29 3.12. ”Filesys” Interface SD: udisk: selection: selection: bmp_ bmp_ sd.bin usb.bin selected : selected: bmp_sd bmp_usb _sel.bin _sel.bin Back: bmp_return.bin 3.13. ”More” Interface bmp_ bmp_ bmp_ bmp_ custom1. custom2. custom3. custom4. bmp_ bmp_ bmp_ bmp_ custom5. custom6. custom7. return. 3.14. ”ChooseFile” Interface File :...
- Page 30 3.15. ”Printing” Interface option: bmp_menu.bin bed: fan: bmp_ bmp_extr bmp_bed_ bmp_fan_ extru1_ no_words. no_words.bin no_words. fan move: words. bmp_fan_ move.bin 3.16. ”Operate” Interface pause: stop: bmp_paus bmp_stop.bin e.bin bmp_ bmp_ move: bmp_ temp.bin speed.bin bmp_ return.bin more.bin 3.17. ”Pause” Interface bmp_ stop:...
- Page 31 3.18. ”Speed” Interface bmp_Add. bmp_Dec.bin Move move: extruct: back: bmp_return.bin step: selection selection 1mm: : : bmp_step1 bmp_mov bmp_extruc _mm.bin .bin t.bin 5mm: selected selected : bmp_step5 : bmp_extruc _mm.bin bmp_mov t_sel.bin 10mm: _sel.bin bmp_step1 0_mm.bin 3.19. ”ReadyPrint>Operate>Pause>More” Interface bmp_f bmp_fila Auto close: bmp_morefunc...
-
Page 32: Assurance
4. The hexadecimal value for the common color IX. Assurance 1. Power test before delivery. 2. Ensure the normal use before delivery. 3. Any problems you can contact Miss Zhong:king@makerbase.com.cn...
Need help?
Do you have a question about the MKS TFT28 and is the answer not in the manual?
Questions and answers