Table of Contents
Advertisement
Quick Links
Advertisement
Table of Contents

Related Manuals for Blackbird 15750


Summary of Contents for Blackbird 15750
- Page 1 4K 4x4 HDMI® Matrix P/N 15750 User's Manual...
-
Page 2: Safety Warnings And Guidelines
SAFETY WARNINGS AND GUIDELINES Please read this entire manual before using this device, paying extra attention to these safety warnings and guidelines. Please keep this manual in a safe place for future reference. This device is intended for indoor use only. •... - Page 3 Prior to operation, check the unit and power cord for • physical damage. Do not use if physical damage has occurred. Before plugging the unit into a power outlet, ensure that • the outlet provides the same type and level of power required by the device.
- Page 4 INTRODUCTION This 4K 4x4 HDMI® Matrix allows you to distribute any of up to four HDMI video sources to any or all of up to four displays. It complies with the HDMI 2.0 and HDCP™ 2.2 specifications, delivers up to 18Gbps video bandwidth, and supports video resolutions up to 4K@60Hz with the YCbCr 4:4:4 color space, including all HDMI 3D video modes.
- Page 5 FEATURES Complies with the HDMI® 2.0, HDCP™ 2.2/1.4, and DVI™ 1.0 • specifications Supports up to 18Gbps video bandwidth • Supports video resolutions up to 4K@60Hz with the YCbCr • 4:4:4 color space, including all 3D HDMI video modes Each output can be individually downscaled to 1080p •...
-
Page 6: Customer Service
CUSTOMER SERVICE The Monoprice Customer Service department is dedicated to ensuring that your ordering, purchasing, and delivery experience is second to none. If you have any problem with your order, please give us an opportunity to make it right. You can contact a Monoprice Customer Service representative through the Live Chat link on our website www.monoprice.com or via email at support@monoprice.com. -
Page 7: Package Contents
PACKAGE CONTENTS Please take an inventory of the package contents to ensure you have all the items listed below. If anything is missing or damaged, please contact Monoprice Customer Service for a replacement. 1x 4K 4x4 HDMI® Matrix 1x AC Power Adapter (12 VDC, 2.5A) 1x IR Remote Control 2x Mounting Ears 1x IR Receiver... -
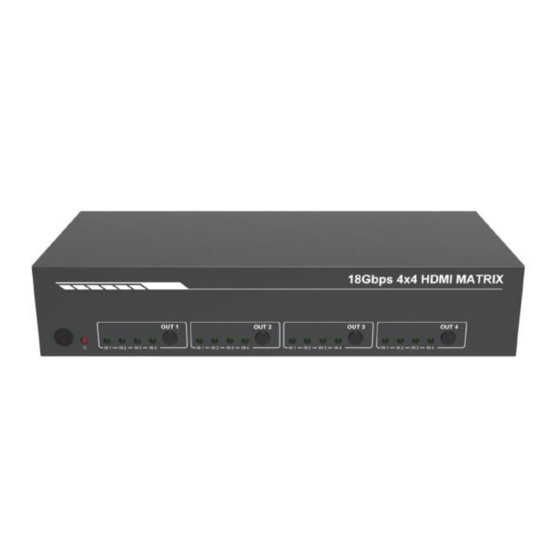
Page 8: Product Overview
PRODUCT OVERVIEW Front Panel IR RECEIVER: IR "eye" for receiving signals from the included IR remote control. 2. POWER: The LED illuminates red when power is applied. IN LEDS: Four LEDs for each output channel used to indicate the selected input for that output. The LEDs illuminate green to indicate the selected source. - Page 9 Rear Panel 5. TCP/IP: RJ45 jack for connecting a computer for web control using the built-in Web GUI. 6. RS-232: 3-pin Euroblock connector for connecting a computer for RS-232 command control. IR EXT: 3.5mm jack for connecting the included IR receiver. 8.
- Page 10 IR Remote Control 14. POWER: Press the POWER button to turn the unit on or to put it into standby mode. 15. 1 2 3 4: Press one of the numbered buttons to directly select an input for each output. 16.
-
Page 11: Sample Connection Diagram
SAMPLE CONNECTION DIAGRAM... - Page 12 WEB GUI This matrix features a built-in Web GUI, which allows it to be controlled by a computer using a network connection. You can connect it directly to your existing Ethernet network or directly to your computer, which requires reconfiguring your network settings.
-
Page 13: Existing Network
Existing Network To connect the matrix to your existing Ethernet network, plug one end of an Ethernet cable (not included) into the TCP/IP jack on the rear panel, then plug the other end into an available RJ45 jack on your router or Ethernet switch. To access the Web GUI, open a web browser, then type the IP address into the address field. - Page 14 Set your computer's IP address to the same network segment as the matrix. For example, set the IP address to 192.168.1.200 and the subnet mask to 255.255.255.0. To access the Web GUI, open a web browser, then type the IP address into the address field. The default IP address 192.168.1.100 Login Refer to the...
- Page 15 Login After typing the IP address into your browser, you will see the following screen. Choose one of the following User Name and Password combinations. Note that the User account can only access the Status and Video pages, while the Admin account can access all six pages.
- Page 16 Status Page The Status Page shows basic information about the model name, firmware version, and network settings. This screen can be seen by both the Admin and User accounts. The two buttons in the upper right corner of the screen are available on all pages and perform the following functions.
- Page 17 Video Page The Video Page allows you to set the input for each output and to manage the presets. To change the input for any given output, click the ᐯ to • the right of the Video Source in the Switch section, then select the desired input from the list.
- Page 18 Input Page The Input Page displays information about which inputs are connected and have an active signal. It also allows you to give more meaningful names to the inputs, as well as manage the EDID® settings. To change the EDID settings for an individual input, click the ᐯ to the right of the input in the Input Setting section, then select one of the EDID settings from the list.
- Page 19 1080I, HD Audio 7.1 3D, Stereo Audio 2.0 3D, Dolby/DTS 5.1 3D, HD Audio 7.1 4K2K30Hz_444 Stereo Audio 2.0 4K2K30Hz_444 Dolby/DTS 5.1 4K2K30Hz_444 HD Audio 7.1 4K2K60Hz_420 Stereo Audio 2.0 4K2K60Hz_420 Dolby/DTS 5.1 4K2K60Hz_420 HD Audio 7.1 4K2K60Hz_444 Stereo Audio 2.0 4K2K60Hz_444 Dolby/DTS 5.1 4K2K60Hz_444 HD Audio 7.1 4K2K60Hz_444 Stereo Audio 2.0 HDR...
- Page 20 COPY_FROM_TX_2 COPY_FROM_TX_3 COPY_FROM_TX_4 Perform the following steps to load a binary file with EDID® settings to the User 1 or User 2 memories. Click the Browse button in the Load EDID to User Memory section, then locate and select your EDID file. Use the pull-down list box to the right of Select Destination to select either the User 1 or User 2 memory.
-
Page 21: Output Page
Output Page The Output Page allows you to change the names of the outputs to more meaningful names and displays the connection status of each output. Use the pull-down list box in the Scaler Mode column to set the scaler status for each output. The Bypass setting turns the scaler off, while the 4K →... -
Page 22: Network Page
Network Page The Network Page allows you to configure the network settings for the matrix. Note that the IP address fields are only available when the Mode is set to Static. You can also change the passwords for the User and Admin accounts, as well as the Product Model name. - Page 23 System Page The System Page allows you perform various system functions. When Panel Lock is set to ON, the front panel buttons are • disabled. When Beep is set to ON, the buttons will cause an audible • beep when pressed. The Serial Baud Rate setting sets the communications rate •...
- Page 24 RS-232 CONTROL The matrix can also be controlled by a computer using RS-232 commands input into an RS-232 command application. To connect your computer to the matrix, use the included 3-pin Euroblock connector to build a USB to RS-232 cable, as shown in the following diagram.
- Page 25 Following are some important notes about RS-232 commands: All commands must be terminated with an exclamation • mark (!). Any carriage return after the ! will be ignored. All spaces in the command are required. • All response messages are terminated with a CR/LF •...
- Page 26 Reboot... System s reboot! Reboots the matrix Initializing... Initialization Finished! System Commands help! Lists all commands. Display the model r type! HDP-MXB44P name. Get the unit all status: power, beep, lock, in/out Displays the current connection, r status! matrix status. video/audio crosspoint, edid, scaler, hdcp,...
- Page 27 Displays the connection HDMI OUT1: r link out x! status of output x. connect x=0~4, (0=all). Reset to factory defaults Reset the matrix to the System s reset! factory default settings. Initializing... Initialization Finished! Turns the button beep beep on s beep z! on or off.
- Page 28 outputs to preset z. z=1~8. s recall recall from preset Loads preset z. z=1~8. preset z! s clear preset Deletes preset z. z=1~8. clear preset 1 Displays preset z video/audio r preset z! settings. z=1~8. crosspoint Sets the serial communications speed. s baud rate z! Baudrate: 115200 z=115200, 57600, 38400,...
- Page 29 input 1 -> output 1 input 2 -> output Displays the signal r av out y! status for output y..y=0~4, (0=all). input 4 -> output Enable out 1 Enables or disables the stream s out y stream for output y.
- Page 30 Sets the HDCP™ status s hdmi y for output y. y=0~4, hdmi 1 hdcp hdcp z! (0=all), z=0~1, (0=off, active 1=active). Displays the HDCP r hdmi y hdmi 1 hdcp status for output y. hdcp! active y=0~4, (0=all). Audio Commands hdmi output 1 arc Turns ARC on or off for s hdmi y arc...
- Page 31 IN3 EDID: 4K2K60_444, Stereo Audio 2.0 IN4 EDID: 4K2K60_444, Stereo Audio 2.0 Displays the EDID® r edid data EDID: 00 FF FF FF status for output y. hdmi y! FF FF FF 00 ……… y=0~4, (0=all). Sets the EDID for input x to default EDID z.
- Page 32 Audio 2.0 11. 4K2K30_444,Dolby/ DTS 5.1 12. 4K2K30_444,HD Audio 7.1 13. 4K2K60_420,Stereo Audio 2.0 14. 4K2K60_420,Dolby/ DTS 5.1 15. 4K2K60_420,HD Audio 7.1 16. 4K2K60_444,Stereo Audio 2.0 17. 4K2K60_444,Dolby/ DTS 5.1 18. 4K2K60_444,HD Audio 7.1 19. 4K2K60_444,Stereo Audio 2.0 HDR 20. 4K2K60_444,Dolby/ DTS 5.1 HDR 21.
- Page 33 Copy_From_Hdmi_Tx_1 Copy_From_Hdmi_Tx_2 Copy_From_Hdmi_Tx_3 Copy_From_Hdmi_Tx_4 Network Commands IP Mode: Static, IP: 192.168.1.72, Subnet Mask: 255.255.255.0, Displays the current IP Gateway: r ipconfig! configuration 192.168.1.1, Mac address: 00:1C:91:03:80:01, TCP/IP port=8000, telnet port=10 Displays the MAC Mac address: r mac addr! address 00:1C:91:03:80:01 Sets the network IP Set IP mode: s ip mode z!
- Page 34 z=0~1, (0=Static, "s net reboot!" 1=DHCP). command or repower device to apply new config! Displays the current IP r ip mode! IP mode: Static mode. Set IP address: 192.168.1.100 Please use "s net reboot!" command or s ip addr xxx. Sets the network IP repower device to xxx.xxx.xxx!
- Page 35 reboot!" command or repower device to apply new config! DHCP on, Device can't config subnet mask, set DHCP off first. Displays the current Subnet Mask: r subnet! network subnet mask. 255.255.255.0 Set gateway: 192.168.1.1 Please use "s net reboot!" command or s gateway repower device to Sets the network...
- Page 36 s tcp/ip port Sets the network TCP/IP Set tcp/ip port. x=1~65535. port:8000 Displays the current r tcp/ip port! tcp/ip port:8000 network TCP/IP port. s telnet port Sets the network telnet Set telnet port:23 port. x=1~65535. Displays the current r telnet port! telnet port:23 network telnet port.
-
Page 37: Technical Support
To download the latest drivers, firmware, manuals, etc., go to www.monoprice.com and type the P/N into the search bar. If available, support files are linked at the bottom of the product page. SPECIFICATIONS 15750 Video Inputs 4x HDMI® Video Outputs 4x HDMI 4x digital coaxial, 4x 3.5mm... - Page 38 Control Ports 1x TCP/IP, 1x RS-232 HDMI® Version HDCP™ Version 2.2/1.4 Video Bandwidth 18 Gbps 4K@60Hz YCbCr 4:4:4, Maximum Video Resolution including all HDMI 3D modes Output Scaling 4K to 1080p Supported Color Spaces RGB, YCbCr 4:4:4/4:2:2/4:2:0 8-bit, 10-bit, 12-bit: 1080p, 4K@30Hz, 4K@60Hz YCbCr Color Depth 4:2:0...
- Page 39 LPCM 2.0, Dolby Digital, Digital Coaxial Audio Formats Dolby Digital Plus™, DTS 2.0/5.1 Analog Audio Formats LPCM 2.0 HDR10, HDR10+, Dolby High Dynamic Range Support Vision™, HLG 4K@60: 10 ft. (3m) Maximum HDMI® Cable 4K@30: 30 ft. (10m) Length 1080p@60: 42 ft. (15m) Input Power 12 VDC, 2.5A AC Adapter Input Power...
-
Page 40: Regulatory Compliance
REGULATORY COMPLIANCE Notice for FCC This device complies with Part 15 of the FCC rules. Operation is subject to the following two conditions: (1) this device may not cause harmful interference, and (2) this device must accept any interference received, including interference that may cause undesired operation. - Page 41 interference will not occur in a particular installation. If this equipment does cause harmful interference to radio or television reception, which can be determined by turning the equipment off and on, the user is encouraged to try to correct the interference by one or more of the following measures: Reorient or relocate the receiving antenna.
- Page 42 Monoprice™, Blackbird™, the Blackbird logo, and all Monoprice logos are trademarks of Monoprice Inc. HDMI®, the HDMI Logo, and High-Definition Multimedia Interface are trademarks or registered trademarks of HDMI Licensing LLC in the United States and other countries. HDCP™ is a trademark of Digital Content Protection LLC.
Need help?
Do you have a question about the 15750 and is the answer not in the manual?
Questions and answers