Advertisement
Quick Links
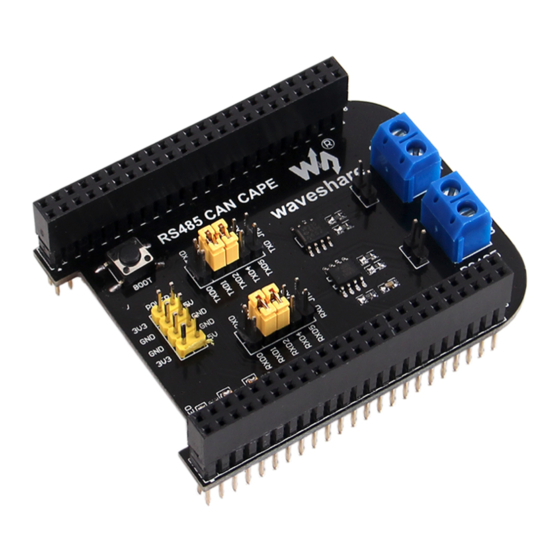
BEAGLEBONE RS485 CAN CAPE EXPANSION BOARD
Getting Ready
Writing the TF Card System Image
Follow the steps below to write the Angstrom into TF card:
1) Extract the system image
Extract the system image file .img.7z by using archiver software like 7z920.exe.
Note: please download the image file from:
LCD CPAE(4.3inch) image for testing
Angstrom-Cloud9-IDE-GNOME-eglibc-ipk-v2012.12-beaglebone-2013.05.24-LCD-cape-LCD4.3-
v1.1.img.7z
LCD CPAE(7inch) image for testing
Angstrom-Cloud9-IDE-GNOME-eglibc-ipk-v2012.12-beaglebone-2013.05.24-LCD-cape-LCD7-
v1.1.img.7z
MISC CAPE and RS485/CAN CAPE image for testing
Angstrom-Cloud9-IDE-GNOME-eglibc-ipk-v2012.12-beaglebone-2013.05.24-MISC-cape-HDMI-
v1.1.img.7z
User Manual
w w w . e k t
. c o m
2
Katrangi
Electronics
Trading
Advertisement

Subscribe to Our Youtube Channel
Related Manuals for BeagleBone RS485


Summary of Contents for BeagleBone RS485
- Page 1 LCD CPAE(4.3inch) image for testing Angstrom-Cloud9-IDE-GNOME-eglibc-ipk-v2012.12-beaglebone-2013.05.24-LCD-cape-LCD4.3- v1.1.img.7z LCD CPAE(7inch) image for testing Angstrom-Cloud9-IDE-GNOME-eglibc-ipk-v2012.12-beaglebone-2013.05.24-LCD-cape-LCD7- v1.1.img.7z MISC CAPE and RS485/CAN CAPE image for testing Angstrom-Cloud9-IDE-GNOME-eglibc-ipk-v2012.12-beaglebone-2013.05.24-MISC-cape-HDMI- v1.1.img.7z Katrangi Electronics Trading w w w . e k t . c o m...
- Page 2 2) Format the TF card Use HPUSBDisk.exe to format the TF card. Choose the Device as your TF card, File system as FAT32. Then click Start. Note: the TF card capacity should be 4GB or above! Use HPUSBDisk.exe to format the TF card 3) Writing the system image Launch Win32DiskImager.exe, select the extracted system image.
- Page 3 Interface definition: Red: VCC Black: GND Green: TXD(connect to RXD) White: RXD(connect to TXD) USB to UART Cable 2) Open PL2303_Prolific_DriverInstaller_v1.8.0.exe and install the driver. 3) Launch putty.exe, configure as follows, then click Open. PuTTY Settings Note: Serial line: check the PC "Device Manager"...
-
Page 4: Lcd Display Overview
Enter Bash Shell 1) Insert the TF card into the BeagleBone Black onboard slot, keep pressing down the BOOT button, power up the board, then release the BOOT button. 2) When the system startups, input "root" to enter Bash Shell environment, now the shell commands are available to use. -
Page 5: Lcd Display
2. 4.3inch LCD interface : for connecting 4.3inch resistive touchscreen LCD 3. DEBUG interface : BB Black debug interface, for connecting serial modules 4. BOOT selection button: Boot from TF card 1. BB_BLACK connector : for connecting BB Black 2. 7inch LCD interface : for connecting 7inch resistive touchscreen LCD 3. - Page 6 Connect BB Black to the 7inch LCD. Connect to the 7inch LCD 2) The touchscreen should be calibrated when the display mode has been changed: root@beaglebone:~# rm -rf /etc/pointercal* root@beaglebone:~# ts_calibrate root@beaglebone:~# sync Reboot the system. Note: if the calibration failed, reboot and retry again.
- Page 7 Short the LED jumper, enter: root@beaglebone:~# test_led The 4 LEDs will light up one by one, press Ctrl+C to exit. Buzzer 1) Short the buzzer jumper, enter: root@beaglebone:~# ls /sys/devices/ocp.3/ You'll find the “pwm_ehrpwm1b.14” as shown: Find the “pwm_ehrpwm1b.14” Katrangi Electronics Trading w w w .
- Page 8 2) Because the pwm_ehrpwm1b.14's extension is .14. It is needed to add parameter 14 when buzzer tested. root@beaglebone:~# test_pwm 14 The buzzer will make sounds in different frequency. DS18B20 1) Insert the DS18B20 into the 1-WIRE socket, short the 1-WIRE jumper, enter: root@beaglebone:~#ls /sys/bus/w1/devices/ You will find the "28-00000 57c5948"...
- Page 9 2) Set system date time: root@beaglebone:~# date 020809302014.23 3) Set the hardware clock of RTC module: root@beaglebone:~# hwclock –w –f /dev/rtc1 4) Show the hardware clock of RTC module: root@beaglebone:~# hwclock –r –f /dev/rtc1 5) Synchronize the hardware clock to system date time: root@beaglebone:~# hwclock –s –f /dev/rtc1...
- Page 10 Now the date time of software and hardware are synchronous. RS485 CAN CAPE Two BeagleBone Black and two RS485/CAN CAPEs are required for this testing. Set jumper to enable UART1(RXD1, TXD1). Connect two CAN Board to CAN1 interface separately, connect the CANH, CANL of one module to the CANH, CANL of another module via jumper wires.
- Page 11 RS485 Two BeagleBone Black and two RS485/CAN CAPEs are required for this testing. Set jumper to enable UART2(RXD2, TXD2). Connect two RS485 Boards to UART2 interface separately. Connect the A, B of one module to the A, B of another module via jumper wires.
-
Page 12: Usb Camera
As shown in the picture: RS485 sender status 4) Press Ctrl+C to exit. Other Expansion Module USB Camera 1) Connect the USB Camera to the BeagleBone Black USB Host connector. 2) Check the assigned IP: root@beaglebone:~# ifconfig eth0 Check the assigned IP Katrangi... - Page 13 As shown in the picture, the IP is 192.168.1.143. Note this IP(it depends). 3) Start up the video stream server: root@beaglebone:~# cd/home/xuser/waveshare_demo/API/camera_test/mjpg-streamer root@beaglebone:~# ./ start.sh Start up the video stream server 4) Open browser on the PC in the same local network, visit the following address to view the video (default port number is 8080): http://192.168.1.143:8080/javascript.html...
- Page 14 5) Press Ctrl+C to exit. USB WIFI 1) Config the wireless network: a) Power off, connect the USB WIFI module to the BeagleBone Black USB Host connector, power up again. b) Check the USB status: root@beaglebone:~# lsusb Check the USB status...
- Page 15 There's no AP connected, therefore, the wlan0 RX TX packets are both 0. f) Config the wlan0 IP: root@beaglebone:~# ifconfig wlan0 192.168.2.107 g) Config the gateway: root@beaglebone:~# route add default gw 192.168.2.1 h) Config the DNS: root@beaglebone:~# vi /etc/resolv.conf Edit nameserver 127.0.0.1...
- Page 16 8.8.8.8 Configure the DNS Save and exit. i) Scan wireless router: root@beaglebone:~# iwlist wlan0 scan Scan wireless router 2) Connect to the router: a) Config the key file /etc/wpa_supplicant.conf: root@beaglebone:~# vi /etc/wpa_supplicant.conf Edit: network={ key_mgmt=NONE Katrangi Electronics Trading w w w . e k t...
- Page 17 Save and exit. b) Connect manually: root@beaglebone:~# wpa_supplicant -B -i wlan0 -c /etc/wpa_supplicant.conf c) Test the connection: root@beaglebone:~# ping www.baidu.com Test WIFI connection: Katrangi Electronics Trading w w w . e k t . c o m...
Need help?
Do you have a question about the RS485 and is the answer not in the manual?
Questions and answers