Table of Contents
Advertisement
Available languages
Available languages
Quick Links
ES
MEZCLADORA DE VACÍO IRIS 2 ADVANCED
................
EN
IRIS 2 ADVANCED VACUUM MIXER
...............
FR
MALAXEUR SOUS VIDE IRIS 2 ADVANCED
................
TALLERES MESTRAITUA S.L.
R-080518
MESTRA
Txori-Erri Etorbidea, 60
Tel. +34 944530388 - Fax +34 944711725
mestra@mestra.es - www.mestra.es
48150 SONDIKA - BILBAO - ESPAÑA
..........................................9
®
.......................5
........................ 13
Rev. 23/05/13
Advertisement
Table of Contents

Related Manuals for Mestra IRIS 2

Summary of Contents for Mestra IRIS 2
- Page 1 R-080518 MEZCLADORA DE VACÍO IRIS 2 ADVANCED ........5 IRIS 2 ADVANCED VACUUM MIXER ............9 MALAXEUR SOUS VIDE IRIS 2 ADVANCED ........13 ® MESTRA TALLERES MESTRAITUA S.L. Txori-Erri Etorbidea, 60 Tel. +34 944530388 - Fax +34 944711725 mestra@mestra.es - www.mestra.es...
- Page 3 Nº Ref. Concepto Description 080518-01 Carcasa Housing 080001-02 Microbomba de vacío Micro-vacuum pump 080518-02 Racor en Y Y connection 080518-03 Condensador Capacitor 080490-29 Rectificador Rectifier 080518-04 Motorreductor Gear motor 080518-05 Racor en codo 1/8 Ø 8 1/8 elbow connection Ø 8 080518-06 Transformador toroidal Toroidal transformer...
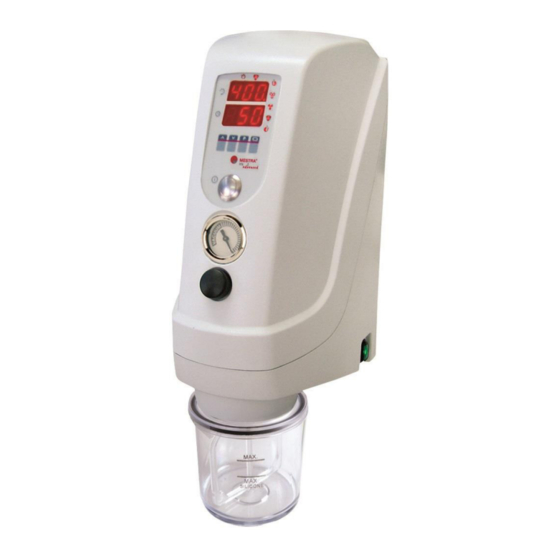
- Page 4 Alarma / Alarm / Alarme A Control / Controls / Contrôle Inversión de giro / Spin inversion / B Vacuómetro / Vacuum meter / Inversion de rotation Manomètre à vide Velocidad / Speed / Vitesse C Válvula de alivio de vacío / Vacuum Tiempo / Time / Temps drain valve / Vanne d’admission d’air Subir-bajar / Up-down / Monter-...
- Page 5 Español La mezcladora de vacío Iris 2 Advanced (R-080518) permite elaborar fácilmente revestimientos, escayolas y mezclas afines. Esta máquina ha sido concebida como un sencillo y fiable dispositivo del Laboratorio Dental. Para conseguir unas óptimas prestaciones del aparato y una larga vida útil, le recomendamos que lea con atención las siguientes instrucciones de uso.
-
Page 6: Instalación
Español INSTALACIÓN FUNCIONES 1. Desembale cuidadosamente su mezcladora • La mezcladora de vacío Iris 2 Advanced Iris 2 Advanced y compruebe que en el (R-080518) cuenta varias posibles interior de los embalajes se encuentran los funciones pueden activarse siguientes accesorios: desactivarse a gusto del usuario. - Page 7 CONFIGURACIONES GUARDADAS empleando para ello una espátula de mano o bien active la función PREBATIDO. La Iris 2 Advanced tiene almacenadas las siguientes configuraciones: 7. Sitúe la taza en la boquilla de la mezcladora (F) realizando una ligera presión para que se produzca un buen asentamiento de la - Batido con inversión de giro.
- Page 8 Asegúrese también MEMORIZAR NUEVAS CONFIGURACIONES del correcto montaje del conjunto Aspas- Taza. El control electrónico de la batidora Iris 2 No permita que niños o personal no Advanced permite almacenar en memoria hasta 4 configuraciones diferentes. Para guardar una cualificado manipulen el aparato.
- Page 9 English The Iris 2 Advanced vacuum mixer (R-080518) is used to make investmets, plaster and similar mixtures. The machine has been designed as a simple and reliable tool for Dental Labs. For optimum performance and a long service life, please read the instructions for use carefully.
- Page 10 INSTALLING THE UNIT • Shortly pressing the key you will advance on the different funcions. 1. Carefully unpack your Iris 2 Advanced vacuum mixer, and check for these fittings in • With the keys , at upper display, select the packaging: the value “YES”...
-
Page 11: Saved Configurations
“VACUUM” section. When the NEW CONFIGURATION STORING pre-set time has elapsed, the unit will stop. The electronic controls of the Iris 2 Advanced 13. At the right of the display, the icon of the allow you to store up to 4 different function running will blink. -
Page 12: Maintenance And Cleaning
• recommend using always original MESTRA spare parts for mixer maintenance. PRECAUTIONARY MEASURES Before connecting up the unit, check the power supply is 230 V, 50/60 Hz with earthing. Do not fit the bowl to the unit when the mixer motor is on. - Page 13 Français Le malaxeur sous vide Iris 2 Advanced (R-080518) permet d’ élaborer facilement des revêtements, des plâtres et autres mélanges similaires. Cette machine a été conçue comme un dispositif simple et fiable du Laboratoire Dentaire. Pour obtenir les meilleures performances possibles et une durée de vie optimale de l’appareil, nous vous conseillons de lire attentivement les consignes d'utilisation suivantes : - Lisez attentivement ce manuel.
-
Page 14: Installation
10 secondes (valeur non éditable). FONCTIONS • Le malaxeur sous vide Iris 2 Advanced (R- TURBO 080518) est pourvu de plusieurs fonctions Les dernières secondes du mélange se possibles qui peuvent être activées ou font à... - Page 15 21. Versez dans le bol (D) les éléments que vous souhaitez mélanger. Faites un pré- Les configurations suivantes sont enregistrées mélange des produits dans le bol même dans 'Iris 2 Advanced en vous aidant d'un spatule ou activez la fonction PRÉ-MÉLANGE.
- Page 16 MESTRA d’origine. MÉMORISER DE NOUVELLES PRÉCAUTIONS CONFIGURATIONS Le contrôle électronique du malaxeur Iris 2 Avant de brancher l'appareil, vérifiez qu'il Advanced permet d'enregistrer en mémoire s'agit bien d'une prise de courant de 230 V jusqu'à...
Need help?
Do you have a question about the IRIS 2 and is the answer not in the manual?
Questions and answers