
Subscribe to Our Youtube Channel
Related Manuals for GEISMAR rectirail-dl2


Summary of Contents for GEISMAR rectirail-dl2
- Page 1 ELECTRONIC RULE FOR MEASURING RAIL STRAIGHTNESS User Manual MU-A-RectiRail DL2-rev01a-Gb...
- Page 3 • Tél.: +33(0)1 41 43 40 40 92200 Neuilly sur Seine • Fax : +33(0)1 46 40 71 70 France • E-mail : geismar@geismar.com FACTORY GEISMAR 5, rue d'Altkirch • Tél.: +33(0)3 89 80 22 11 68006 Colmar cedex •...
- Page 4 The information, drawings and descriptions available in this manual are confidential and remain the property of GEISMAR. On no account must they be disclosed, loaned, copied or used for manufacturing or sales purposes or for any other use without GEISMAR’s prior written consent.
-
Page 5: Table Of Contents
CONTENTS GENERAL CHARACTERISTICS ________________________________________________ 4 TECHNICAL DATASHEET _____________________________________________________ 5 USING THE HARDWARE ______________________________________________________ 6 Overview ........................6 Mechanical side stops ....................7 Magnets and electric stops ..................8 Buttons ........................9 Battery ........................10 USING THE SOFTWARE _____________________________________________________ 12 Menu overall organisation ..................12 Changing the language ..................... -
Page 6: General Characteristics
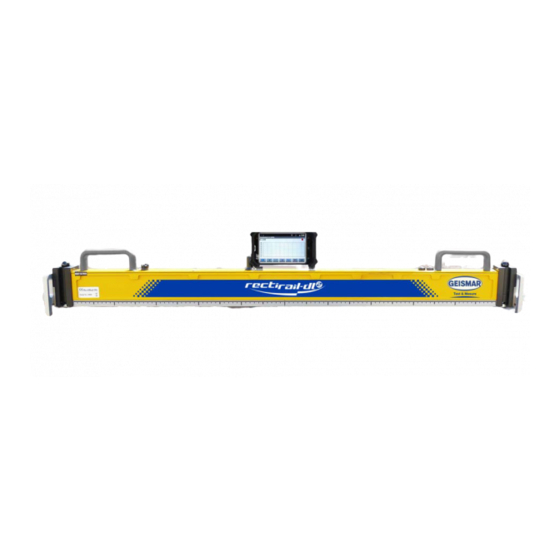
GENERAL CHARACTERISTICS RectiRail DL2 rule is designed to measure the longitudinal profile of a rail over a length of 1 metre, to an accuracy of +/-50 microns. RectiRail DL2 consists of 100 position sensors secured to a reference rail. The rule bears on the part to be inspected, by means of two pads placed at each end of the rule. -
Page 7: Technical Datasheet
TECHNICAL DATASHEET Characteristic Value Unit Dimensions L x H x W 1160 x 160 x 100 Weight (including battery) Measurement range ± 50 Accuracy µm Resolution 12.5 µm Storage capacity Limited only by PDA capacity. Rule autonomy > 800 Readings PDA autonomy Hours Operating temperature... -
Page 8: Using The Hardware
USING THE HARDWARE Overview Bluetooth antenna Button Joystick Holding magnets Insulating bl k Mechanical stops with indexing / 44 MU-A-RectiRail DL2-rev01a-Gb... -
Page 9: Mechanical Side Stops
Mechanical side stops These stops have indexed positions. choose their position, pull them outside and rotate them until the required configuration is reached. Rail profile measurement Rail route measurement (head) (side) (0° position) (90° position) Fillet measurement at 45° Ground installation. Rest position. -
Page 10: Magnets And Electric Stops
Magnets and electric stops Magnets are used to hold the RectiRail DL2 in place. Once the rule has been positioned on the area to be measured, press the two buttons securing the magnets placed on the top of each insulating block. These magnets ensure that the rule is held properly on the rail, thus contributing to good contact between the rail and the electric stops. -
Page 11: Buttons
Buttons The RectiRail DL2 is fitted with 3 control buttons: The VALIDATION BUTTON is used to: - start the rule - validate choices when browsing in the PDA menus: press this button to validate the choice made (highlighted or encircled) on the PDA screen. Left The ESCAPE BUTTON is used to: - switch off the rule, when it is held down... -
Page 12: Battery
Battery RectiRail DL2 has an internal block of 7.2v Ni-MH rechargeable batteries that must not be removed by the user. The following procedure must be complied with RectiRail DL2 when charging the RectiRail DL2 Place the on a flat surface having first ensured that this surface is clean and dry. - Page 13 Rule charging Charge connector Charge indicator / 44 MU-A-RectiRail DL2-rev01a-Gb...
-
Page 14: Using The Software
USING THE SOFTWARE Menu overall organisation MAIN Connect Validate Cancel Measure Zoom Scan Back up Validate Cancel Open Validate Cancel Settings Option menu (password) Calibrate (password) Exit Exit Switch off / 44 MU-A-RectiRail DL2-rev01a-Gb... -
Page 15: Changing The Language
Changing the language The language of the RectiRail-DL is linked to the language selected on the PDA Click on the icon: – Settings of your PDA – Language and input – Language - Your language If the translation was not in your language, the software will be in English. Contact your representative to obtain an update in your language. -
Page 16: Main Screen
Main screen Rule battery level Bluetooth connection indicator indicator - (§4.3) Exit/Switch off Start to RectiRail (§0) measure Settings Change (§0) Zoom Back up Measurement Scan Open Mode File / 44 MU-A-RectiRail DL2-rev01a-Gb... -
Page 17: Connection
On starting the software, a message stating that the version of the software installed in the rule is an “old” version may be displayed: this will not prevent the rule from being used. However, some functions may not be available. Please contact your Geismar representative should you have any queries. / 44... - Page 18 4.4.2 Reconnecting the RectiRail Click on the icon to bring up the screen below: Two possibilities: - The rule, identifiable from its serial number, is available in the list: in this case, check that the rule is energised and click on the rule name. The software will automatically connect to this rule.
-
Page 19: Data Management
Data management 4.5.1 General principles The measurements taken by the RectiRail are backed up in a file with the “DA5” extension. These “DA5” files are visible when browsing in the PDA tree from a PC to which the PDA has first been connected (refer to the PDA user manual). The measurements are not directly “visible”... - Page 20 If a DA5 file has the suffix “-x“, this means it was created for a measurement taken in grouped mode with 1 file per measurement group (see §0. 7 ). A “standard” DA5 file does not have this suffix. The name “MyDocuments” may vary according to operating system and language.
- Page 21 ⑥ - Validate by OK Ref. Refer to §0. 4.4 for more details on management of DA5 files and file naming (§0). To simplify data input, the identifier of the previous reading is proposed by default. Users can abort at any time via the “Cancel” button. 4.5.3 Information saved The following settings are saved in each measurement:...
-
Page 22: Settings
Settings 5.1 General settings Users access this function by validating the “Settings” choice in the main menu. The following screen is then displayed: Rule serial number Min / Max display Embedded See § software version Measurement mode See § PDA software version Option (Password) - Page 23 By validating the “Protection” button you can access application password management (advanced parameter setting, calibration, standard reading/loading, protection). Access is protected by password. Contact your GEISMAR representative for the password. 5.1.3 Calibration (password) By validating the “Calibration” button you can access the RectiRail calibration mode.
- Page 24 5.1.4 Measurement mode Two measurement modes are available. “GROUPED” mode “NORMAL” mode This mode can contain up to 3 measurements This mode can contain an unlimited number of Eg. Rail profile measurement (head) Rail route management (side) measurements Fillet measurement at 45° (45° position) This mode is accessible by This mode is accessible by selecting...
-
Page 25: Advanced Settings
Advanced settings Password This menu is used to configure various settings. Access is restricted by password. If necessary, contact your Geismar representative for the password. Display of maximum and minimum thresholds (See § ① - Setting with the cursor... - Page 26 5.2.2 Threshold display Threshold Password display This option is used to display thresholds (= horizontal lines) on the measurement graphs. - If the option is not ticked: the thresholds are not displayed. - If the option is ticked: the thresholds corresponding to the values entered are displayed.
- Page 27 5.2.4 Rectification This option presents measurements in the form of their difference with the reference line based on the rail points measured under the 3rd and 98th sensors or the 1st and 100th sensors, according to the chosen parameter setting. (In the 1st case, the 3rd and 98th values will thus always be at 0, else the 1st and last points will be at 0).
-
Page 28: Taking A Measurement In Normal Mode
Taking a measurement in normal mode Parameter setting ② - If the “choose position” box is ticked in the “Settings” menu, then when the Ref. measurement is started, a screen will ask you for rule position before each measurement is taken: - To validate the settings, exit the menu by clicking on ①... -
Page 29: Starting To Measure
Starting to measure - Back in the main screen, the measurement is started by validating the "measurement” choice in the main menu. If the screen for choosing the position is displayed (see §0) click on the current position of the rule and start to measure. - A progress bar then indicates acquisition status: - After a few seconds, acquisition is complete and the measurement is displayed on the screen:... - Page 30 The folder in which the save will be made is recalled in the title bar. 6.3.1 There is no DA5 - The following screen is displayed. - Click on OK and follow the steps described below to create a DA5 and save the measurement ⑥...
- Page 31 6.3.2 There is already a DA5 in the PDA ⑫ - The DA5 in which the save will be made is recalled in the title bar ⑪ - The screen displays the last measurement saved ⑬ - Enter the name of the new measurement ⑭...
-
Page 32: Reading
Reading - Once the “Reading” choice has been validated, the following input screen will be displayed: - The joystick, pen or finger are used to select the reading to be displayed: Rule Screen Meaning Joystick upwards Previous reading Arrow Joystick downwards Next reading Arrow Display of the selected reading in the... -
Page 33: Zoom
6.5. Zoom Once the curve has been displayed on the screen, the display zoom (scaling factor) can be modified. To do this, select and validate the “Zoom” choice On each validation, the current zoom moves to the next value. Mode Scale scope Rectification -2.5 to 2.5 mm... - Page 34 x1, x5, x10 zoom The curves displayed with these zoom factors are rectified. Rectification allows measurements to be presented in the form of their difference with the reference line based on the rail points measured under the 3rd and 98th sensors, or the 1st and 100th sensors, according to the chosen parameter setting in the Options (protected) menu.
-
Page 35: Scan Mode
Scan mode The scan mode is used to display and move cursors on the graph for accurate measurement of the coordinates of a specific point. Access is via the button The graph area consists of: • 2 cursors (blue and green) These cursors can be moved using: - The RectiRail DL2 joystick - The green and blue arrows on the PDA screen... -
Page 36: Taking A Measurement In Grouped Mode
Taking a measurement in grouped mode Parameter setting Choice of generated file By selecting the “grouped” measurement mode, you can choose the file generated when measurements are saved: ① • 1 file per group (ticked box) - In this mode, the 1, 2 or 3 measurements taken will be automatically grouped in the same DA5 when saving. -
Page 37: Starting To Measure
Starting to measure - Back in the main screen, the measurement is started by validating the "measurement” choice in the main menu. - The screen for choosing the position is displayed: Select position Start to measure - A progress bar then indicates acquisition status: - After a few seconds, acquisition is complete and the measurement is displayed on the screen. -
Page 38: Backup
Backup In this measurement mode (grouped measurement, 1 file per group), the user only chooses the name that will identify this measurement group. This name will be that of the DA5. For example, if the chosen name is “my measurement” then: - The DA5 will be: “my measurement_x.DA5”... -
Page 39: Resetting The Screen
The measurements are then saved: Name of measurements Resetting the screen When new measurements need to be taken, it may prove useful to reset the screen. To do so, follow the steps below: Écran effacé In the main screen, select “measurement”, and in screen for choosing the position, click ④... -
Page 40: Reading
Reading In this measurement mode, you can read the DA5 files specifically created in the “grouped measurement, 1 file/group” mode. ⑥ - Click on reading As explained in the above section, these files are identified by the suffix “_x”, ⑦ automatically added to the DA5 name. -
Page 41: Scan
Scan The scan mode (see §6.6 Scan mode) is accessible via the button but is limited to the display of one curve. Following validation of this mode, the screen below lets you choose the curve you want to visualise: Select the curve and validate by The scan mode is now activated for this curve (refer to for use of this mode):... -
Page 42: Grouped Mode, With Several Files Per Group
Grouped mode, with several files per group In this measurement mode: - The software displays several separate curves on the screen (3 at most) - Each curve must be saved separately - Several measurements taken at the same point can be compared by displaying them simultaneously on the screen ①... -
Page 43: Exit
7.8.3 Reading and comparing measurements When reading a measurement, the following screen is displayed: Select measurement Select the required position for this measurement Delete the other measurements Validate by OK Once the choice has been validated by OK, you can request reading of a second measurement. -
Page 44: Troubleshooting
TROUBLESHOOTING Below is a troubleshooting guide for the RectiRail DL2. Should the problem persist after you have tried the solutions described below, we suggest you contact your Geismar representative. STOP CONTACT PROBLEM is displayed when taking a measurement: This means that there is no contact or that contact is insufficient between the rule electric stops and the rail. -
Page 45: Precautions Of Use
10 PRECAUTIONS OF USE - RectiRail DL2 is a measurement device avoid all impacts on the rule (falling, miscellaneous impacts, etc.). - Also avoid impacts on the supporting parts and side stops. - Likewise, leave the rule to settle in event of sudden changes in temperature or dampness (moving from heated premises to the outside, etc.). -
Page 46: Ticket Back
RRIPINOISE DE ANIQUE | Route d’Italie 38352 La Tour du Pin - France • Tel. : +33 (0)4 74 97 24 88| • Fax : +33 (0)4 74 97 30 76 | • E-mail : sav-stumec@geismar.com / 44 MU-A-RectiRail DL2-rev01a-Gb... -
Page 47: Notepad
11 Notepad / 44 MU-A-RectiRail DL2-rev01a-Gb... - Page 48 OCIÉTÉ RRIPINOISE DE ANIQUE | Route d’Italie 38352 La Tour du Pin - France • Tel. : +33 (0)4 74 97 24 88 | • Fax : +33 (0)4 74 97 30 76 | • E-mail : stumec@geismar.com...
Need help?
Do you have a question about the rectirail-dl2 and is the answer not in the manual?
Questions and answers