Table of Contents
Advertisement
Quick Links
Advertisement
Table of Contents

Related Manuals for Pehamed CD mon

Summary of Contents for Pehamed CD mon
- Page 1 Instruction Manual CD mon Digital Luminance/ Illuminance Meter...
- Page 2 ______________________________________________________________________________________________________________ Instruction Manual for the following device: CD mon Digital Luminance / Illuminance Meter Firmware 2.01 PEHA med. Geräte GmbH Mühlstraße 38 DE - 65843 Sulzbach, Germany Tel.: +49 6196 500 40 30 Fax: +49 6196 500 40 50 E-mail: info@pehamed.de...
-
Page 3: Table Of Contents
Battery....................7 Prior to Start-Up................. 9 Device Description.................10 Keypad ....................11 Quick Start..................12 Zeroing .....................14 CD mon Measurement Modes.............15 Switching-off ...................16 Positioning the Device..............16 Menu ....................17 Measurement of Image Display Devices ........21 Measurement of Maximum Contrast..........22 Luminance Variations within an Image........23 Measurement of Viewing Devices ..........24... - Page 4 As with all high quality products, you must strictly follow the operating instructions given in this document to ensure long- term, trouble-free and reliable performance. The CD mon Luminance/ Illuminance Meter is a universal, compact light meter designed for quality control of viewing boxes and image display devices.
-
Page 5: General Information
The device fulfils the requirements set forth therein for a luminance/illuminance meter according to DIN 5032 Class B. By using the spacer leg included with the CD mon device, you can include reflected ambient light in the measurements. Contact measurement is also possible. -
Page 6: Scope Of Delivery
• Contact tube • Instruction Manual Laser Classification The lasers used in the CD mon device to target the measurement point are classified in Laser Class 2 according to VDE 0837 and IEC 825. The permissible radiated power of a continuously operated laser of this class is limited to a maximum of 1 milliwatt (1 mW). -
Page 7: Battery
First Charging At the time of shipment, the LiPo rechargeable battery installed in the CD mon device has been factory loaded to ca. 50% of its capacity. For that reason, please recharge the LiPo rechargeable battery to full capacity before using the unit. - Page 8 Charging the Rechargeable Battery Use the USB cable included in the delivery to charge the rechargeable battery of the PEHAMED CD mon device. The charging voltage can be supplied either directly from a computer USB socket or via the pluggable power supply with USB socket supplied with the device.
-
Page 9: Prior To Start-Up
German Waste Electrical and Electronic Equipment Ordinance (EAR) Once the CD mon device has reached the end of its useful service life and can no longer be used, PEHAMED and/or your local public waste disposal authority would be happy to provide you with information on how to properly dispose of the device. -
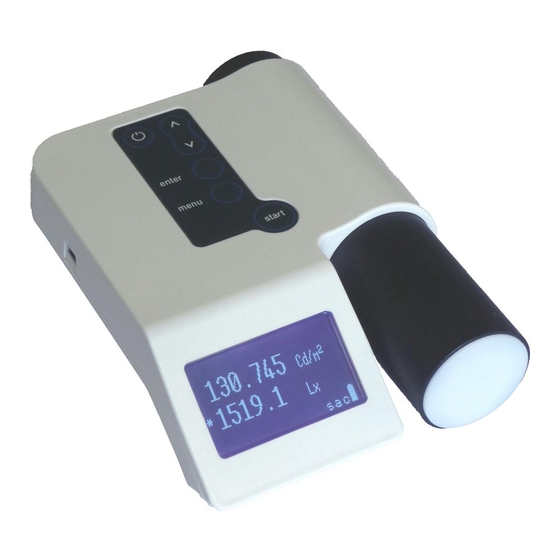
Page 10: Device Description
Connection for USB Data and Recharging Cable Lux Measurement Sensor Backlit Display (Display data is automatically inverted when device is turned upside down.) CD mon Front View automatic switch for contact measurement Optical System for Lumi- Threaded Socket nance Measurement for Spacer Leg... -
Page 11: Keypad
“Calculate” Start appears in the display. To switch on both lasers for aiming at the measurement point, press and hold down the button. Release button to start the measurement. CD mon Instruction Manual Edition: June 2017 Page 11 of 31... -
Page 12: Quick Start
If both sensors have been activated (See menu item “cd/lx meas.”), a luminance value (cd/m²) and an illuminance value (lx) will be displayed. Then, the CD mon measurement device is ready for operation. CD mon Instruction Manual... - Page 13 You can switch off the CD mon device by pressing the On/Off/Zero button for ca. 5 seconds (For details, please see “Switch-off”).
-
Page 14: Zeroing
• Press the On/Off/Zero button until you hear an acoustical signal. • The display will now show: You have now completed the zeroing process, and the measurement value display will reappear. CD mon Instruction Manual Edition: June 2017 Page 14 of 31... -
Page 15: Cd Mon Measurement Modes
To switch between measurement modes, use the menu item “measure – cont/trig” in the Menu (See “Menu”). Switching-off Switch off the CD mon device by pressing the On/Off/Zero button for ca. 5 seconds. The display will show the following during switch-off: If the “PWR Off”... -
Page 16: Positioning The Device
To mount the spacer leg, screw it into the threaded socket between the two lasers on the front of the device. The threaded socket for the tripod is located on the underside of the device. CD mon Instruction Manual Edition: June 2017 Page 16 of 31... -
Page 17: Menu
______________________________________________________________________________________________________________ Menu The CD mon device has a number of setting options that are listed in a separate menu. You can open the menu at any time by pressing the menu button. However, after switching on the device, you must wait for the self-test to be completed. - Page 18 = “Trigger Mode” A measurement is made only after you press the start button. The measurement value will be displayed until you perform a new measurement. CD mon Instruction Manual Edition: June 2017 Page 18 of 31...
- Page 19 With the not inverted (“not inv.”) setting, bright characters will be shown on a dark background. With the “inverted” setting, dark characters will be shown on a bright background. CD mon Instruction Manual Edition: June 2017 Page 19 of 31...
- Page 20 The respective latest measurement value is displayed in the lowest line of the display (For more detailed information, see “Measurement of Viewing Devices”). CD mon Instruction Manual Edition: June 2017 Page 20 of 31...
-
Page 21: Measurement Of Image Display Devices
Luminance with Switched off Luminance Device (Veiling Luminance) in (cd/m cd/m < 1.0 Performance < 3.0 Class 1 < 5.0 < 2.5 Performance < 5.0 Class 2 < 7.5 CD mon Instruction Manual Edition: June 2017 Page 21 of 31... -
Page 22: Measurement Of Maximum Contrast
The minimum gray value is greater than or equal to the veiling luminance, as the minimum gray value consists of the veiling luminance and the minimum luminance of the image display device. CD mon Instruction Manual Edition: June 2017 Page 22 of 31... -
Page 23: Luminance Variations Within An Image
Image Display Devices with Cathode Ray Tube Flat Screen Monitor ± 15% of ME-M Performance - 30% of ME-M Class 1 ± 20% of ME-M Performance - 35% of ME-M Class 2 CD mon Instruction Manual Edition: June 2017 Page 23 of 31... -
Page 24: Measurement Of Viewing Devices
15 minutes before starting with measurements. Use the following measurement points for viewing boxes with a single luminous field (for 1 35x43 cm or 40x40 cm field): ME-1 ME-2 ME-M ME-4 ME-3 CD mon Instruction Manual Edition: June 2017 Page 24 of 31... - Page 25 ME-4 Aim at the measurement point (central viewing box reference point) with the CD mon device and start the measurement. After you release the On/Start button, the measurement will be started, and the luminance value will appear in the display in cd/m².
-
Page 26: Retrieving Stored Values
Minimum Limit Reference: 1,212 cd/m² (Central Point) 911 cd/m² 75.2% 891 cd/m² 73.5% 881 cd/m² 72.7% 901 cd/m² 74.4% CD mon Instruction Manual Edition: June 2017 Page 26 of 31... - Page 27 1,342 cd/m² 821 cd/m² 61.2% 1,011 cd/m² 75.4% 1,011 cd/m² 75.4% 841 cd/m² 62.7% Tolerance Limit + 15% 1,122 cd/m² 83.6% 1,192 cd/m² 88.8% 1,222 cd/m² 91.0% 1,162 cd/m² 86.6% CD mon Instruction Manual Edition: June 2017 Page 27 of 31...
-
Page 28: Measurement Of Ambient Brightness
• Read the measured value in lux on the left side of the display. • If necessary, dim room light until a value equal to or less than 50 lux is measured at the switched-off viewing box. CD mon Instruction Manual Edition: June 2017 Page 28 of 31... -
Page 29: Technical Specifications
Power Supply: 3.7 V LiPo rechargeable battery with battery charger PC Interface: USB 2.0 interface Size and Weight: 45 mm x 110 mm x 150 mm (HxWxD) and 500 g CD mon Instruction Manual Edition: June 2017 Page 29 of 31... -
Page 30: Complaint Handling
Any additional claims such as for compensation for lost earnings or usage loss are herewith explicitly excluded! In case of a guarantee claim, PEHAMED shall decide whether to replace the product free-of-charge or to repair it. The following information must be submitted in the case of a possible guarantee claim: •... - Page 31 ● defects caused by shipping damage Guarantee: In addition to the manufacturer’s guarantee offered by PEHAMED /Sulzbach, you are also entitled to guarantee claims as foreseen by applicable statutory regulations. CD mon Instruction Manual Edition: June 2017...
Need help?
Do you have a question about the CD mon and is the answer not in the manual?
Questions and answers