Table of Contents
Advertisement
Quick Links
Advertisement
Table of Contents

Related Manuals for Pehamed CD-LUX

Summary of Contents for Pehamed CD-LUX
- Page 1 Instruction Manual Digital Luminance/ Illuminance Meter...
- Page 2 Instruction Manual for the technical device: CD-LUX Luminance/Illuminance Meter Edition Date: May 2016 How to reach us: PEHA Med. Geräte GmbH Mühlstrasse 38 D-65843 Sulzbach/Ts. Germany Tel.: +49 6196 500 40 30 Fax:: +49 6196 500 40 50 E-mail: info@pehamed.de...
-
Page 3: Table Of Contents
Table of Contents Device Description..............5 General Information ..............8 Start-Up ..................9 Measuring with the Luminance Detektor.......11 Zeroing ..................12 Measuring in "Continuous Mode"..........13 Measuring in "Trigger Mode" ............14 Measurement of Image Display Devices.......15 Measuring Veiling Luminance ..........16 Measurement of Maximum Contrast ........17 Luminance Variations within One Image ......19 Measuring Luminance Variations..........20 Measuring Uniformity of Viewing Box Luminance....22... - Page 4 As with all high value products, it is essential, for trouble-free operation, that the operating instructions contained in this manual are carefully followed. IMPORTANT: The basic CD-LUX unit and its sensors have been precisely adjusted to each other under reference conditions in a factory calibration process performed by pehamed.
-
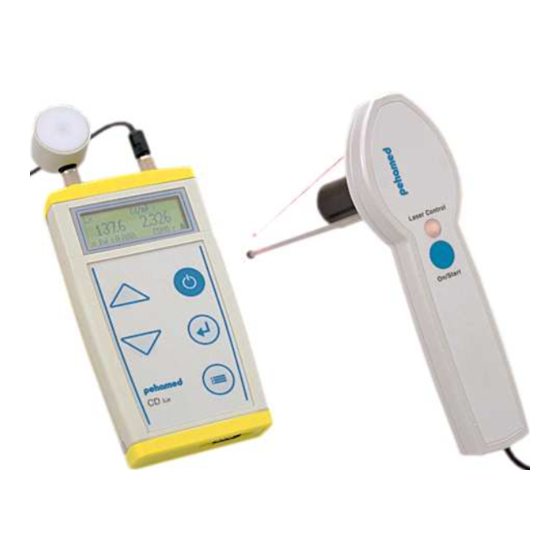
Page 5: Device Description
Device Description cd/m² SENSOR LUX SENSOR INTERFACE SOCKET INTERFACE SOCKET ON/OFF/ZERO ENTER/OK/MEMORY/RESET DOWN MENU/SAVE/RESULT USB INTERFACE BATTERY BOX... - Page 6 ON/OFF/ZERO button To start or zero the unit, press this button down for ca. 2 seconds until an acoustical signal sounds. To switch off the unit , press and hold down this button for ca. 5 seconds. ENTER/OK/MEMORY/RESET button • Press this button to confirm a selected menu item.
- Page 7 Laser Classification The laser used in the CD-LUX unit to align it with the measurement point is classified according to VDE 0837 and IEC 825 in Laser Class 2. The permissible laser performance of a continuous laser beam of this class is limited to a maximum of 1 milliwatt (1 mw).
-
Page 8: General Information
Thanks to its spacer leg, the CD-LUX is able to include reflected ambient light in its measurements. The built-in laser positioning aid of the CD-LUX enables its... -
Page 9: Start-Up
Transport case Snap the sensors into the sensor interface sockets and loosely tighten the knurled fitting. IMPORTANT! The CD-LUX must be switched off at this time, otherwise the sensor will not be detected by the unit’s software. Now switch on the unit by pressing the ON/OFF/ZERO button. - Page 10 The following display information depends upon the sensor type connected. Example: CDMO - Sensor erkannt CDMO 1,054 as Cd/m²: 0,00 0,000 ⇒ Ref=0.000 CDMO t Following completion of the above display sequence, the CD-LUX is ready for use. The display now shows 0.000 for all measurement values.
-
Page 11: Measuring With The Luminance Detektor
Measuring with the Luminance Detector The hand-held luminance detector has a measurement range of ca. 0.05 cd/m² to 80,000 cd/m² and automatically switches the measurement range to kcd/m² as needed. Up to a measured luminance value of 10,000 cd/m², the direct value is shown (e.g. -
Page 12: Zeroing
Zeroing The CD-LUX can be manually reset to zero. The unit is zeroed during factory calibration and does not normally become misadjusted. IMPORTANT! Nevertheless, we recommend that you zero the unit prior to each measurement series and/or in case you should see improbable measurement values. -
Page 13: Measuring In "Continuous Mode
Measuring in “Continuous Mode” The CD-LUX can be switched by menu item selection into two different measurement modes (See the Chapter “Menu“). In “Continuous Mode,” the unit is switched in such a way that the hand-held luminance detector continuously transmits new signals every ca. -
Page 14: Measuring In "Trigger Mode
Measuring in “Trigger Mode” In “Trigger Mode,” the unit is switched in such a way that the sensor only transmits a signal after the blinking red laser point has been switched on by pressing the ON/START button on the hand-held luminance detector, and the measurement has been started by releasing this button. -
Page 15: Measurement Of Image Display Devices
Measurement of Image Display Devices • The Veiling Luminance is measured with the image display device switched off, under normal viewing conditions at the work place. The ratio between the Maximum White Luminance (determined during the measurement of the Maximum Contrast) of the image display device and the measured Veiling Luminance must be >... -
Page 16: Measuring Veiling Luminance
Measuring Veiling Luminance • Switch on the CD-LUX by pressing the ON/OFF/ZERO button. 0. 0 0 0 appears in the display. • Press and hold down the ON/START button on the hand- held detector which activates the laser. Continue to... -
Page 17: Measurement Of Maximum Contrast
Veiling Luminance and the Minimum Luminance of the image display device. Measuring Maximum Contrast • Switch on the CD-LUX by pressing the ON//OFF/ZERO button. 0. 0 0 0 appears in the display • Press and hold down the ON/START button on the hand- held detector which activates the laser. - Page 18 • Hold the detector steady during the measurement cycle. A blinking asterisk (*) will appear above the respective measurement value during the measurement cycle. • The measurement cycle takes ca. 2 seconds, and the measurement value for the Minimum Luminance L cd/m²...
-
Page 19: Luminance Variations Within One Image
Luminance Variations within one Image Use either the test pattern for geometrical image characteristics or the SMPTE test pattern (See DIN 6868/57) to measure luminance variations within a displayed image. First make one measurement near the center of the image M1 and then one measurement each in each of the 4 corners of the image. -
Page 20: Measuring Luminance Variations
4 corner points E1, E2, E3 and E4. • Switch on the CD-LUX by pressing the ON/OFF/ZERO button. 0. 0 0 0 appears in the display. • Press and hold down the ON/START button on the hand- held detector which activates the laser. - Page 21 • Measure and save the values for the 4 corner measurement points in the same way • To retrieve the measurement values from the memory, please see the instructions on page 27. • To delete the measurement values stored in the memory, press the RESET button for ca.
-
Page 22: Measuring Uniformity Of Viewing Box Luminance
Measuring Uniformity of Viewing Box Luminance Switch on the viewing box, set it to maximum brightness and let the viewing box warm up for ca. 15 minutes before starting with measurements. Mark the points that need to be measured. (Use a template if needed). Use the following measurement points for a viewing box with a maximum viewing area of 35x43 cm or 40x40 cm: 8 cm... - Page 23 If the viewing area is larger than 40x40 cm, use the following measurement points: ¼ Length ME-1 ME-2 ¼ H ME-5 ME-6 ME-M ME-8 ME-7 ME-3 ME-4 ME-M must be in the exact center of the viewing area, and the measurement points ME-1, ME-2, ME-3, and ME-4 8.0 cm from each edge of the viewing surface.
-
Page 24: Measuring Viewing Box Luminance
Viewing Box Luminance Measuring • Switch on the CD-LUX by pressing the ON/OFF/ZERO button. 0. 0 0 0 appears in the display • Press and hold down the ON/START button on the hand- held detector which activates the laser. Continue to... - Page 25 • Repeat this process for ME-1, ME-2, ME-3, and ME-4. Save each of these measurements values as shown above. For larger viewing boxes, repeat this process for ME-5, ME-6, ME-7, and ME-8.
-
Page 26: Retrieving Stored Measurement Values
Retrieving Stored Measurement Values Press the MENU button for several seconds until the word “Calculate” briefly appears in the display. Then the stored measurement values for the reference point and the remaining measurement points and their percentage values vs. the reference point value are displayed. Example: Reference=2811.35 CD/m²... -
Page 27: Examples
Examples Example 1 (for a single field viewing box - 35x43 cm) A. At maximum brightness setting: Tolerance Limit + 30% Assume that ME-M has a value of 3,084 cd/m². If ME-1 = 2,273 cd/m², the LCD will display 73.7%. If ME-2 = 2,333 cd/m², the LCD = 75.6%. - Page 28 Example 2 (for a 2 field or multi-field field viewing box) A. At maximum brightness setting: Tolerance Limit + 30% Assume that ME-M has a value of 3,385 cd/m². If ME-1 = 2,383 cd/m², the LCD will display 70.4% If ME-2 = 2,784 cd/m², the LCD = 82.3% If ME-3 = 2,884 cd/m², the LCD = 85.2% If ME-4 = 2,603 cd/m², the LCD = 76.9% Tolerance Limit + 15%...
-
Page 29: Measuring Ambient Light In Lux
• Switch off the viewing box. • Hold the switched on CD-LUX basic unit with its interfaced illuminance detector directly above the ME- M central measurement point of the viewing box with the illuminance detector facing away from the viewing box towards the room. -
Page 30: Menu
Menu The CD-LUX Luminance/Illuminance Meter offers various adjustment settings which are listed in a separate menu. To open the adjustment settings menu, first switch on the unit by pressing the ON/OFF/ZERO button. Once the self-test has run, open the menu by pressing and holding down the MENU button for ca. - Page 31 Once all required menu settings have been selected, briefly press the MENU button to save your selections. The word “Saving” will now appear in the display, and you will automatically exit the menu. All settings remain active until changed and are not affected by battery changes.
- Page 32 PWR-off - enable PWR-off - disable Explanation: With these menu settings you can enable/disable the automatic power switch-off function of the unit. (When activated the unit automatically switches itself off after ca. 5 minutes of inactivity.). This function is useful when a longer series of measurements must be made.
-
Page 33: Lcd Display
LCD Display After switch-on of the CD-LUX and completion of the self- test the following display appears: Illuminance measurement Luminance measurement value in lux value in cd/m² Measurement Cd/m²: mode 0,00 0,000 (t=trigger; ⇒ Ref=0.000 CDMO c=continuous) Value to be stored... -
Page 34: Switching-Off
Switching-off The CD-LUX unit will automatically switch itself off after a period of inactivity of ca. 5 minutes. (This function can be disabled for continuous operation by setting PWR-off-disable in the adjustment settings menu.) You can also manually switch off the unit by pressing the ON/OFF/ZERO button for ca. -
Page 35: Battery Change
Battery Change The CD-LUX is powered by a 9 Volt alkaline block battery. Proceed as follows to change the battery: • Remove the battery box cover on the bottom of the unit. • To do so, simultaneously depress the spring-loaded buttons located on the right and left sides of the cover. -
Page 36: Usb-Interface
Serial Interface The CD-LUX is equipped with an USB- interface for data output. Please note that you can only use the dedicated data transfer cable which is available as optional equipment! -
Page 37: Sensors
Sensors Two types of sensors may be connected to the CD-LUX unit. The corresponding sensor interface sockets are located on the top of the unit. Each of the respective sensor interface plugs must be connected with the proper socket and fixed in position with the knurled fitting on the on the plug connector. -
Page 38: Luminance Detector
The luminance detector has a measurement range of ca. 0.05 cd/m² to ca. 80,000 cd/m². The detector is connected to the CD-LUX basic unit by means of a plug-and-socket connector on the end of the cable with the corresponding sensor interface socket. - Page 39 ATTENTION! Measurements made without the optical measurement system are incorrect! The hand-held detector is fitted with a spacer leg. It must be used with the detector for all measurements as the optical measurement system has been designed for use at the precise distance from the surface of the image display device or viewing box provided by the spacer leg.
-
Page 40: Illuminance Detector
Illuminance Detector The illuminance detector has a measurement range of ca. 1 lux to ca. 80,000 lux. The detector is connected to the CD-LUX basic unit by means of a plug-and-socket connector with the corresponding sensor interface socket. IMPORTANT! Always connect the illuminance detector with CD-LUX basic unit switched off, otherwise it will not be detected by the software. -
Page 41: Technical Specifications
Technical Specifications Accuracy: per DIN 6856/ 1+2; DIN 6868/157 < 10% (2σ) Accuracy Class: B – per DIN 5032/7 Repeatability: Measurement Ranges: 0.05 - 80,000 cd/m² 1 - 80,000 lux Aperture Angle: 5° Distance - optical system-monitor surface: ca. 13 cm ca. -
Page 42: Important Safety And Handling Informations For Batterys
• Ensure batteries are inserted with the correct pole orientation. "+" and "-" are marked on the batteries. • Switch off the CD-LUX when not in use (to save battery power!). • Do not charge, heat, burn, short circuit or mechanically damage batteries.
Need help?
Do you have a question about the CD-LUX and is the answer not in the manual?
Questions and answers