Table of Contents
Advertisement
Quick Links
Reloading Procedure
SelF SeRvice, Multi-PuRPoSe, ReloAdABle
• After each use, the Eliminator
new CO
cartridge and a new agent cartridge.
2
• Watch the Reloading Procedure video at www.rusoh.com and read this
procedure before reloading the extinguisher.
• Refer to the Owner's Manual for installation, operation, 30-day inspection,
annual inspection, and warranty information.
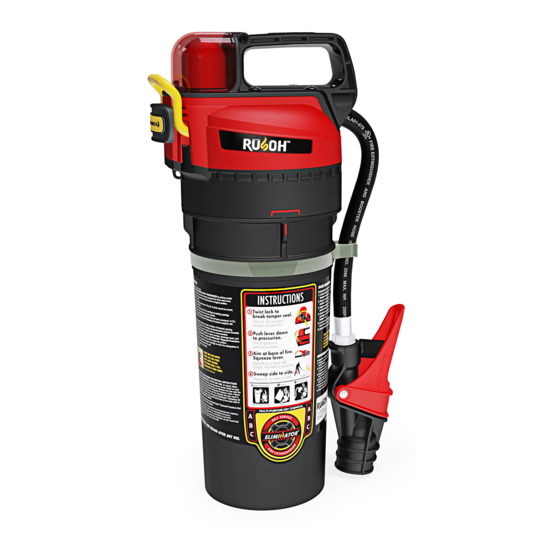
getting AcquAinted
The reloading kit contains a replacement agent cartridge and a special cap
that holds the replacement CO
fully loaded with the dry chemical extinguishing agent. A white dust gasket, a
yellow tamper seal, and a spare red CO
the cap's hinged door (Fig. B).
iMPoRtAnt: Wrench set, PN 81-500, is required for this procedure.
To order, visit rusoh.com.
Handle recess
Hinged door
Agent
cArtridge
Fig. A
SAve thiS ReloAding PRoceduRe FoR FutuRe ReFeRence.
©2017 Rusoh, Inc.
Eliminator
dRy cheMicAl FiRe extinguiSheR
fire extinguisher must be reloaded with a
™
cartridge (Fig. A). The agent cartridge is
2
cO
relOAd
kit cAp
Yellow tamper seal
™
™
cartridge gasket are located under
2
cArtridge
2
White dust
gasket
Hinged door
in open position
Red CO
2
cartridge gasket
Printed in China
For Reloading Model Number
SelF SeRvice 0930001
with Reload Kit 85-994
Fig. B
Form 76-379B
Advertisement
Table of Contents

Related Manuals for Rusoh Eliminator

Summary of Contents for Rusoh Eliminator
- Page 1 For Reloading Model Number Reloading Procedure SelF SeRvice 0930001 with Reload Kit 85-994 ™ Eliminator ™ SelF SeRvice, Multi-PuRPoSe, ReloAdABle dRy cheMicAl FiRe extinguiSheR • After each use, the Eliminator fire extinguisher must be reloaded with a ™ new CO cartridge and a new agent cartridge. • Watch the Reloading Procedure video at www.rusoh.com and read this procedure before reloading the extinguisher. • Refer to the Owner’s Manual for installation, operation, 30-day inspection, annual inspection, and warranty information. getting AcquAinted The reloading kit contains a replacement agent cartridge and a special cap that holds the replacement CO cartridge (Fig. A). The agent cartridge is fully loaded with the dry chemical extinguishing agent. A white dust gasket, a...
- Page 2 Alignment rib Agent Valve lever cArtridge Instruction label VAlVe Assembly Valve nozzle Rusoh ™ fluffing wheel • note: The agent cartridge contains 6 pounds of Eliminator multi-purpose dry ™ chemical extinguishing agent that includes monoammonium phosphate, mica, talc, and amorphous silica (HMIS 1-0-0). The extinguishing agent is nontoxic. • note: The co cartridge is a removable component filled with compressed liquid (HMIS 1-0-3). Refer to www.rusoh.com for the Safety Data Sheets (SDS) for these components. dAngeR! • CO cartridge is under high pressure. Do not puncture or damage CO cartridge.
- Page 3 2. Discard the spent CO cartridge following the Disposal Procedure on page 8. SteP 4 Remove discharge head from agent cartridge. Use the Eliminator wrench set (sold separately) to ™ Fig. e loosen the discharge head from the agent cartridge, as described below: 1. Pull the hose out of the hose clip (Fig. E). 2. Place the cartridge wrench on a level floor* with the textured footrest facing up. Set the bottom of the extinguisher onto the circular portion of the wrench.
- Page 4 In order for the unit to seal properly, Sealing these areas must be clean. If you surfaces notice any caked-on extinguishing agent on these surfaces, use a small brush to loosen it. Inverted discharge head 3. Using compressed air, blow out the discharge head thoroughly. While squeezing the valve lever (Fig. C, page 2) to fully open the valve, blow air from the center of the discharge head through the hose and valve and then in the reverse direction. Refer to the Reloading Procedure video at www.rusoh.com. 4. Install the new dust gasket in the inverted discharge head, as shown in Fig. G. Press around the outer edge of the gasket so it is securely positioned. SteP 7 Inspect unit for damage. 1. Visually inspect the discharge head, hose, and valve assembly. If damage is found, replace components per the Self Service Manual. 2. Check to make sure the puncture lever is operating correctly. With the lock (Fig. C, page 2) in the unlocked (vertical) position, press down on the puncture lever a few times to ensure it moves freely and snaps back into position.
- Page 5 SteP 8 Remove reload kit cap from replacement agent cartridge. Use the Eliminator wrench set (sold separately) to loosen the reload kit cap, ™ per the method described below. iMPoRtAnt: Always keep the agent Fig. h cartridge on a level surface to prevent extinguishing agent from spilling. 1. Place the cartridge wrench with the Handle Reload textured footrest facing up. Set the recess kit cap bottom of the replacement agent cartridge onto the circular portion of Replacement the wrench. agent cartridge 2. Insert the bar wrench in the handle recess on the reload kit cap (Fig. H). 3. Grasp both ends of the bar wrench and place one foot on the footrest.
- Page 6 SteP 9 Attach discharge head to new agent cartridge. WARning! Do not refill or reuse the agent cartridge. It is designed to be factory filled and factory sealed to meet performance specifications. uninstalling and then reinstalling the same agent cartridge will void the warranty. 1. For easier installation, apply a small amount of petroleum jelly to the discharge head sealing surfaces (Fig. G, page 4). Refer to the Reloading Procedure video at www.rusoh.com. 2. Place the discharge head on the agent cartridge. While holding onto the discharge head handle, turn the discharge head clockwise until snug. The turning resistance will become noticeably harder as the large O-ring begins to contact the sealing surface of the discharge head (Fig. G, page 4). Use the bar wrench, if necessary, to fully tighten the unit. When correctly installed, the red alignment rib on the agent cartridge will be within the red alignment marking on the discharge head (Fig. J). noticE: There is a stop tab to prevent overrotation. If you feel the Fig. J unit hit this tab, stop turning the discharge head.
- Page 7 5. Close red cover. SteP 11 Install new tamper seal. Position the new tamper seal so the text is right side up and the Lock snap hooks align with the lock openings Lock in openings. Using two fingers, horizontal gently press the tamper seal Tamper (locked) seal position arrows (Fig. L) until the seal locks into position on both sides of the Fig. l lock. SteP 12 Fluff the agent cartridge. Invert the extinguisher. Turn the Rusoh ™ wheel (Fig. M) on the bottom of the unit back and forth several times until it turns freely. Then turn the wheel about three full rotations. The wheel should turn smoothly. Fig. M...
- Page 8 PRoceduRe ™ dAngeR! If extinguisher is damaged and has not been discharged, do NOT pressurize unit or puncture CO cartridge. iMPoRtAnt: Disposal must be performed in strict compliance with state and local waste disposal policies. Please contact your local waste disposal center, recycling center, hazardous waste authorities, or the Rusoh Customer Service Department at 1-800-318-2944 for details. You can also search Earth911.com for a recycling solution near you. do not dispose of the eliminator fire extinguisher in a regular trash receptacle. ™ 1. If the Eliminator has been used and is undamaged, take it outside to ™ verify that it has been fully discharged. Follow the T-P-A-S-S instructions in your Owner’s Manual, even if you believe that you have previously discharged the unit. Aim the discharge near trees or bushes that have a higher resistance to acidic-type fertilizer. Avoid flowers and grasses. 2. Remove the CO cartridge from the Eliminator discharge head and ™ confirm that it is punctured. If it is not, return cartridge to the unit and repeat the discharge procedure outlined in step 1 above. 3. Place the punctured CO cartridge in any recycling bin that accepts metals.
Need help?
Do you have a question about the Eliminator and is the answer not in the manual?
Questions and answers