Table of Contents
Advertisement
Available languages
Available languages
Quick Links
Advertisement
Table of Contents

Related Manuals for Lorentz PayGo PS2-100


Summary of Contents for Lorentz PayGo PS2-100
- Page 1 User Guide for PS2-100 Retail Solar Pump System PS2-100 PayGo Solar Pump System...
- Page 2 English English Thank you for choosing a LORENTZ pump! This user guide provides information for two versions of the PS2- pump in hotter water will damage Note: The pump is not equipped 100 controller, the retail version and the PayGo version. Sections it irreparably.
-
Page 3: Getting Started
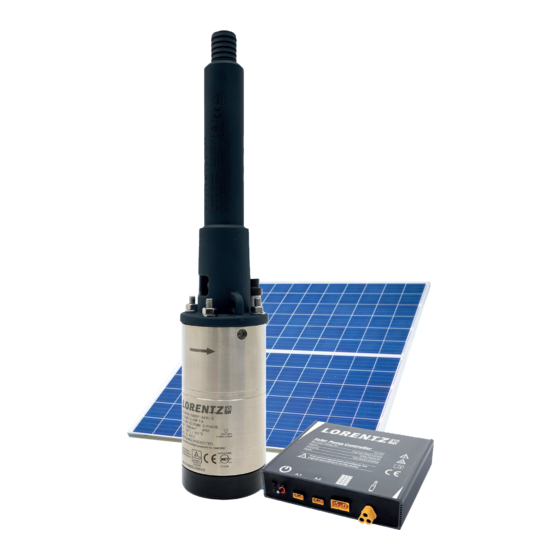
English English Getting started Connection diagram Setting up your pump 1. Connect a hose or pipe to the pump outlet. 2. Fix the controller properly on a wall or the backside of a PV module. Solar Pump Controller 3. Connect the motor cables. Max Input Voltage Voc 50 V DC Output... -
Page 4: Operation
A unique keycode is sent once payment has been 4. The system will run. received. LED indicators Step 3: Connect your LORENTZ PayGo app via Bluetooth with LEDs (lights) on the controller tell you: your controller. The pump is running. Step 4: To turn off... -
Page 5: Troubleshooting
15 min. The issue could also be related to missing jumper cables. Further information can be found on our website under The plugs are wet or have not been inserted properly. https://www.lorentz.de/ps2-100 The controller is too hot and needs to cool down. - Page 6 Français Français Merci d’avoir choisi une pompe LORENTZ! Ce manuel d’utilisateur fournit des informations sur deux ver- mauvaises herbes. Le pompage des accessoires. Les connecteurs sions du contrôleur PS2-100, la version commerciale et la version d’eau à forte teneur en sable MC4 peuvent être utilisés pour...
-
Page 7: Premiers Pas
Français Français Premiers pas Diagramme de connexion Mise en place de votre pompe 1. Connectez un tuyau ou un conduit à la sortie de la pompe. Solar Pump Controller 2. Fixez correctement le contrôleur sur un mur ou à l’arrière d’un Max Input Voltage Voc 50 V DC Output... -
Page 8: Opération
4. Le système fonctionnera. Un code clé unique est envoyé une fois le paiement reçu. Indicateurs LED Étape 3: Connectez votre application LORENTZ PayGo via Blue- Les voyants du contrôleur (LED) vous indiquent: tooth avec votre contrôleur. La pompe fonctionne. -
Page 9: Dépannage
également être lié à des ponts manquants. revendeur auprès duquel vous avez acheté le Les fi ches sont humides ou n’ont pas été insérées correctement. produit / votre distributeur. Le contrôleur est trop chaud et doit refroidir. Trouvez plus d’informations sur notre site web https://www.lorentz.de/fr/ps2-100... - Page 10 Español Español ¡Gracias por elegir una bomba LORENTZ! Este manual del usuario proporciona información para dos ver- extremo de la bomba y no está posibilidades de que el controla- siones del controlador PS2-100, la versión comercial y la versión cubierto por la garantía.
-
Page 11: Primeros Pasos
Español Español Primeros pasos Diagrama de conexión Instalación de su bomba 1. Conecte una manguera o tubería a la salida de la bomba. 2. Fije el controlador correctamente en una pared o en la parte tras- Solar Pump Controller era de un módulo fotovoltaico. Max Input Voltage Voc 50 V DC Output... -
Page 12: Operación
3. Encienda la bomba. do el pago. 4. El sistema funcionará. Paso 3: Indicadores LED Conecte su aplicación LORENTZ PayGo a través de Blue- tooth con su controlador. Los LED (luces) en el controlador le indican: Paso 4: La bomba está funcionando. -
Page 13: Resolución De Problemas
/ su distribuidor. podría estar relacionado con puentes faltantes. Los enchufes están mojados o no se han insertado correctamente. Encuentre más información en nuestro El controlador está demasiado caliente y necesita enfriarse. sitio web https://www.lorentz.de/es/ps2-100... -
Page 14: Your Distributor
Your distributor...
Need help?
Do you have a question about the PayGo PS2-100 and is the answer not in the manual?
Questions and answers