Advertisement
Quick Links
Light My Bricks
Installation Instructions for Light My Bricks LED Lighting Kits
May 23, 2016 · 16 min read
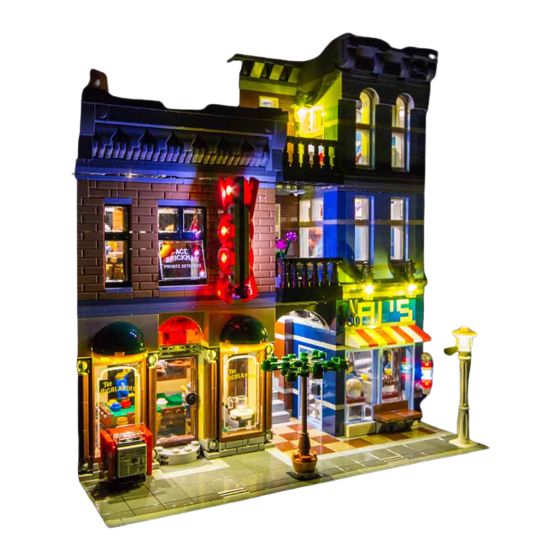
Light My Bricks : Detective's O ce 10246
Light Kit Instructions
The following page is the instructions for the Light My Bricks LEGO
Detective's O ce (10246) Light Kit.
To ensure a trouble-free installation of your light kit, please read and
follow each step carefully.
Please note: This page lists instructions for the
LED light kit only. If you are wishing to purchase
the Light My Bricks LEGO Detective's O
(102461) LED light kit , please click here to view
the product page
Package contents:
6x White Strip Lights
•
. . .
ce
Advertisement

Related Manuals for LIGHT MY BRICKS Detective's O ce 10246


Summary of Contents for LIGHT MY BRICKS Detective's O ce 10246
- Page 1 Light My Bricks : Detective’s O ce 10246 Light Kit Instructions The following page is the instructions for the Light My Bricks LEGO Detective’s O ce (10246) Light Kit. To ensure a trouble-free installation of your light kit, please read and follow each step carefully.
- Page 2 5x White 30cm Bit Lights • 11x Flashing White 30cm Bit Lights • 1x 12-port Expansion board • 1x 8-port Expansion board • 1x 6-port Expansion board • 1x Lamp Post with LED and cable attached • 1x AA Battery Pack (requires 3x AA batteries) •...
- Page 3 CAUTION: Forcing LEGO® to connect over a cable can result in damaging the cable and light. Connecting cable connectors to Expansion Boards Take extra care when inserting connectors to ports of Expansion Boards. Connectors can be inserted only one way. With the expansion board facing up, look for the soldered “=”...
- Page 4 overheating of the expansion board when connected. Connecting cable connectors to Strip Lights Take extra care when inserting connectors to ports on the Strip Lights. Connectors can be inserted only one way. With the Strip Light facing up, ensure the side of the connector with the wires exposed is facing down. If a plug won’t t easily into a port connector, don’t force it.
- Page 5 2.) Replace the original lamp post with the Light My Bricks lamp postensuring that the cable is laid in the middle the 2 studs.
- Page 6 3.) Gently bend the base plate down and lift the building of the groundoor up and thread the cable for the lamp post underneath the brick wall. Ensure that the cable is laid in between the brick studs. 4.) Pull the cable up from underneath the wall and then connect this tothe rst available port of the 8-port expansion board.
- Page 7 6.) Slightly lift up the grey 2x10 Lego piece, and then remove thebarber pole section from underneath.
- Page 8 7.) Disassemble the round Lego pieces which make up the barber poleand then replace them with the Transparent Blue and Red Lego pieces which came with this kit. 8.) Take one of the ashing bit lights and then starting from the bottomsections up, lay it down (LED component facing up) and then connect the rst transparent red light piece on top.
- Page 9 9.) Continue this process with 2 more ashing bit lights for anotherblue and red light, ensuring you lay the cable the exact way as shown in the photo examples. There will be a slight gap between each brick, this is because of the cables and this is OK as this whole section will connect securely under the grey Lego 2x10 brick.
- Page 10 11.) Reconnect the Lego pieces we removed on top of this section andthen plug the 3 cables of the ashing lights into the spare ports on 8port expansion board. Secure the expansion board to the top of the back wall using one of the provided double sided adhesive squares. Remember: You can test out the lighting we have connected so far by simply plugging in the battery pack cable into a spare port of the expansion board and then turning it on.
- Page 11 13.) We will now move onto installing the “down lights” for the front ofthe pool hall. Start by removing the following lego pieces. 14.) Take a standard bit light (non ashing) and lay it down at thebottom of one of the lighting sections in the following position pictured below. Then connect this back into its original position ensuring that the LED light component is clearly visible from underneath.
- Page 12 Ensure that the LED component is facing the correct way before connecting Repeat this process for the 2nd lighting section using another standard bit light then reconnect the Lego pieces we removed in step 15 to their original positions. 15.) Connect the other end of the cables from the 2 LED lights we justinstalled into the spare ports of the 8-port expansion board.
- Page 13 16.) Take a 15cm cable and connect it into a spare port of theexpansion board. We will use this to connect to the strip lights. 17.) Take the entire section of the second oor and ip it over so we caninstall lights to the ceiling.
- Page 14 Take 3 LED strip lights and connect them together using 2x 5cm connecting cables. Stick/connect the lights in the following positions below. We will identify them as striplight#1, striplight#2, and striplight#3. 18.) Take a 15cm cable that we connected earlier to the expansionboard and connect the other end of this to the left port of striplight#1.
- Page 15 19.) Take another 15cm cable and connect this to striplight#3 andthread the other end of this cable up through the spacing which leads to the second oor. 20.) Reconnect the entire second oor on top of the rst oor and thenpull the 30cm cable up from the rst oor.
- Page 16 21.) We will now light up the lamps above the “Al’s” barber sign. Start by removing the following pieces to then allow us to remove the 2 individual lamp sections.
- Page 17 22.) Disconnect the 2 transparent yellow Lego pieces from the lampsections...
- Page 18 Take one of the bit lights and thread the cable from the connector side up through the smaller hole of the transparent yellow Lego piece. Thread this all the way until the bit light part is up against the Lego piece. Reconnect this piece with LED back to the lamp shade ensure cable is facing toward the back and the LED component is facing the correct way down...
- Page 19 Repeat this process for the 2nd lamp shade. 23.) Reconnect the 2 wired lamp sections back to its original positionsensuring the cables for the LEDs are laid between studs. Then reconnect the pieces which make up the windows and the rest of the wall.
- Page 20 25.) Take another 15cm cable and connect it to the next available portof the 6-port expansion board. 26.) Turn the building around to the back side and then use one of theprovided adhesive squares to stick the expansion board on the top of the wall in the following position.
- Page 21 27.) Lay any excess cables from the lamp LEDs underneath lego tiles onthe roof of level 2. When doing so ensure that cables are hidden so they are not obviously visible when looking in from the outside through the windows. 28.) We will now connect ashing LED lights to the “Pool”...
- Page 22 29.) Lay this section down with the arm facing up then remove the 2 red Lego pieces which make up the letter “P”. Lay section down with the handle facing up 30.) Take 1 of the ashing bit lights and lay the LED component partdown in the center of where the “O”...
- Page 23 Take another 2 ashing bit lights and repeat the same step for the 2x letter “O”’s ensuring the LED component part is laid in between the 4x Lego studs and visible in the center. For the letter “L” section, lay the 4th ashing bit light in the top section of the black part closest to the top.
- Page 24 Ensure all cables for the ashing LEDs are facing up toward the handle 31.) Flip the “Pool” sign over as we will now have to lay another 4 ashing bit lights on this side. Take another 4 ashing bit lights and connect them to the sign by laying them in the same positions as we did for the other side of the sign.
- Page 25 32.) We now have a lot of messy cables. Let’s neaten this all up bygrouping them all together which will then allow us to neatly thread this through the window of the Ace Brickman Detective’s O Group the cables and thread them all the way through the window 33.) Connect back the “Pool”...
- Page 26 34.) Turn the building around and then remove the following piece aswe will be placing the 12-port expansion board here.
- Page 27 35.) Place the expansion board in the following position and secure itby using a self adhesive square. 36.) Connect the other end of the 15cm cable from the 6-portexpansion board to a 12-port expansion board. 37.) We need to hide all the cables from the pool sign. Do this bypulling the lot of cables underneath the middle window and then up in between this window and the right window, then up above the expansion board.
- Page 28 38.) Take another 15cm cable and then connect it to a spare port of the12-port expansion board. 39.) Take 2x LED strip lights and then stick/connect them on theceiling of level 2 (underneath the top level) in the following position. We will refer to them as striplight#4 and striplight#5.
- Page 29 40.) Connect the 2 strip lights we just installed to the rest of thelighting circuit by connecting the other end of the 15cm cable from the 12-port expansion board to striplight#4 41.) Take another 15cm cable and connect this to the other end ofstriplight#5.
- Page 30 42.) We will now connect the lamp for the top oor window. Removethe following pieces so that we can remove the lamp section.
- Page 31 43.) Disassemble the lamp section and then using bit light, thread theconnecting end through the small hole on the top of the grey piece. Then thread the cable from the connector side up through the smaller hole of the transparent yellow Lego piece. Thread this all the way until the bit light part is up against the Lego piece.
- Page 32 44.) Reconnect the lamp section back to its original position and thenthread the cable from the lamp down the staircase section as we will need to connect this to the 6-port expansion board on level 2. 45.) Lift and ip over the entire 3rd level on it’s side so that we can pullthe cable from the lamp down from the spacing and then connect this to a spare port on the 6-port expansion board.
- Page 33 47.) Take the roof section of this building and ip it on its side.Stick/connect the nal strip light (striplight#6) in the following position and then connect to it the 15cm cable that we pulled up from the lower level (striplight#5) . 48.) Take the AA Battery pack and insert the attached cable into the leftport of striplight#5.
- Page 34 Reconnect the roof back to it’s original position and place the battery pack on the roof top in the following position. 49.) Turn the building around to the back and hide/secure the batterycable underneath the following Lego bricks.
- Page 35 This nally completes the LED lighting circuit. Your kit is now ready to be turned “ON”. Now turn o your lights, turn on the lighting kit, and enjoy! . . .
Need help?
Do you have a question about the Detective's O ce 10246 and is the answer not in the manual?
Questions and answers