Table of Contents
Advertisement
Quick Links
Advertisement
Table of Contents

Related Manuals for HDigit Sense


Summary of Contents for HDigit Sense
- Page 1 English Instruction Manual Bedienungsanleitung FM/DAB+/Internet Radio...
-
Page 2: Safety Information
English IMPORTANT SAFETY INSTRUCTIONS To reduce the risk of electrical shock, fire, etc.: 1. Read these instructions. 2. Keep these Instructions. 3. Heed all Warnings. 4. Follow all instructions. The lightning flash with arrowhead symbol 5. Do not use this apparatus near water. within an equilateral triangle is intended to alert the user to the presence of uninsulated 6. - Page 3 Sense English 9. Do not defeat the safety purpose of the polarized or grounding - type plug. a polarized plug has two blades with one wider than the other. A grounding type plug has two blades and a third grounding prong. The wide blade or the third prong are provided for your safety.
-
Page 4: Table Of Contents
English Contents Safety Information Chapter 4 Music Player Mode 4.1 Access to Music Player Mode Package Contents 4.2 Shared Media (From UPnP Media Server) 4.3 Repeat/Shuffle Internet Radio Quick Start Guide 4.4 Clear My Playlist What you need before you can use your Internet Radio Unit Overview 4.5 Now Playing Information 4.6 My Playlist... -
Page 5: Package Contents
Sense English Package Contents Main Unit Chapter 7 Aux in Mode 7.1 To Play Audio with Aux in Mode Chapter 8 Alarms 8.1 Setting Alarm Snooze 8.2 Setting Alarms Chapter 9 Settings 9.1 Enter Settings 9.2 Time Settings 9.3 Equaliser Settings Adapter 9.4 Network Settings... -
Page 6: Internet Radio Quick Start Guide
English Internet Radio Quick start Guide What you need before you can use your Internet Radio Before you use your Internet Radio, you need the following: LAN Settings: • Make sure the internet facility is ready and the network settings are available for LAN (ADSL or Cable Modems is highly recommended). •... -
Page 7: Unit Overview
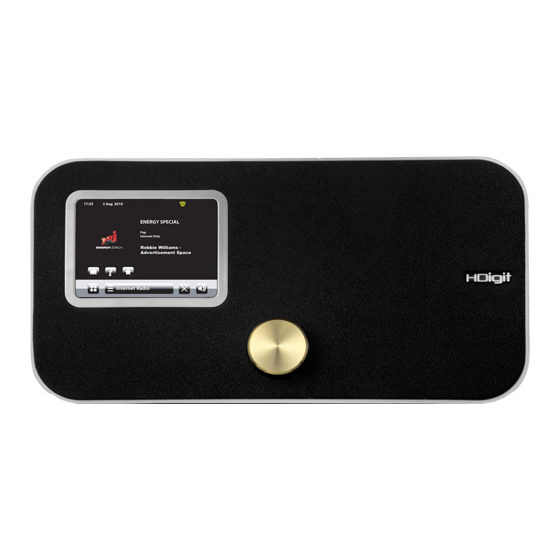
Sense English Unit Overview Unit Front Note: Press the standby/on button to turn the radio on or off, turn this button to adjust the volume level of your radio. - Page 8 English Unit Back Overview Unit Back...
-
Page 9: Chapter 1 Introduction
Sense English Chapter 1 Introduction 1.1 Screens • The screen shows various menus, dialogues and displays, as described below. There are basically six types of screen:: P Menu P Splash (mode) P Now playing P Dialog P Error/Information P Standby (Clock) When the text is too long to fit into the screen, it will be truncated first, then, after a few seconds, slowly scroll the standby/on button so that you can read it all. -
Page 10: The Function/Usage Of Ui Screen Buttons
English 1.2 The Function/Usage of UI Screen Buttons Function/Usage Takes you back to menu screen Stop Close Pause Touch for previous track, or Return to previous screen FM mode: touch to change frequency Touch for next track, or Volume FM mode: touch to change frequency In play mode, this button is used to return to Skip track / Fast forward the last track list or station list... -
Page 11: Character Summary
Sense English 1.3 Character Summary As you touch the icons on the menu screen, it will try to enter the selected mode and start playing the last station or track that was playing in that mode. If this is not successful, your unit will try to connect to the selected source by scanning for stations, networks, or prompting for user input as appropriate. - Page 12 English Each mode has a Mode menu, with options specific to that mode. . DAB to enter the DAB radio mode menu, which has five options: For example, touch Scan, Edit favourites, DRC, Manual tune and Prune invalid stations. The system Settings menu allows access to system settings and information such as Time, Alarms, Equaliser, Network and Miscellaneous settings and Setup Wizard.
-
Page 13: Chapter 2 Getting Start/Setup
Sense English Chapter 2 Getting Start/Setup To play DAB or FM radio, all you need is a power source (a 100-240V mains supply). For Music Player mode, you need a wireless Ethernet network and a UPnP music server (e.g. a PC). - Page 14 English 2. Now it asks you to set Time format: 24h or 12h, touch your preferred format. 3. Now it asks you to Select Time Sync Source: None/Internet/DAB/FM, normally, we select Internet as the preferred option. 4. Now it asks you to Select Time Zone, touch to browse to your local time zone, and then touch your local time zone to confirm.
- Page 15 Sense English 9. If a WEP/WPA key (password) is required, the radio will ask you to input the WEP/WPA code and display the password entry screen as follows: • Touch the alphanumeric character in turn. Note: a. if your password is composed of numbers, then touch to have numbers displayed.
-
Page 16: Shift To Wired Network
English 2.2 Shift to Wired Network Note: Make sure the LAN cable is already connected to the LAN. To enter the LAN Setting, select Screen Menu → Settings > → < Network Settings > → < Manual Settings > → < Add Wired Network > → < DHCP enable > → <Waiting for Ethernet.> later, it will say connected. If your radio failed to access the network, please do the following: a. -
Page 17: Internet Radio Portal Registration
Sense English 2.4 Internet Radio Portal Registration 1. To register your radio, first you need to know your radio’s unique portal access code which you from the main menu > Help > Get access code >. Write down the access code. -
Page 18: Setting Up A Music Server
English 3. If this is your first visit to the portal, register for a new account, entering the following information: P Access Code P Your Email Address P Password P Radio Model (Kicker) If you already have an account and wish to add an additional radio, log in to your account and select My preferences > Add another Wi-Fi radio. -
Page 19: Sharing Media With Windows Media Player
Sense English 2.6 Sharing Media with Windows Media Player The most common UPnP server is Windows Media Player (10 or later). Alternatively, other UPnP platforms and servers may be used. To set up WMP for media sharing, perform the following steps: 1. -
Page 20: Chapter 3 Internet Radio Mode
English Chapter 3 Internet Radio Mode 3.1 Access to Internet Radio Mode When you select the Internet radio mode, the radio will try to connect to the Frontier Silicon Internet radio portal to get a list of stations, organized into different categories like Country, Most popular and Genre. -
Page 21: Last Listened To
Sense English P Browse station list P Return to playing screen P Last Listened To Internet Radio > Browse station List > Menu: From the portal touch the P Favourites List P Your local programs, for example, Local China P Stations: browse by Country, Genre, <Search stations>, popular and New stations... -
Page 22: Browse
English 3.4 Browse Internet Radio icon > Browse Stations list > To browse Internet broadcasts, touch the Stations /Podcasts. Browse through the menus to find broadcasts. 3.5 Search You can also search through Internet broadcasts about stations or podcasts with particular key- words in their title. -
Page 23: My Added Stations
English Sense 3. 3. Select a broadcast from the list. Note: For podcasts, you may able to select a particular episode. 3.6 My Added Stations Even though the Internet radio portal contains thousands of stations, you may want to listen to stations not listed. -
Page 24: Chapter 4 Music Player Mode
English Chapter 4 Music Player Mode 4.1 Access to Music Player Mode P Music player mode plays audio files such as MP3s, AACs, WMAs or FLACs from a computer with the local network. P To enter Music player mode, touch on the main menu and the display shows the Select Music Source screen. -
Page 25: Shared Media (From Upnp Media Server)
Sense English 4.2 Shared Media (From UPnP Media Server) 1. Select My Music > Shared Media. If you have set up shared media (as described on page 16), you should see an entry consisting of <computer name>: <Shared media name>, for example JB-Laptop: Audio. If you have more than one computer sharing media, the alternatives are listed. -
Page 26: Repeat/Shuffle
English 4.3 Repeat/Shuffle You can repeat tracks or play them in random order by touching the repeat or shuffle Altenatively: My Music > Repeat > ON a. or touch the My Music > Shuffle > ON b. or touch the 4.4 Clear My Playlist My Music icon to enter its setting menu, and then touch Clear My Playlist >Yes Touch the... -
Page 27: Chapter 5 Dab+/Dab Mode
Sense English Chapter 5 DAB+/DAB Mode 5.1 Access to DAB+/DAB Mode DAB mode receives DAB/DAB+ digital radio and displays information about the station, stream and track playing. To enter DAB mode, touch on the screen menu. When entering DAB mode, the last-listened station is automatically selected. -
Page 28: Convert To Another Station
English 5.3 Convert to another Station While a program is playing, this can be achieved simply by touching to the previous or next station. 5.4 Presets Station as Favourite Hint: IInternet, DAB and FM, each of them can preset up to 10 stations, and their setting methods are alike, below we demonstrate how to operate this for DAB/FM mode. -
Page 29: Now Playing Information
Sense English 5.6 Now Playing Information While the stream is playing, the screen shows its name and DLS (Dynamic Label Segment) information broadcasting by the station providing real-time information such as program name, track title and contact details. Stereo broadcasts are indicated with an icon at the top of the screen. -
Page 30: Chapter 6 Fm Mode
English Chapter 6 FM mode 6.1 Access to FM Mode FM radio mode receives analogue radio from the FM band and displays RDS (Radio Data System) information about the station and show (where broadcast). on the screen menu. To enter FM mode, touch 6.2 Seek Automatically Note: before executing this, it is recommended to make a scan setting which indicates the next page ! -
Page 31: Scan Settings
Sense English 6.5 Scan Settings P By default, FM scans stop at any available station. This may result in a poor signal-to-noise ratio (hiss) from weak stations. P To change the scan settings to stop only at stations with good signal strength, touch FM >... -
Page 32: Chapter 7 Aux In Mode
English Chapter 7 Aux in Mode Aux In mode plays audio from an external source such as an MP3 player. 7.1 To Play Audio with Aux in Mode 1. Turn the volume low on the radio and, if adjustable, the audio source device. 2. -
Page 33: Chapter 8 Alarms
Sense English Chapter 8 Alarms There are two versatile wake-up alarms with a snooze function, and a sleep function to turn the system off after a set period. 8.1 Setting Alarm Snooze The default snooze duration time is 1minutes. To change, Screen Menu > Settings >... -
Page 34: Chapter 9 Settings
English When the set time is reached, the alarm will sound. The screen shows that activated alarm with an icon at the top left of the screen, while the alarm is sounding: a. To activate the snooze function, touch snooze . The radio returns to standby according to the set period, with silenced alarm icon flashing and countdown snooze time. -
Page 35: Time Settings
Sense English 9.2 Time Settings A range of time settings are available, which include the functionality to set: P Time zone P Use daylight savings time P Setting the time source. E.g. None, Internet, DAB, or FM-RDS P Manual set-up P Time format 9.3 Equaliser Settings... -
Page 36: Network Settings
English 9.4 Network Settings P This unit can remember the last wireless networks it has connected to, and automatically try to connect to whichever can be found. P If you want to delete unwanted networks or do a network Wizard (rescan network), please follow the steps below: Screen Menu >... -
Page 37: Sleep
Sense English 9.7 Sleep Note: You may want your radio to turn off after a pre-defined period of time, setting sleep can easily achieve this for you.. 1. The default Sleep is OFF. To change, Screen Menu > Settings > Miscellaneous settings >... -
Page 38: Check For Updates
English CAUTION Before starting a software upgrade, ensure that Jupiter 8 is plugged into a stable mains power connection. Disconnecting power during a software update may permanently damage the unit To turn automatic checking on or off, touch the Settings menu icon > Miscellaneous Settings > Software update > then set it to Enabled. -
Page 39: Factory Reset
Sense English 9.12 Factory Reset A factory reset resets all user settings to default values, so time/date, network configuration and presets will be lost. However, the radio’s current software version is maintained, as is registration with the Internet radio portal. Internet radio favourites therefore remain unless you re-register your radio with another account on the portal website. - Page 40 Instruction Manual FM/DAB+/Internet Radio...
Need help?
Do you have a question about the Sense and is the answer not in the manual?
Questions and answers