Table of Contents
Advertisement
Contents
1
1.1
1.2
2
3
3.1
3.2
3.3
3.4
4
4.1
5
5.1
5.2
5.3
5.4
5.5
5.6
5.7
6
6.1
6.2
6.3
6.4
6.5
7
8
9
10
10.1
11
Certified by OneDoc A.620.107 Rev.04-MU 24/145 #1061394
Danieli Automation Standard - Installation Use and Maintenance Manual - ID2202
INFRARED PHOTODETECTOR
Installation, use and maintenance manual
ID2202
Installation, use and maintenance manual
24
24
24
25
26
26
27
29
29
31
31
32
32
32
32
35
36
36
36
38
38
38
38
38
39
40
40
40
41
41
42
23
Advertisement
Table of Contents

Related Manuals for Danieli Automation ID2202

Summary of Contents for Danieli Automation ID2202
-
Page 1: Table Of Contents
EPLACING THE OPTICAL WINDOW ROUBLESHOOTING CONTENT OF THE PACKAGE SUPPLIED SPARE PARTS / ACCESSORIES ACCESSORIES ADDITIONAL INFORMATION 10.1 VERALL IMENSIONS TECHNICAL ASSISTANCE Certified by OneDoc A.620.107 Rev.04-MU 24/145 #1061394 Danieli Automation Standard - Installation Use and Maintenance Manual - ID2202... -
Page 2: Introduction
PERATING RINCIPLE The ID2202 uses an IR sensor to measure the quantity of infrared radiation that is present in its field of view. A digital output is activated in the presence of hot material, or when the output signal of the sensor IR exceeds a threshold value, which can be set by a potentiometer. -
Page 3: Technical Specifications
IP66 (NEMA 4X) Dimensions (not including connectors) 266 x 180 x 64 mm (10.5” x 7.1” x 2.5”) Weight 1.7 kg (3.7 lb) Certified by OneDoc A.620.107 Rev.04-MU 26/145 #1061394 Danieli Automation Standard - Installation Use and Maintenance Manual - ID2202... -
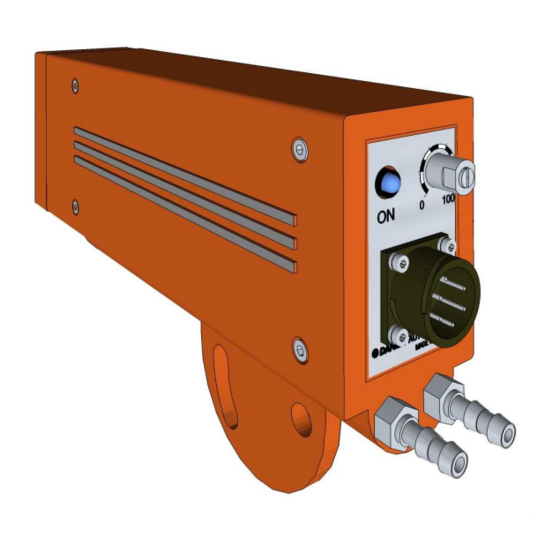
Page 4: Description
DESCRIPTION XTERNAL APPEARANCE The container of photodetector ID2202 (1), made of pressure-cast aluminium, is equipped with a semi- circular support plate (2) that allows its fastening and orientation on the vertical plane within an angle of about 30° , and incorporates a circuit for liquid co oling (3), to be supplied with water or other refrigeration fluids based upon the working environmental conditions. -
Page 5: Electrical Interface
Presence of material, digital output PNP HEALTHY Reliable detection, digital output PNP TEST Test, digital input SSEL Sensitivity selection, digital input 4. Circular connector Electrical connections Certified by OneDoc A.620.107 Rev.04-MU 28/145 #1061394 Danieli Automation Standard - Installation Use and Maintenance Manual - ID2202... - Page 6 SSEL – sensitivity selection It is possible to select the “coarse” sensitivity of the detector ID2202 by activating or not the SSEL digital input, that is to say connecting it or not to the power supply. The potentiometer located on the rear panel provides the fine control.
-
Page 7: Sensitivity Control Potentiometer
The LED allows the operator, provided with an electric torch (with filament lamp) to identify where the ID2202 field of view is. The operator comes in front of the HMD and moves the torch (aimed at the HMD) in the area where it is assumed the HMD’ field of view is. Sighting can be precisely identified by the corresponding switching on of the LED. - Page 8 Danieli Automation – ID2202 The following table summarises the signals of the rear LED. Certified by OneDoc A.620.107 Rev.04-MU 31/145 #1061394 Danieli Automation Standard - Installation Use and Maintenance Manual - ID2202...
-
Page 9: Replacing Id2000 And Id2200 Models
To enable the test function, it is necessary that ID2000 and ID2200 apply a 24V between the pins F and E. In ID2202, instead, the test function is enabled by applying 24V just on pin F, whilst pin E is used as input for selecting the SSEL sensitivity. -
Page 10: Installation
Example The ID2202 must be installed to detect a material with minimum temperature of 480° C, and a minimum dimension of 10mm. What is the ideal distance for installation? Should ID2202 detect “low” temperatures, it must be set with high sensitivity (SENS = HI). - Page 11 Installation, use and maintenance manual 7. Maximum distance of use varies according to the rolled product’s temperature and dimension. 8. Angle of horizontal reading Certified by OneDoc A.620.107 Rev.04-MU 34/145 #1061394 Danieli Automation Standard - Installation Use and Maintenance Manual - ID2202...
- Page 12 9. Material detection field in relation to distance The ID2202 is normally installed to the side or above the rolling line. Avoiding a down to top orientation would be better because dust and scale could soil the optical window, preventing its correct operation.
-
Page 13: Protection From Light Radiation
Correct installation shown in fig. 10: the observation field of ID2202 is from top to down, while a screen protects it from external light sources. -
Page 14: Cooling
Danieli Automation – ID2202 NOTE: if set to “LOW sensitivity” (instead of "HIGH"), the detection threshold is higher, and the ID2202 is able to operate in conditions of greater background light. ATTENTION ! The presence of reflective surfaces within the reading field of the ID2202 (for example ducts or rolls) may cause uncertainties in the reading, and are therefore to be avoided. - Page 15 Installation, use and maintenance manual Especially when the ID2202 is set to high sensitivity, it could be useful, anyway, to act on the adjusting potentiometer, for instance in the occurrence of false detection, or when, in the absence of the bar, the red LED flashes to indicate that the signal level is near the threshold value.
-
Page 16: Maintenance
Carry out the operations above in reverse order, paying particular attention to the assembly of the seal located between the glass and the detector. Certified by OneDoc A.620.107 Rev.04-MU 39/145 #1061394 Danieli Automation Standard - Installation Use and Maintenance Manual - ID2202... -
Page 17: Troubleshooting
If the Self-Test does not work: check that the power supply is present, check the connector, check the external cabling. Certified by OneDoc A.620.107 Rev.04-MU 40/145 #1061394 Danieli Automation Standard - Installation Use and Maintenance Manual - ID2202... -
Page 18: Content Of The Package Supplied
Protection glass 3985000035 Connection cable, L=2m (6.6 ft) 5331000239 ACCESSORIES Description Code D.A. Cooled protection 5915000475 Front protection with air cleaning 5915000450 Certified by OneDoc A.620.107 Rev.04-MU 41/145 #1061394 Danieli Automation Standard - Installation Use and Maintenance Manual - ID2202... -
Page 19: 10 Additional Information
VERALL IMENSIONS Figure 13 shows the overall dimensions of the photodetector. Figure 14 shows an example of construction of a support, designed to contain and protect the ID2202 photodetector. 13. Dimensions of the detector (DIN reference mm) Certified by OneDoc A.620.107 Rev.04-MU 42/145 #1061394... -
Page 20: 11 Technical Assistance
Contact the customer assistance office by phone, fax or e-mail: tel: +39 0432 518999 fax: +39 0432 518188 e-mail: service@dca.it Certified by OneDoc A.620.107 Rev.04-MU 43/145 #1061394 Danieli Automation Standard - Installation Use and Maintenance Manual - ID2202...
Need help?
Do you have a question about the ID2202 and is the answer not in the manual?
Questions and answers