
Related Manuals for Chicco Close to you SE


Summary of Contents for Chicco Close to you SE
- Page 1 Read all instructions BEFORE assembly and USE of product. KEEP INSTRUCTIONS FOR FUTURE USE. Bedside Bassinet Owner's Manual IS0197E_01 ©2020 Artsana USA, INC. 06/20 www.chiccousa.com...
- Page 2 • Do not use accessories, spare parts, • SUFFOCATION HAZARD - Infants or any component not supplied or have suffocated: approved by Chicco as they may • In gaps between extra padding and make the product unsafe. side of the bassinet, and •...
-
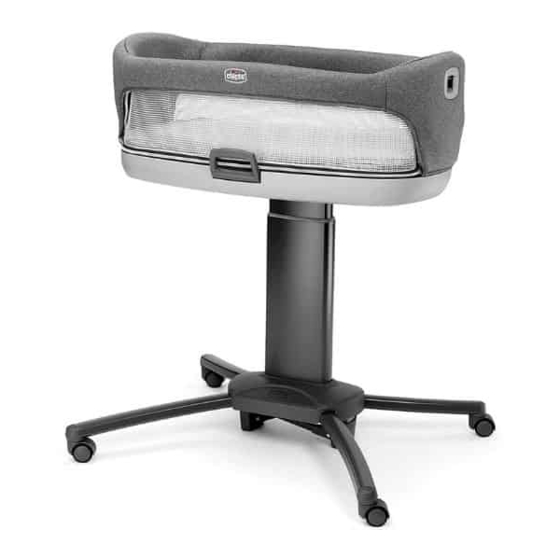
Page 3: Parts List
Parts List A. - Base B. - Front Legs (long) C. - Rear Legs (short) D. - Base Cover... - Page 4 Parts List E. - Bassinet Support F. - Bassinet Floor and Fabric G. - Bassinet Rails H. - Mattress...
- Page 5 How to Assemble the Bedside Bassinet WARNING Before use, remove and dispose of any plastic bags and keep them out of reach of children to avoid the danger of suffocation. Failure to follow these warnings and instructions could result in serious injury or death. This product requires adult assembly.
- Page 6 How to Assemble the Bedside Bassinet “CLICK!” “CLICK!” 1A. Attach a long Front Leg (B)to base as shown, then attach other Front Leg. Pull on both Front Legs to make sure they are secure. Note: Each leg will only fit to the correct attachment post.
- Page 7 How to Assemble the Bedside Bassinet “CLICK!” “CLICK!” 1B. Attach a short Rear Leg (C ) to base as shown, then attach other Rear Leg. Pull on both Rear Legs to make sure they are secure.
- Page 8 2A. Line up the tab on the base to the cutout on the Base Cover. Slide the Base Cover onto the Base. Make sure that the Chicco logo is on the same side as the Front Legs (B), as shown. 2B. Push down on the Base Cover...
- Page 9 How to Assemble the Bedside Bassinet 3. Locate the large square openings on the front side (with the longer legs) of the base, insert the Bassinet Support into the Base, as shown. Pull on the Bassinet Support to make sure it is secure.
- Page 10 How to Assemble the Bedside Bassinet 4. To attach both sections of the Bassinet Rails together, line up the Bassinet Rail ends. Then slide the male end down into the grooves, as shown.
- Page 11 How to Assemble the Bedside Bassinet 5A. Grasp both sections of the Bassinet Rails together and line up the Rail ends with the Bassinet posts. 5B. Slide the Bassinet Rail ends onto the Bassinet posts, and push down until they click into place.
- Page 12 How to Assemble the Bedside Bassinet 6. Pull the Bassinet fabric up and over the top of the Bassinet Rails. On one side of the Bassinet, locate both ends of the zipper, and zip it together. Repeat for the other side.
- Page 13 How to Assemble the Bedside Bassinet 7. Tuck the ends of the zippers behind the fabric and post. Insert the fabric tabs into the groove of the Bassinet Base as shown.
- Page 14 How to Assemble the Bedside Bassinet 8A. Locate the two openings on bottom of the Bassinet and the 2 metal pins on top of the Base. Make sure that the openings a, b and pins 1, 2 are oriented as shown. Bottom Bassinet View 8B.
- Page 15 How to Assemble the Bedside Bassinet 9. Lock the Bassinet onto the Base. Turn the four (4) locks on the bottom of the Bassinet in the direction of the arrow until they click into place and cover the end of “CLICK!”...
- Page 16 How to Assemble the Bedside Bassinet WARNING FALL HAZARD - To help prevent falls, stop using the bassinet when infant begins to push up on hands and knees or weighs over 20lbs. (9kg), whichever comes first. 10. Insert the mattress into the Bassinet, as shown.
- Page 17 Using the Bedside Bassinet 11A. To raise the Bassinet, pull up on the Bassinet, as shown. After reaching desired height, push down on the Bassinet to make sure it is secure. 11B. To lower the Bassinet, locate both levers on the back of the Bassinet.
- Page 18 Bedside Bassinet Mode 12A. To use in the Bedside Bassinet Mode. Raise the Bassinet above the top edge of the mattress. Move the Bassinet over the mattress and up to the side of the bed. Adjust the Bassinet down until the front bottom edge of the Bassinet is slightly above the top of the mattress.
- Page 19 Bassinet Mode WARNING DO NOT use this product to transport child from room to room. 13. To use in the Bassinet Mode. Move the Bassinet to your preferred location. Adjust the Bassinet to the desired height.
-
Page 20: Wheels And Brakes
Wheels and Brakes 14. To apply the brakes, lower the wheels locking levers. To release the brakes raise the wheels locking levers. - Page 21 Softgoods Removal 15A. To remove the fabric, pull out the fabric tab tucked into the Bassinet base on one end. Repeat for the other side. 15B.Undo all 4 zippers, 2 on each side, as shown.
- Page 22 Softgoods Removal 15C. Remove the fabric from the Bassinet frame. 15D. The Mattress fitted sheet can be washed. Slip the fitted sheet over the edges of the Mattress pad and remove. Reverse this step to slip the fitted sheet onto the Mattress pad.
- Page 23 Softgoods Removal 16A. To re-attach the fabric, make sure the logo faces the front handle. Pull the edges of the fabric around the top rails. 16B. Redo all 4 zippers (2 on each side) and tuck the zipper ends behind the fabric.
-
Page 24: Cleaning And Maintenance
Periodically check the bassinet for loose screws, worn parts, torn material or stitching. Replace or repair the parts as needed. Use only Chicco replacement parts. Keep the bassinet in a dry place. If bassinet becomes wet open bassinet and allow to dry completely. - Page 25 For More Information If you have any questions or comments about this product, or are missing any of the parts please do not return this product to the store. Contact us in one of the following ways: (877)-424-4226 info.usa@artsana.com www.chiccousa.com 1826 William Penn Way Lancaster, PA 17601...
- Page 26 www.chiccousa.com...
Need help?
Do you have a question about the Close to you SE and is the answer not in the manual?
Questions and answers