Table of Contents
Advertisement
Quick Links
EPFL Center of MicroNanoTechnology
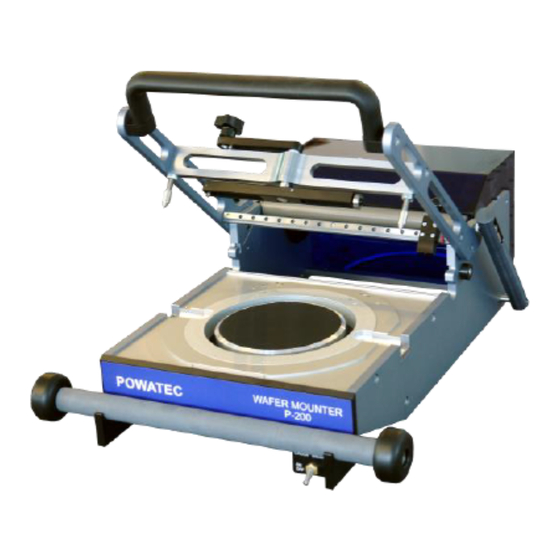
Wafer mounting with POWATEC P‐200 and U‐200
The P‐200 from Powatec is a manual wafer mounter fitted with dedicated frames, cutter devices and
pad roller enabling bubble free mounted wafers or chips onto UV‐sensitive tape. To do this, proceed
as follows:
1‐ Make sure the machine is plugged in. A green square light should be visible through the lid.
This enables correct functioning of the motor driven UV‐tape rollers.
2‐ Place a frame, adjusting its position with the 4 alignment screws present on the system.
Small magnets ensure firmness of steel frames.
Note: if using 6'' frames (!!not usable with the grinder!!), a size adapter is to be placed first.
CMi / Wafer mounting with POWATEC P‐200 and U‐200
Wafer mounter P‐200
Plug the machine in
Green light
Adapter for 6'' frames
Page 1/6
Advertisement
Table of Contents

Related Manuals for POWATEC P-200

Summary of Contents for POWATEC P-200
- Page 1 EPFL Center of MicroNanoTechnology Wafer mounting with POWATEC P‐200 and U‐200 Wafer mounter P‐200 The P‐200 from Powatec is a manual wafer mounter fitted with dedicated frames, cutter devices and pad roller enabling bubble free mounted wafers or chips onto UV‐sensitive tape. To do this, proceed as follows: 1‐ Make sure the machine is plugged in. A green square light should be visible through the lid. This enables correct functioning of the motor driven UV‐tape rollers. Green light Plug the machine in 2‐ Place a frame, adjusting its position with the 4 alignment screws present on the system. Small magnets ensure firmness of steel frames. Note: if using 6’’ frames (!!not usable with the grinder!!), a size adapter is to be placed first. Adapter for 6’’ frames CMi / Wafer mounting with POWATEC P‐200 and U‐200 Page 1/6 ...
- Page 2 EPFL Center of MicroNanoTechnology Adapter for 6’’ frames 3‐ For wafer mounting: place your wafer on the vacuum chuck. The side to be ground later is facing down. Then activate the vacuum. Using the screw nut located below the chuck, adjust the height of the wafer so it is on the same level as the frame. Use the manual rolling pad to check visually. For chips mounting: lower the chuck height as much as possible. The chips will be placed manually on the tape, only after this latest is fully stuck on the frames and cut (i.e. last step of the present procedure). Place your wafer Activate the vacuum Adjust the height Check visually 4‐ Using both hands, pull on the extremity of the UV tape to release it from the roll. Keep pulling until passing over the full frame and being able to stick it to the other end of the system. Pull the tape Stick it to the black bar CMi / Wafer mounting with POWATEC P‐200 and U‐200 Page 2/6 ...
- Page 3 EPFL Center of MicroNanoTechnology 5‐ Use the manual rolling pad to nicely stick the tape to the wafer + the frame. One single pass is enough. Keep rolling until reaching the roll the tape was initially stuck to. Note: if the wafer is higher than the frame, you may need to adjust the tape sticking manually. Roll all the way up Adjust manually if needed 6‐ Lower the cutting system. First, cut the top part of the tape by gently pressing down the blade and going back and forth on the track. Then, cut the whole periphery of the frame using the circular cutting blade. Cut the top part Cut the periphery 7‐ Lift the cutting system back up. Using one hand to hold the frame steady against the machine, use the other one to remove the cut part of the tape. Remove tape CMi / Wafer mounting with POWATEC P‐200 and U‐200 Page 3/6 ...
- Page 4 EPFL Center of MicroNanoTechnology 8‐ Turn the vacuum off and get your frame ready for grinding. Stop the vacuum Get the frame 9‐ Only for chips mounting: manually stick the chips on the tape (side to be ground facing up!). Any location on the available tape area is usable. CMi / Wafer mounting with POWATEC P‐200 and U‐200 Page 4/6 ...
- Page 5 EPFL Center of MicroNanoTechnology UV curing U‐200 The U‐200 from Powatec is a manual UV irradiation system fitted with 31 LED’s (310mW @ 365nm). It is used to cure UV‐tape to ensure easy and safe removal of thin workpieces. 1‐ Open the cover lid and adjust the speed at which the workpieces will pass through UV irradiation. For very thin workpieces, the slower the better. This enables full curing of the tape. Adjust speed 2‐ Put the frame on the left part of the machine. Sticky part of the tape is facing up (wafer on top). Close the lid and start the system pressing the green button. Wait for the frame to reach the right end part of the travel. Place the frame Switch on Sticky part up! Let it travel Get the frame out CMi / Wafer mounting with POWATEC P‐200 and U‐200 Page 5/6 ...
- Page 6 EPFL Center of MicroNanoTechnology 3‐ Stop the machine by pressing on the green button once again. Get the frame out and close the lid. Release the frame first and then get the workpieces. After UV irradiation, the tape is not usable anymore. Switch off Release the frame Release the sample CMi / Wafer mounting with POWATEC P‐200 and U‐200 Page 6/6 ...
Need help?
Do you have a question about the P-200 and is the answer not in the manual?
Questions and answers