Table of Contents
Advertisement
Quick Links
Advertisement
Table of Contents

Subscribe to Our Youtube Channel
Related Manuals for YAMIT AF-9800 Series

Summary of Contents for YAMIT AF-9800 Series
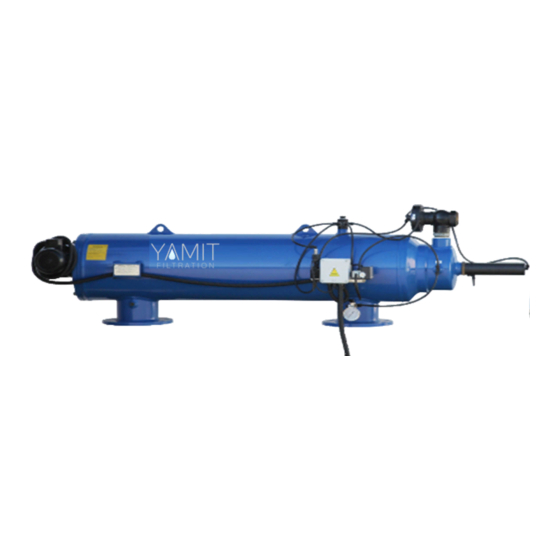
- Page 1 ENGLISH AF-9800 Series Electric Hydraulic Self-Cleaning Screen Filter SERVICE & MAINTENANCE MANUAL YAMIT Filtration & Water Treatment Ltd. PO BOX 232 Moshav Tnuvot , 4283000 Israel Tel: +972-4-6220006 / e-mail: yamit@yamit-f.com / www.yamit-f.com...
-
Page 2: Table Of Contents
ELI 02 Controller & Electrical Wiring Control Loops Drawing Baccara AC Control Loops Drawing Galsol AC International Warranty ALL RIGHTS RESERVED, THIS MANUAL AND THE INFORMATION CONTAINED ARE NOT ALLOWED TO BE USED WITHOUT WRITTEN PERMISSION FROM YAMIT Filtration & Water Treatment Ltd. -
Page 3: Introduction
YAMIT or agriculture, municipal water and sewage systems, and all types of industrial applications. All products manufactured by YAMIT are easy to install, use and service and don’t require special skills to operate them. -
Page 4: Description & Operation
The AF-9800 Hydro electric self-cleaning screen filter enables high quality filtering at filtering degrees of 10-3000 micron from different types of fluid sources such as sewage, reservoirs, rivers, lakes, and wells. The AF-9800 SERIES filter contains the following parts: Flushing chamber INLET... - Page 5 AF9800 Filter Operation General Description Filtration Water enters the filter through the “Inlet” (1) and passes through the coarse screen (2) that functions as a “first stop” for rough particles. Water then reaches the fine screen (3), which further purifies the flow by separating smaller particles from the water.
-
Page 6: Technical Data
AF9800 4. Technical Data Standard Features • Minimum operating pressure: 1.5 bar (21.8 psi) • Maximum operating pressure: 10 bar (145 psi) • Clean filter pressure loss: 0.1 (2 psi) • Maximum water temperature: 65°C (149°F) • Filtration range: 50-3000 micron •... - Page 7 AF9800 Flow Rate Int/Outlet Flushing Flushing Max. Flow Rate Screen area Model ØD Flow rate Volume (m3/h) (gpm) ) (in (mm) (in) (m3/h) (gpm) (m³) (gal) AF9810X 1760 8410 1304 0.0833 22.0 2640 11710 1815 22.0 AF9812R 0.0833 AF9814R 3960 12990 2013 0.0833...
-
Page 8: Initial Installation & Operation
AF9800 5. Initial Installation & Operation General The filter assembly is protectively packed with all parts assembled. Installation Take the filter assembly out of the wood platform. Install the filter assembly to the inlet line and outlet line. Connect a drainpipe to the hydraulic flushing valve outlet opening (at least 63 mm or 2”... - Page 9 AF9800 Initial Operation Gradually open the inlet valve (make sure that the outlet valve, if installed, is open). Check the filter assembly and its connections for leaks. Perform a flushing cycle by disconnecting the low pressure tube from the differential pressure indicator (closing of the electrical circuit) – re connect it immediately as flushing start.
-
Page 10: Maintenance & Periodical Checking
AF9800 6. Maintenance & Periodical Checks 6.1 – Electric Motor Removal & Installation Close the inlet and the outlet line valves. Set the main switch at the control panel to "0" position. Verify that filter is drained prior to service. A qualified technician will carry out the electrical connections. -
Page 11: Solenoid Removal & Installation
AF9800 6.2 - Solenoid Removal & Installation The solenoid hydraulically controls the flushing valve's operation. 1. Remove the upper cover, disconnect and remove the 4 x 1.5V batteries. 2. Disconnect the solenoid control tubes. 3. Remove the fittings from the damaged solenoid. 4. -
Page 12: Dp Indicator Removal & Installation
AF9800 6.3 – DP Indicator Removal & Installation The differential pressure indicator supplies data to the electronic control unit, which controls the filter's self-cleaning process. 1. Set the main switch at the control panel to "0" position. 2. Close the inlet and outlet valves of the filter and verify that filter is drained prior to service. -
Page 13: Hydraulic Piston Assembly Removal & Installation
AF9800 6.4 – Hydraulic Piston Assembly Removal & Installation The hydraulic piston enables the linear movement of the dirt collector. Set the main switch at the control panel to "0" position. Close the inlet and outlet valves of the filter and verify that filter is rained prior to service. -
Page 14: Coarse Screen Removal & Installation
AF9800 6.5 - Coarse Screen Removal & Installation 1. Close the inlet and the outlet line valves. 2. Set the main switch at the control panel to "0" position. 3. Verify that filter is drained prior to service. 4. Remove the nuts and washers attaching the cover to the filter housing. 5. -
Page 15: Fine Screen Assembly Removal & Installation
AF9800 6.6 - Fine Screen Assembly Removal & Installatione 1. Close the inlet and the outlet line valves. 2. Set the main switch at the control panel to "0" position. 3. Verify that filter is drained prior to service. 4. Remove the nuts and washers attaching the cover to the filter housing. 5. - Page 16 AF9800 Figure 9: Fine Screen Assembly Removal & Installation...
-
Page 17: Dirt Collector Removal & Installation
AF9800 6.7 - Dirt Collector Removal & Installation 1. Close the inlet and the outlet line valves. 2. Set the main switch at the control panel to "0" position. 3. Verify that filter is drained prior to service. 4. Remove the nuts and washers attaching the cover to the filter housing. 5. - Page 18 AF9800 Figure 10: Dirt Collector Removal & Installation...
-
Page 19: Periodical Checking
AF9800 6.8 - Periodical Checks Perform yearly Periodical Checks at the beginning of the season, according to the following instructions: 1. Check the condition of the coarse screen. If defective, replace according to "Coarse Screen Removal & Installation". 2. Check the condition of the fine screen assembly. If defective, replace according to "Fine Screen Assembly Removal &... - Page 20 AF9800 Figure 10: Periodical Checks...
-
Page 21: Ipb
AF9800 7. IPB... - Page 22 AF9800 Filters Catalogue No Part Breakdown Filter body AF9800 AF9800 Filter cover AF9810X 5311400100 U-Ring for Cover 16" AF9812R AF9814R 5311450100 U-Ring for Cover 18" AF9816R AF9816X 5311600100 U-Ring for Cover 24" AF9818X AF9810X AF9812R 5292183001-073 Stud 3/4"NC*73 SS304 AF9814R AF9816R AF9816X 5292183001-080...
- Page 23 AF9800 IPB No Filters Catalogue No Description AF9810X 4081266100-450 O-Ring 450 AF9812R AF9814R 4081291100-452 O-Ring 452 AF9816R AF9816X 4081380100-459 O-Ring 459 AF9818X AF9810X E5006600100-01##-02 Fine screen Upper Section PVC280 ASSM A9810R-12R AF9812R AF9814R E5007600100-01##-02 Fine screen Upper Section PVC315 ASSM AF9814R-16R AF9816R AF9816X E5008600100-01##-02...
- Page 24 AF9800 IPB No Filters Catalogue No Description AF9803 5113610104 Dirt collector 2" UPPER PLUG AF9800 AF9810X AF9812R AF9814R 5131391708 Dirt collector shaft 17mm AF9810X-16X AF9816R AF9816X AF9818X AF9800 5113390301 Dirt collector 2" middle plug AF9800 AF9810X-18 4102043002-019 Attachmetn screw NC10*3/4" SS304 AF9810X 5121610305 Suction nozzle AF9810R-12R...
-
Page 25: Appendix
AF9800 8. Appendix 8.1 –ELI 02 Controller & Electrical Wiring ( V-08-2019) Warning - Do not operate the system without checking the motor rotation. Summary of Abbreviations DP = Differential pressure switch which measures the differential pressure across the filter, And activates the flushing mechanism above a set point. (Normally set to 0.5 bar) SV = Flushing solenoid , Which activates the flush filter hydraulic mechanism. - Page 26 AF9800 A. PANEL CONTROLS DESCRIPTION. 1. MAIN , Toggle switch 0-1. Enable Connection of the MAIN voltage supply to the control unit. Light indicator (Green) – indicates 24VDC internal supply. 2. FLUSH , Push-button switch (Yellow) , Enable manual flushing. Note that FLUSH indicator will lit during flushing process.
- Page 27 AF9800 INSTALLATION General – The control unit & Filter junction box are supplied with 5 meters cables in flexible conduit. The user must connect only the line supply cable through a PG-13.5 mm conduit. Requirements : 5 x 1-1.5mm supply cable. 1.
- Page 28 AF9800 E. FLUSHING PROCESS. General – A Filter flush cycle is activated by the PLC which cause the flushing solenoid (SV) and the motor (M) to switch on for preset time (TF). When the solenoid is in ON position , hydraulic command is applied to the filter flushing Valve causing it to open while the hydraulic piston starts it’s movement across the screen.
- Page 29 AF9800 F - CROUZET – XD-10 Controller The first LCD display to appear is the Input/Output image table and the Real Time clock. An i/o no. indicates inactive i/o while a darkened i/o no. indicates an active i/o. - PLC inputs display. - PLC outputs display.
- Page 30 AF9800...
- Page 31 AF9800 F. ELECTRICAL DRAWINGS.
- Page 32 AF9800...
- Page 33 AF9800 FPLC RESET FAULT FLUSH COMMON REMOTE FOUT FAULT FLUSH...
-
Page 34: Control Loops Drawing Baccara Ac
AF9800 400mm... -
Page 35: Control Loops Drawing Galsol Ac
AF9800 ARIA 400/300/170 FPLC FOUT... -
Page 36: International Warranty
YAMIT or its authorized representative, of written notice thereof from the purchaser within 30 days of discovery of such defect or failure - YAMIT will repair or replace or refund the purchase price, at its sole option, any item proven defective in workmanship or material.
Need help?
Do you have a question about the AF-9800 Series and is the answer not in the manual?
Questions and answers