Advertisement
Quick Links
Advertisement

Related Manuals for digades dguard


Summary of Contents for digades dguard
- Page 1 Installation Guide Protect your bike Guard your life...
- Page 2 ® installation dguard ® Process of parts installation dguard Cable harness Define places to Live terminal for • place harness Powersupply install the parts ignition next to original (+ & - ) • start with the dguard ® harness • connect the Connect the •...
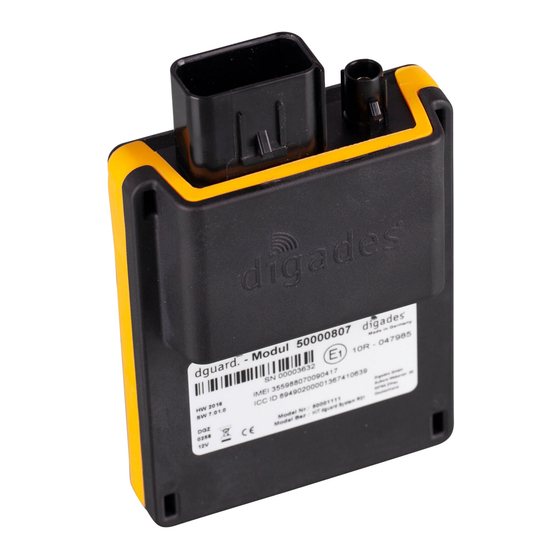
- Page 3 (and one that provides maximum protection in the ® event of an accident) for the dguard module within the motorbike frame (e.g. under the body seat, in the rear of the frame, behind fairing or behind side panel) •...
- Page 4 You can see it on the rear side of the module. WARNING! ® To guarantee full functionality in the event of an accident and to avoid false alarms, ensure that the dguard module is properly fixed positioned after installation.
- Page 5 ® advice - dguard GPS-antenna: • ® the GPS antenna must be directly connected to the dguard module • when you connect the GPS antenna with the module correctly, you will hear a *CLICK*. Please double-check that the connector is plugged in carefully! •...
- Page 6 ® ® advice - dguard cable harness & dguard button: ® The cable harness must be connected to the dguard ® ® module, the dguard sensor, the dguard button, the vehicle battery (“terminal 30”) and the live positive terminal of the power circuit activated by the ignition (“terminal...
- Page 7 Installation with the handlebar adapter depends on whether your steering rod offers enough space. ® If your motorbike does not offer enough space on the steering rod, you can fix the dguard button to the cockpit without a handlebar adapter. INSTRUCTION ®...
- Page 8 8. Ensure that the adhesive surface of the adhesive pad is free of contamination. 9. Stick the adhesive pad to the handlebar adapter. ® 10.Press the dguard button against the adhesive surface on the handlebar adapter. ® 11.Connect the cable with the 3-pin connection to the dguard button.
- Page 9 Live terminal of ignition • connect the ignition positive wire „terminal 15“ – by the connecting board (ignition). Plug in the connectors • switch on the ignition – the LED in the dguard ® button starts flashing green FIRST CHECK...
- Page 10 ® Never disconnect the dguard making adjustments to the system or performing a software update. A loss of the power ® supply can lead to total failure of the dguard system, which cannot be remedied by the user. • If you are uncertain about the correct connection to the ignition terminal 15, ask the technical support of the motorbike manufacturer.
Need help?
Do you have a question about the dguard and is the answer not in the manual?
Questions and answers