Advertisement
Quick Links
INSTALLATION,
OPERATIONS &
MAINTENANCE
MANUAL
THE BASICS:
A
CLOSED
looks like this:
The power button is
located
HERE
Four valves
control
Underneath the
the flow of water
Control Panel.
1
2
Valve 3 should always be in the
The RainSafe is controlled from the
3
4
Turn the
choice and press it to select.
CHANGING THE FILTERS
(once every 6 weeks):
Location
of the solid
particle filter
HOW TO REMOVE
Filter housing O-ring
1. Change both filters at the same time. Refer to the labels to make
sure that each filter goes where it is supposed to go
2. Turn off the power and close the valves
3. Unscrew, wash and put back the solid particle filter and housing
4. Use the wrench to unscrew the filter housing and remove the used
filter (you will see a plastic ring around the filter, remove it and put
it around the new filter)
5. Clean the two filter housings
6. Insert the new filters and screw the filter housings back by hand
tightening it
7. Open the two valves and turn the machine on again
8. On the control panel navigate to:
Home screen>Settings Menu>(Insert Pin)Reset Filter
BEFORE INSTALLING THE RAINSAFE:
Item Check List:
part of a "stand alone system" not connected to
existing drains where the ozone may leak inside
• RainSafe System
the house.
• RainSafe Customer and Operations Manual
• Ozone has a distinctive smell and prolonged
• Genyo Pump Controller Manual
exposure might be harmful so make sure that it
• Lowara Pump Manual
is vented in an area with low traffic.
• Inlet Filter
• The RainSafe is fitted with 1" BSP swivel female
• Outlet Filter
fittings for the outlet and inlet pipes so your
• Outlet 1" elbow
inlet and outlet pipes should end with 1" BSP
• Boxed ORP probe
male fittings or 1" BSP threaded pipes.
• Depending on the planned route you might
When planning the installation of the RainSafe :
need fittings that allow for change of direction
• Make sure you have the position and pipe routes
(elbows).
planned, and that you have the materials and
• The overflow pipe will be exposed to ozone that
tools ready.
can react with some pipe materials so you will
• Note that the inlet, outlet and overflow pipes are
need to use rigid PVC pipes for the overflow
in a fixed position.
route.
• If you can't allow for a gap between the back of
• Pipework and fittings must be prepared using
the machine and the wall note the position and
abrasive pad.
the exit points of the pipes on the drawing.
• Pipework must be joined using P.V.C. solvent
• We recommend using rigid pipes.
cement adhesive to EN 4680.
• The overflow must lead directly outside,
• Pipework may be reduced from tailpipe to a
preferably connected to the rainwater
minimum of DN40.
harvesting system.
• The overflow will vent out ozone and excess
water so it is important that the overflow pipe is
SAFETY INSTRUCTIONS:
It is important to read and understand the safety
instructions to ensure reliable service from your RainSafe
Warning: To guard against injury, basic safety precautions should be observed, including the following:
• Installation should only be performed by an authorised RainSafe technician. Failure to do so will lead to
warranty invalidation relating to compliance with installation and maintenance.
• Do not use the RainSafe for any purpose other than its intended purpose as described in this manual.
• To prevent the risk of severe or fatal electrical shock, special precautions must be taken since water is
present near electrical equipment. Always disconnect power before performing any maintenance
• Avoid exposure to direct or strongly reflected germicidal ultraviolet rays. Germicidal ultraviolet rays are
harmful to the eyes and skin.
• Intended for indoor use only: do not install the system outdoors and/ or directly expose it to atmospheric
agents. The RainSafe should be protected from the elements and from temperatures below 5ºC and above
35ºC
• Ensure overflow for water is correctly plumbed as per Installation Guidelines and is free draining and sealed
to outdoors with no water traps in ventilation path. It should not be connected to existing drains where the
ozone may leak inside the house
• Ensure ozone is vented through an external wall to an elevated release point away from windows or other
openings
• Ensure proper ventilation to the outside is provided where the RainSafe is to be housed to ensure safe and
adequate ventilation of the ozone
• Do not operate the RainSafe if the power cord and/or plug are damaged, or if any other damage is visible or
suspected
• Electrical power supplied to the RainSafe MUST match power requirements listed on the RainSafe
DANGER
• Plug the RainSafe into an approved ground fault circuit interrupt (GFCI) receptacle with suitable 30 mA RCD
High Voltage
fitted
• In the unlikely event of the quartz glass sleeve housing the UV lamp being broken, immediately contact your
local service engineer and do not use the water
• Air Dryer is insulated and may appear cool. NOTE: It can be very hot under the insulation. Do not attempt
to touch or remove air dryer during operation. The air dryer operates at high temperatures. If removing wait
sufficient time for it to cool down before removal
• Only use correct inlet and outlet filters –non suitable filters will invalidate the warranty
• Only install the correct UV Lamp- non suitable UV Lamp will invalidate the warranty
DO NOT MODIFY THE RAINSAFE IN ANY WAY.
THIS WILL INVALIDATE THE WARRANTY WITH IMMEDIATE EFFECT
HOW THE RAINSAFE™ WORKS WITH RAIN WATER:
Rain water is collected from the roof and it flows through the gutters into the water harvesting tank.
A pump draws the rain water from the harvesting tank and pushes it into the RainSafe.
The RainSafe first filters the water then treats it with UV radiation before storing it into its own tank.
In the tank water is treated with ozone. Before delivering the clean water the RainSafe filters it again
and removes the ozone.
Now you have clean water throughout the house.
THE RAINSAFE USES A UNIQUE METHOD FOR TREATING VARIOUS SOURCE WATERS:
MANDATORY REQUIREMENTS:
•
You have an adequate rain harvesting system that uses a first flush diverter, calmed inlet and
floating suction
•
The water delivery pipes are in good condition and clean
•
Source water parametric requirements:
(1) ≥ 80% UVT, 2) Turbidity ≤ 1 NTU, (3) TOC (total organic carbon) ≤ 4mg/l, (4) TSS ≤ 1mg/l (5)
Chlorine free water, (6) pH 6.5-8, (7) Bromides < 5µg/l.
•
Cold supply water only between 5ºC and 25ºC
•
Power supply of 220-240V 50Hz AC and a connection through a 30mA RCD
•
The RainSafe must be installed indoors in a clean well ventilated room
•
You have a pre-planned safe way of getting rid of the excess ozone.
Please read and follow the detailed instructions and warnings presented in this manual.
valve
An
OPENED
valve
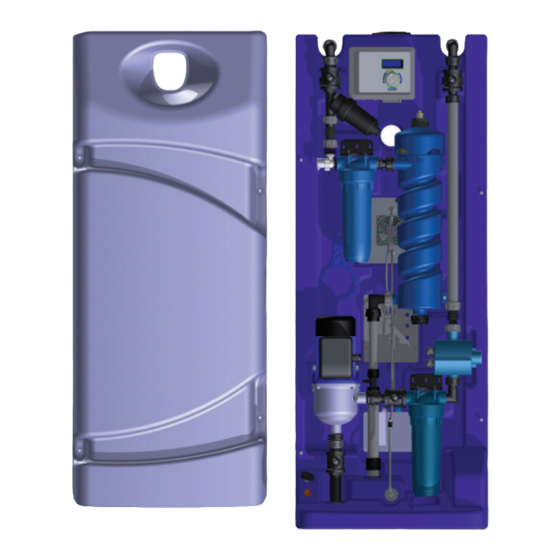
KNOW YOUR RAINSAFE:
looks like this:
23
22
21
20
OPEN
position
19
18
17
16
15
14
13
Control Panel.
WHEEL
left or right to highlight your
CHANGING THE UV LAMP
HOW TO REMOVE
THE FILTER HOUSING
Filter plastic ring
THE FILTER
Video instructions on www.rainsafewater.com
• Always use correct filters in the correct position
Warning: The UV lamp should be handled with
• Always change both filters at the same time
great care. The lamp is not warranted against
• Make sure the O-rings on the filter housings are
breakage and damage. Always install the lamp
clean and properly seated
in a careful manner, not at an angle which could
• Always wear clean gloves (powder free)
cause damage to the quartz glass sleeve inside
when putting in new filters to avoid possible
the generator. In the event of damage to the UV
contamination of filters.(separate pair for dirty
lamp or quartz glass sleeve, contact your approved
and clean filters)
technical installer and do not use the water.
• Never run the RainSafe without filters
Outlet Pipe
Overflow
Pipe
INSTALLING THE RAINSAFE:
1. Connect the outlet, inlet and overflow
pipes then push the machine into the
final desired position.
Before proceeding with the install
follow this check-list:
• Is the power supply 220-240V
50Hz AC, connected through a
30mA RCD and accessible?
• Is the overflow free draining and
sealed to outside of the system and
at least 40DN?
• Are there any bends or traps that
Note that there will be a 20 sec. delay on power up before the fill process starts.
24
2
1
3
4
5
6
7
8
9
10
11
12
REMOVING THE OLD LAMP
INSERTING THE NEW LAMP
1. Disconnect electrical
1. USE GLOVES: Carefully
power and close the valves
insert the new lamp. Make
2. Gently disconnect the plug
sure lamp sits properly. (Do
from the lamp at the top of
not touch the lamp glass)
the generator.
2. Re-attach and hand-
3. Remove the black plastic
tighten the black plastic
lock nut from the top of
collar by turning clockwise.
the generator by turning
3. Connect the lamp cable
anticlockwise.
plug onto lamp.
4. USE GLOVES. Carefully
4. Reopen the valves
withdraw the lamp from
the generator by lifting it
out.
Video instructions on www.rainsafewater.com
Turn ON the power
On the control panel navigate to:
Home screen>Settings Menu>(Insert Pin)Reset Lamp
Distance between the
outlet and inlet pipe
370 mm
Distance from the
end of the inlet/outlet
pipes and the back of
Inlet Pipe
the machine
Distance between
possible routing
options of the
overflow pipe
Distance from the
end of the overflow
pipe to the bottom
of the machine
Distance from the end
of the inlet / outlet
pipes and the bottom
of the machine
Back of Machine
Side of the Machine
Tank Lid
may cause back pressure?
enough buffer solution
• Do all the connections meet the
Do not touch the glass of the probe
RainSafe guide lines?
Screw the probe in by hand until you
• Has off-gas venting been installed
feel confident that water can't leak
and does it lead to an outside area
3. Install the filters
with low traffic?
• Does the source water meet the
4. Open all the valves except the outlet
RainSafe requirements?
Make sure the tank lid is firmly closed
Plug in the machine
2. Connect the ORP probe.
Before connecting the ORP probe
5. Turn it ON
remove the plastic cap, ensure the
O-ring is fitted and the probe has
GUTTERS
1:
RainSafe tank: Stores the treated water ready for use.
2:
Control Panel: Controls operation of system & treatment.
3:
Outlet 1" BSP: Treated water is pumped out of the RainSafe storage tank for supply to household.
26
4:
Outlet Isolation Valve: Stops flow of treated water from RainSafe to outlet.
5:
Outlet Riser Pipe: Delivery of treated water from RainSafe to Outlet 1" BSP.
6:
UV Reactor: Germicidal sanitiser.
7:
Ozone (O3) Generator: Generates ozone by way of corona discharge.
8:
Air Pump: Pumps dried air through the ozone generator and into the storage tank.
9:
Outlet Pump Controller: Control for outlet pump to supply treated water on demand.
10:
Outlet Filter Isolation Valve: For use when changing outlet filter.
11:
Outlet Filter: Converts ozone back to oxygen.
25
12:
Diffuser: Bubbles ozone into the stored water in the tank.
13:
Redox Sensor: Measures ozone in water.
14:
Level Sensor: Measures water level in tank.
15:
Pump Isolation Valve: For maintenance purposes only – to allow service/ repair of the pump.
16:
Air Dryer: Removes humidity from the air for ozone generation.
17:
Outlet Pump: Supplies treated water from the RainSafe to outlet via the outlet filter.
18:
Flow Meter: Monitors incoming flow, alarms for blocked inlet filter, flow too low or unexpected water flow.
19:
Filter Wrench: For maintenance purposes – for use when changing filters.
20:
Inlet Filter 5 µm: Filters fine particles from the source water.
21:
Solid Particle Filter: Filters larger particles from the source water.
22:
Inlet Isolation Valve: Stops inlet flow of source water to the RainSafe.
23:
Inlet 1" BSP: Connection to supply of source water.
24:
Lid: Seals the RainSafe tank.
25:
Overflow Vent DN50 connection: Overflow for the system, tank breather, and vents any excess O3 to atmosphere.
Must be connected to drainage to prevent flooding, Must vent to external environment.
26:
Power Supply A 220–240 V: Supplies power to the system. Be aware that plug type may differ to suit country of sale.
DRAINING THE RAINSAFE
1. Close the inlet valve and make sure the outlet
valve is opened
2. Turn on a faucet tap in the house to empty the
tank
The RainSafe is designed to keep the water clean as long as it's ON. If you know the RainSafe is going to
be powered down for a long period of time (e.g. you are leaving on a holiday and you will turn the power
OFF) you need to drain the tank and remove and discard the filters BEFORE leaving.
If the RainSafe wasn't in use for a long period of time you need to drain it and change the filters.
It is recommended that the tap water be allowed to run down the drain to flush the outlet system prior to
drinking the water or householder should consider sanitising the distribution system if concerned.
FIRST RUN
(commissioning mode):
405 mm
The system will guide you through the steps below which prepare your RainSafe to provide water to your buildings water
supply. This should take about 30 minutes to complete. Water will not be available until all steps are completed. You
will need to follow this procedure only once. In the event that you interrupt the procedure by powering off the RainSafe
or the machine displays an error you will be prompted to restart the commissioning process.
It is advised to flush out the system and pipework by running a tap to empty the RainSafe of the first volume of water
and then allowing the RainSafe to re-fill before commencing normal use.
For the first run follow these steps:
1. Turn on the RainSafe. The control panel will display the Commissioning mode screen containing the software
version number. Press OK.
2. The language selection screen will be displayed, choose "English". The control panel will ask you to confirm your
choice, press OK.
3. The control panel will display the set time screen. Set the correct time. The control panel will ask you to confirm
your choice, press OK.
4. The control panel will display the set date screen. Set the correct date. The control panel will ask you to confirm
your choice, press OK.
5. On the next screen "Calibrate Ozone sensor" is displayed. Press Ok. The ozone sensor will then be calibrated. This
will take 60 seconds.
6. Once ozone sensor calibration is complete a menu will be displayed. Select the start commissioning option.
7. The next screen will display the RainSafe machines Status, ORP value, LPM (litres per minute) and current water
level (L) in litres.
8. At this point a fill will be carried out,
a.
The status will change from "Inactive" to "Warmup" for 35 seconds.
b. After warmup the status will change to "Fill". At this point the machine will fill to 220 litres.
c.
Once 220 litres is reached the status will change to "Cooldown" for 30 seconds.
d. After cooldown the status will change to "Ozone On". At this point the ozone level will rise to 700 and two
minutes later the status will change back to "Inactive".
9. After the fill has been completed a DAF fill will be carried out,
a.
The status will change from "Inactive" to "Warmup" for 35 seconds.
b. After warmup the status will change to "Fill for 90 seconds.
c.
After this the status will change to "Cooldown" for 30 seconds.
d. After cooldown the status will change to ozone on for two minutes and the status will change back to inactive.
10. Once fills have been completed the question "Confirm checked for leaks" will be displayed. Once checked press OK.
11. You will be prompted to enter the control panel pin number. Enter the correct pin and press ENTER.
(The PIN number may be obtained by registering the machine at www.rainsafewater.com/register using the
Hardware ID displayed.)
12. The control panel will then display "Pin OK". Cycle the power to the RainSafe.
13. The commission process is now complete and the RainSafe is in run mode.
Customer Data Consent
You will need to complete the data consent form before the internet connection is activated.
Your distributor will provide you with the consent form.
You can monitor your RainSafe by connecting it to the Internet.
Once connected you can monitor water use, alerts and alarms, parameters on the working machine.
Connecting the RainSafe to the user's Wi-Fi:
1. Remove control knob from control panel.
2. Remove control panel front cover
3. Remove Wi-Fi module from logic board
4. Plug Wi-Fi module into programming card
5. Plug card USB lead into computer
6. Open RS Wi-Fi programme on computer
7. In the window;
•
Open port
•
Enter SSID and passkey for broadband network
•
"configure"
•
On bottom of window you will see the following
•
" set ok?"
•
"success"
8. Return module to control panel and refit cover and knob
To operate The RainSafe make sure all the valves are opened and the power is ON
ROOF
WATER PUMP
RAINSAFE
FIRST FLUSH
DIVERTER
WATER
HARVESTING
TANK
FILLING THE RAINSAFE
1. Make sure the inlet valve is opened and close
the outlet valve
2. Turn the RainSafe ON and it will start filling
3. Open the outlet valve after the machine is
filled
Advertisement

Related Manuals for Ozone RAINSAFE

Summary of Contents for Ozone RAINSAFE
- Page 1 • Ozone has a distinctive smell and prolonged Overflow It is advised to flush out the system and pipework by running a tap to empty the RainSafe of the first volume of water • Genyo Pump Controller Manual exposure might be harmful so make sure that it and then allowing the RainSafe to re-fill before commencing normal use.
- Page 2 ERROR CODES TROUBLE SHOOTING TROUBLE SHOOTING Error - Lamp Fail - The RainSafe lamp has failed. The system cannot treat any more water until a new lamp has been installed and the NO WATER AT TAP SCREEN DISPLAYS LOW FLOW Lamp timer has been reset.
Need help?
Do you have a question about the RAINSAFE and is the answer not in the manual?
Questions and answers