Table of Contents
Advertisement
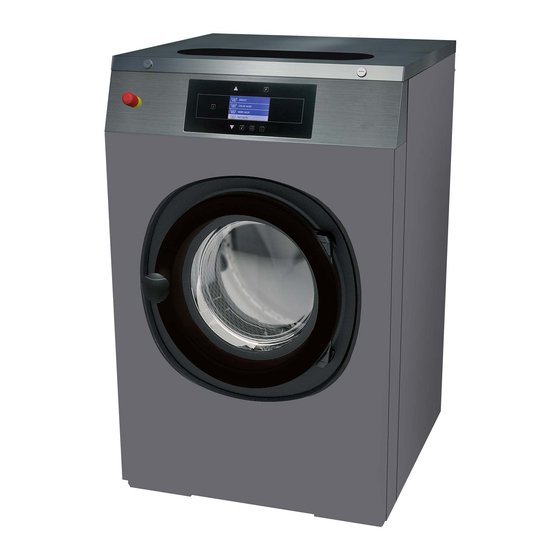
Industrial washer extractors
Freestanding, high spin machines
7 kg
18 kg
8 kg
18 kg
18 kg
Original installation, maintenance and user's manual
8 kg
11 kg
24 kg
28 kg
Rigid-mount machines
11 kg 14 kg
24 kg
28 kg
24 kg
28 kg
14 kg
– medium spin
– normal spin
– medium spin
Publication date: 7 Jul 2014
549263 D
Advertisement
Table of Contents

Related Manuals for LAVAMAC AR-280-ES

Summary of Contents for LAVAMAC AR-280-ES
- Page 1 Industrial washer extractors Freestanding, high spin machines 7 kg 8 kg 11 kg 14 kg 18 kg 24 kg 28 kg Rigid-mount machines 8 kg 11 kg 14 kg – medium spin 18 kg 24 kg 28 kg – normal spin 18 kg 24 kg 28 kg...
-
Page 3: Table Of Contents
Contents Contents Safety precautions ............................4 Operation..............................8 Symbols on the machine ...........................8 Version Xcontrol Version Xcontrol Plus ....................9 Before washing............................10 Opening the drum door ..........................10 Placing the laundry into the machine ....................... 10 ... -
Page 4: Safety Precautions
Safety Precautions Safety precautions WARNING - SAVE THESE INSTRUCTIONS FOR LATER USE. Failure to comply with the instructions may lead to incorrect use of the appliance, and may result in risk of fire, bodily injuries or death and/or damage to the laundry and/or the appliance. WARNING - Read the IMPORTANT SAFETY INSTRUCTIONS in this manual carefully before operating the appliance. - Page 5 Safety Precautions Do not wash articles that have been previously cleaned in, wash in soaked in, or spotted with gasoline, dry-cleaning solvents, or other flammable or explosive substances as they give off vapors that could ignite or explode. Such fabrics must first be washed by hand and air dried. ...
- Page 6 Safety Precautions WARNING IF THE INSTALLED APPLIANCE OPERATE WITH COIN, TOKEN OR SIMILAR OPERATION FOR USE IN SELF-SERVICE SITUATIONS, THEN THE OWNER-INSTALLER MUST PROVIDE A REMOTE-LOCATED EMERGENCY STOP DEVICE. THIS DEVICE MUST BE PLACED IN SUCH A WAY THAT IT IS EASY AND SAFELY ACCESSIBLE FOR THE USERS.
- Page 7 Safety Precautions WARNING WHEN POWER SUPPLY HAS BEEN SWITCHED OFF WAIT FOR AT LEAST 10 MINUTES BEFORE STARTING INSPECTION OR SERVICING THE WASHER. BEFORE STARTING INSPECTION OF FREQUENCY INVERTER, CHECK FOR RESIDUAL VOLTAGE ACROSS MAIN CIRCUIT TERMINALS + AND -. THIS VOLTAGE MUST BE BELOW 30 VDC BEFORE YOU CAN ACCESS THE INVERTER FOR INSPECTION.
-
Page 8: Operation
Operation Operation Symbols on the machine Caution, dangerous electrical tension, Warm water inlet electrical devices (red color of the label) Caution, other danger, read and follow written instructions Soft cold water inlet (light blue color of the label) Caution - Increased temperature Hard cold water inlet Do not close or cover (dark blue of the label) -
Page 9: Version Xcontrol Version Xcontrol Plus
Operation Version Xcontrol Version Xcontrol Plus START START (ADVANCE function for the OPL version) (ADVANCE function) CONFIRM THE SELECTION STOP (program interruption) CANCEL THE SELECTION CONFIRM THE SELECTION MOVE UP CANCEL THE SELECTION MOVE DOWN MOVE UP SELECTION OF ADDITIONAL FUNCTIONS MOVE DOWN INFO SELECTION NO... -
Page 10: Before Washing
Operation Before washing Sort the linen according on the temperature and the instructions of the manufacturer of the fabrics. Check if there aren‘t any strange objects between the linen like nails, screws, needles, etc. in order not to damage the washer-extractor or the linen. Turn sleeves of shirts, blouses, etc. inside out. To get a better washing result, you have to unfold the fabrics and mix the bigger and smaller pieces of fabrics. -
Page 11: Wash Programs Overview
Operation Wash programs overview Wash program 1 Hot wash intensive 90°C Wash program 2 Warm wash intensive 60°C Wash program 3 Coloured wash intensive 40°C Wash program 4 Bright wash intensive 30°C Wash program 5 Woollens 15°C Wash program 6 Hot wash 90°C ECONOMY level... -
Page 12: Start The Washer
Operation Start the washer Version Xcontrol Coin operated models Choose the required wash program. Insert the correct amount of coins in the slot - the sum must correspond to the selected program. The display shows the remaining sum to be paid. After the payment is done, the display prompts the user to start the program utilizing the START button. -
Page 13: End Of Wash Cycle
Operation Version Xcontrol Plus After you have selected the required wash program, start the wash cycle by pressing the START button. If you enter a number that does not correspond to any of the available programs, the display shows the message INVALID. -
Page 14: Automatic Door-Lock Unlocking Module
Operation Version Xcontrol Plus If a power cut occurs in an idle condition of the machine and no wash program is running, the machine remains in the idle condition. If a power cut occurs during the wash process, the message “CONTINUE / STOP” appears as soon as the power supply is restored. -
Page 15: First Service At Technical Problem
Operation First service at technical problem N° Failure message Failure Action Fault occurrence No Drain End Drain failure Full Stop + tumble Draining Whole cycle, revolutions under Safety switch Tilt Fault Full stop + tumble the distribution revolutions activated level. Safety switch activated during the Imbalance... - Page 16 Operation N° Failure message Failure Action Fault occurrence Verification fault Verify Par frequency inverter Don’t start At loading parameters parameters Wrong software Wrong Softw Don’t start New software version version Reduction of spinning Unbalance detection sequence revolutions. Imbalance Spinning sequence system activated.
- Page 17 Operation N° Failure message Failure Action Fault occurrence Internal memory TRACEYBILITY Traceability function, whole E550 Error data for For Info only Write cycle traceability TRACEYBILITY Internal Traceability Traceability function, whole E551 For Info only Full memory is full cycle E560- Errors in communication Only in Advanced menu USB Errors...
-
Page 18: Technical Data
Technical data Technical data Freestanding, high spin machines (further referred to as "freestanding") MACHINE kg / lb 7 / 15 8 / 18 11 / 25 14 / 30 18 / 40 24 / 55 28 / 65 Inner drum volume diameter mm / inch 530 / 20.87... -
Page 19: Connections
Technical data Connections MACHINE 7 / 15 8 / 18 11 / 25 14 / 30 18 / 40 24 / 55 28 / 65 Water valves connection DN20 ¾“ DN20 ¾“ DN20 ¾“ DN20 ¾“ DN20 ¾“ DN20 ¾“ DN20 ¾“... -
Page 20: Freestanding Machines 7-8-11-14-18-24-28 Kg / 15-18-25-30-40-55-65 Lb
Technical data Freestanding machines 7-8-11-14-18-24-28 kg / 15-18-25-30-40-55-65 lb Front Left side Rear side Figure 1 – Freestanding machines 1. Electrical connection 13. USB port 2. Hot water 14. Electrical connection to liquid soap pumps 3. Cold water hard 15. Trace-Tech connection (RS485) 4. - Page 21 Technical data MACHINE 7 / 15 7.99 2.64 1.89 8 / 18 7.99 2.64 1.89 11 / 25 7.99 2.64 1.89 14 / 30 7.99 2.64 1.89 18 / 40 7.99 2.64 1.89 24 / 55 7.99 2.64 1.89 Table 4 continuation – Freestanding machines, layout of machine 28 / 65 7.99 10.79...
-
Page 22: Rigid-Mount Machines 8-11-14-18-24-28 Kg / 18-25-30-40-55-65 Lb
Technical data Rigid-mount machines 8-11-14-18-24-28 kg / 18-25-30-40-55-65 lb Front Left side Rear side Figure 2 – Rigid-mount machines 1. Electrical connection 14. Electrical connection to liquid soap pumps 2. Hot water 15. Trace-tech connection (rs485) 3. Cold water hard 16. - Page 23 Technical data according Freestanding machines 7 kg / 15 lb standard to the request Ingress Voltage Frequency Total power Fuse Motor output Heating Phase protection [Hz] [kW] [kW] [kW] 200-240 50/60 0.85 0.75 200-240 50/60 0.75 200-240 50/60 0.75 200-240 50/60 0.75 200-240...
- Page 24 Technical data according Freestanding machines 11 kg / 25 lb standard to the request Ingress Voltage Frequency Total power Fuse Motor output Heating Phase protection [Hz] [kW] [kW] [kW] 200-240 50/60 200-240 50/60 200-240 50/60 200-240 50/60 200-240 50/60 200-240 50/60 200-240 50/60...
- Page 25 Technical data according Freestanding machines 14 kg / 30 lb standard to the request Ingress Voltage Frequency Total power Fuse Motor output Heating Phase protection [Hz] [kW] [kW] [kW] 200-240 50/60 200-240 50/60 200-240 50/60 200-240 50/60 10.1 200-240 50/60 200-240 50/60 200-240...
- Page 26 Technical data Freestanding machines 24 kg / 55 lb standard Ingress Voltage Frequency Total power Fuse Motor output Heating Phase protection [Hz] [kW] [kW] [kW] 200-240 50/60 200-240 50/60 200-240 50/60 380-415 + N 50/60 380-415 + N 50/60 380-415 50/60 440-480 50/60...
- Page 27 Technical data according Rigid-mount machines 8 kg / 18 lb standard to the request Ingress Voltage Frequency Total power Fuse Motor output Heating Phase protection [Hz] [kW] [kW] [kW] 200-240 50/60 200-240 50/60 200-240 50/60 200-240 50/60 200-240 50/60 200-240 50/60 200-240 50/60...
- Page 28 Technical data according Rigid-mount machines 14 kg / 30 lb standard to the request Ingress Voltage Frequency Total power Fuse Motor output Heating Phase protection [Hz] [kW] [kW] [kW] 0.85 0.75 200-240 50/60 0.85 0.75 200-240 50/60 0.75 200-240 50/60 0.75 200-240 50/60...
- Page 29 Technical data Rigid-mount machines 18 kg / 40 lb – medium spin not standard Ingress Voltage Frequency Total power Fuse Motor output Heating Phase protection [Hz] [kW] [kW] [kW] 200-240 50/60 200-240 50/60 200-240 50/60 12.9 200-240 50/60 18.9 380-415 + N 50/60 380-415 + N 50/60...
- Page 30 Technical data Rigid-mount machines 24 kg / 55 lb – medium spin not standard Ingress Voltage Frequency Total power Fuse Motor output Heating Phase protection [Hz] [kW] [kW] [kW] 200-240 50/60 200-240 50/60 200-240 50/60 380-415 + N 50/60 380-415 + N 50/60 380-415 50/60...
-
Page 31: Installation
Installation Installation Freestanding machines Transportation and unpacking – freestanding machines The machine is delivered bolted onto the transport pallet and packed in a shrink-wrap foil or box. Remove packing from the machine. Remove front and rear panel. Remove the bolts between the machine and pallet. Mount front and rear panel. - Page 32 Installation Siting – freestanding machines Install the machine close to a floor drain or open drain. In order to make installation and servicing the machine easier the following clearances are recommended: At least 500 mm / 20” between the machine and the wall behind And min.
- Page 33 Installation The bottom frame of the machine shall be used for the purpose of lifting the whole machine. Place the machine over the two drilled holes. Check that the machine is seated in a perfectly level manner. Adjust with the feet. ...
- Page 34 Installation Freestanding machines 18-24-28 kg / 40-55-65 lb with weighing system – on request Lift up the machine. Install two left load sensor supports and two right load sensor supports (pos.1 and 2) to the machine frame as shown in figure 6. ...
-
Page 35: Rigid-Mount Machines
Installation Rigid-mount machines Transportation and unpacking – rigid-mount machines WARNING! ALWAYS CONSULT THE STATIC REQUIREMENTS WITH A STATIC ENGINEER IN ORDER TO MEET THE REQUIREMENTS OF PERMISSIBLE LOADS, VIBRATIONS AND NOISE LEVEL IN THE BUILDING! THE MANUFACTURER DOES NOT RECOMMEND INSTALLING THE WASHING MACHINE IN A ROOM WITH A CELLAR UNDERNEATH OR ON A FLOOR HAVING ROOMS UNDERNEATH. - Page 36 Installation Rigid-mount machines MACHINE 18-24-28 kg / 40-55-65 lb MEDIUM SPIN 57.5 670.5 8 / 18 20.55 18.66 2.71 5.47 2.26 25.98 26.39 67.5 57.5 670.5 11 / 25 24.21 18.66 2.65 5.47 2.26 29.52 26.39 67.5 57.5 785.5 14 / 30 24.21 22.59 2.65...
- Page 37 Installation WASHER Installation on floor or steel base – rigid-mount machines The drum of rigid-mount machines is fixed to the frame. The floor and steel base (if used) underneath the machine CONCRETE FLOOR MUST be stable enough to be able to absorb the dynamic loads which are created during the spinning sequence, see the values for each machine specified in table 1, 2.
-
Page 38: Water Connections
Installation Water connections The appliance has been designed with a build-in “AB” airgap system according EN1717. Nevertheless, when potable water will be connected to the appliance an approved double check valve or some other no less effective device providing backflow prevention protection to at least fluid category three shall be fitted at the point of connections between the water supply and the appliance. -
Page 39: Recuperated Water Connection
Installation Recuperated water connection WARNING! DISCONNECT THE MACHINE POWER SUPPLY! WHEN THE MAIN SWITCH IS TURNED OFF THE INLET TERMINALS OF THE MACHINE MAIN SWITCH ARE STILL UNDER CURRENT! Drill out the protective screens of the water inlet from INLET OF CABLE FOR CONTROL OF THE WATER the recycle utilizing a drilling bit of 15mm / 0.59"... - Page 40 Installation Treatment of the recuperated water The recuperated water must be filtered before entering the recycling tank. A mechanical filter must be installed which filters off small particles (fluff, buttons, paper, etc.) of sizes 0.2 mm or smaller. The denser the mesh, the better.
-
Page 41: Drain Connection
Installation Drain connection Drain valve Connect a 76 mm (3") pipe or rubber hose to the machine’s drain pipe, ensuring a downward flow from the machine. Avoid sharp bends which may prevent proper draining. The drainage pipe should be located over a floor drain, drainage channel. Figure 21 1. -
Page 42: Venting
Installation Drain pump Machines 7-8 kg / 15-18 lb Connect a flexible hose of a 24 mm / 0.94“ diameter to a drain pipe in manner providing sufficient siphon effect (the hose bend must not be located lower than the water level). In order to achieve good draining, the hose must not bend at a sharp angle. -
Page 43: Liquid Soap Connection
Installation Machines 7-8-11-14 kg / 15-18-25-30 lb 1. Remove the rear cover. 2. Fit the holder pos. 1 with the steam valve and filter onto the rear part of the machine. 3. Connect the steam hose pos. 2 to steam valve. - Page 44 Installation WARNING CHECK THAT THE HOSE CONNECTIONS ARE TIGHT (CHECK THE CLAMPS)! ANY LEAKAGE OF CHEMICALS MAY CAUSE SERIOUS BODY INJURIES AS WELL AS SERIOUS DAMAGE TO THE WASHER. IF ONE OF THE NIPPLES ARE OPEN, CLOSE AND SECURE THE OPENING WITH AN APPROPRIATE COVER.
-
Page 45: Electrical Installation
Installation Electrical installation General The machine has been designed for connecting to the electrical network according the specification of your order. Before connection check the electrical data stated on the data plate, if they correspond to your electrical network. An individual branch circuit needs to be used for each machine. The way of the connection is described in figure 27. - Page 46 Installation Residual current device (RCD) In some countries an RCD is known as an “earth leakage trip” or “Ground Fault Circuit Interrupter” (GFCI) or an “Appliance Leakage Current Interrupter” (ALCI) or “earth (ground) leakage current breaker”. Specifications: Tripping current: 100mA (if locally not available/allowed use a 30mA trip current, preferably selective type with small time delay set) Install max.
- Page 47 Installation Power supply protection device nominal Min. phase conductor Min. Protection conductor current (US) section in mm (AWG) section in mm (AWG) Automatic circuit breakers Fuses 16A (15A) 10A (10A) 1,5 mm² (AWG 15) 1,5 mm² (AWG 15) 20A (20A) 16A (15A) 2,5 mm²...
- Page 48 Installation 1. Washing machine (rear view) 2. Laundry protective earth connection 3. Washing machine external protective terminal 4. Protective conductor - washing machine connection 5. Earth mark Figure 30 Multiple single-phase machines in line When multiple single phase machines are connected to the same electrical network, it is necessary to connect the machines according to figure 31.
-
Page 49: Maintenance And Adjustments
Maintenance and adjustment Maintenance and adjustments WARNING! ALWAYS FOLLOW SAFETY INSTRUCTIONS! DO NOT BYPASS ANY SAFETY DEVICES OR THEIR PARTS. ANY INTERFERENCE TO THE MACHINE FUNCTIONS AND CONSTRUCTION ARE PROHIBITED! USE THE PROPER CHEMICAL AGENTS WHICH AVOID CALCIUM SEDIMENTS ON HEATING ELEMENTS AND OTHER MACHINE PARTS. -
Page 50: Checking And Maintenance Every Six Months
Maintenance and adjustment Checking and maintenance every six months The filters in the water connection at the valves need to be cleaned. Turn off the tap. Unscrew the hoses at the back of the appliance. Take out the filter at the center with pointed pliers, clean and re-insert. -
Page 51: Adjusting Of Safety Switch - Freestanding Machines
Maintenance and adjustment Adjusting of safety switch – freestanding machines STICK OF SAFETY SWITCH The safety switch is an important component which must - if correctly adjusted - stop the machine when excessive movement and shaking occur due to an unbalance caused by improper distribution of linen in the washing drum, or when the amount of laundry exceeds the machine capacity. -
Page 52: Water Filters
Maintenance and adjustment Water filters Machines are equipped with filters on water inlets. It is necessary to clean up the filters occasionally to avoid a prolongation of filling the machine with water. Intervals of cleaning depend on the quality of the water, for example foreign particles in the water line. -
Page 53: Trouble Shooting Aids
Trouble shooting aids Trouble shooting aids Unblocking of the door lock in case of emergency If the power blackout takes too long, you can make an emergency unblocking of the door lock. The emergency door opening has been described as follows: WARNING! BEFORE THE EMERGENCY DOOR OPENING TURN OFF THE MACHINE MAIN SWITCH! NEVER OPEN THE DOOR WHILE DRUM IS STILL RUNNING! -
Page 54: Putting The Machine Out Of Service
Putting the machine out of service Putting the machine out of service Disconnecting the machine Switch off the external electric power inlet to the machine. Turn off the main switch on the machine. Shut the external water or steam inlet to the machine. ... - Page 56 IMPORTANT ! MACHINE TYPE: PROGRAMMER: Electronic timer INSTALLATION DATE: INSTALLATION CARRIED OUT BY: SERIAL NUMBER: ELECTRICAL DETAILS: .....VOLT....PHASE....HZ NOTE: ANY CONTACTS WITH YOUR DEALER REGARDING MACHINE SAFETY, OR SPARE PARTS, MUST INCLUDE THE ABOVE IDENTIFICATION. MAKE CERTAIN TO KEEP THIS MANUAL IN A SECURE PLACE FOR FUTURE REFERENCE.
Need help?
Do you have a question about the AR-280-ES and is the answer not in the manual?
Questions and answers