Table of Contents
Advertisement
Quick Links
Advertisement
Table of Contents

Related Manuals for BÜHLMANN Quantum Blue Reader

Summary of Contents for BÜHLMANN Quantum Blue Reader
- Page 1 Quantum Blue Reader ® User Manual Quantum Blue Reader - User Manual Version A1 ®...
-
Page 2: Table Of Contents
TABLE OF CONTENT TABLE OF CONTENT 1 Introduction 2 General information 2 1 Technical Assistance 2 2 Policy Statement 2 3 Version Management 3 Intended use of the Quantum Blue Reader ® 4 Safety Information 4 1 Proper Use 4 2 Electrical Safety 4 3 Environment 4 4 Environmental Hazards 4 5 Heat Hazard... - Page 3 TABLE OF CONTENT 11 4 Menu Structure in the Admin Area 11 4 1 Date & Time 11 4 2 Manage Data 11 4 3 Delete Unsent Results 11 4 4 Export Raw Data 11 4 5 User Management 11 4 6 Update Software 11 4 7 Mode of Operation 11 4 8 Manufacturer reset 11 4 9 Communication Settings...
-
Page 4: Introduction
GENERAL INFORMATION 1 INTRODUCTION Thank you for choosing the Quantum Blue Reader We are confident that this product will become an ® integral part of your daily work Rapid testing enables fast result reporting and thus provides a tool for health care professionals to support immediate decision making Using the wealth of experience obtained from providing reflectrometric detection technology to thousands of customers worldwide, the specialists at BÜHLMANN Laboratories AG have developed a new generation reader for mobile rapid test applications The Quantum Blue... -
Page 5: Safety Information
SAFETY INFORMATION 4 SAFETY INFORMATION The instructions and safety information in this user manual must be followed to ensure safe operation of the Quantum Blue Reader Please note that if the equipment is used in a manner not specified by BÜHLMANN ®... -
Page 6: 2 Electrical Safety
SAFETY INFORMATION 4.2 Electrical Safety Any defects which you discover on electrical components / sub-assemblies must be repaired without delay Until this is done, the system, sub-assembly or item of equipment must not be used in its faulty condition Call your local BÜHLMANN distributor Do not expose the reader to strong electromagnetic radiation It is the responsibility of the user to ensure that a compatible electromagnetic environment... -
Page 7: 8 Symbols On The Quantum Blue ® Reader Instrument
SAFETY INFORMATION 4.8 Symbols on the Quantum Blue Reader Instrument ® The following symbols appear on the type plate at the rear of the Quantum Blue Reader instrument ® Symbol Description CE mark for Europe In vitro diagnostic mark, device is intended to be used as an in vitro diagnostic device Serial number Legal manufacturer... -
Page 8: 9 Symbols On The Package Of The Reader
SAFETY INFORMATION 4.9 Symbols on the Package of the Reader Symbol Description Transport and Storage conditions Keep package dry! Handle package with care! Quantum Blue Reader - User Manual Version A1 ® Release Date: 2020-11-04... -
Page 9: Functional Description
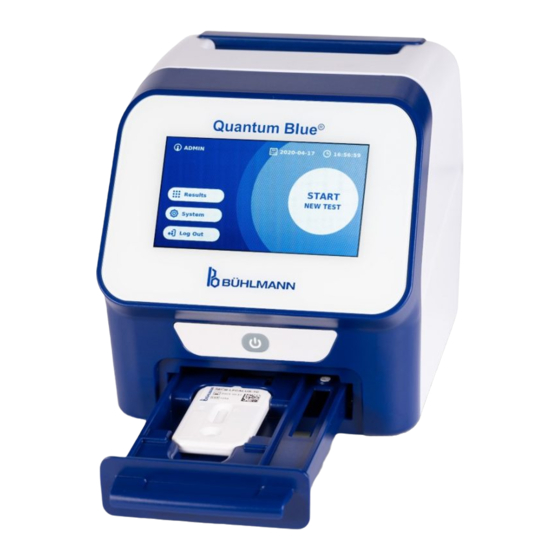
FUNCTIONAL DESCRIPTION 5 FUNCTIONAL DESCRIPTION 5.1 Hardware Figure 1 Figure 2 Touch display Power button with LED Drawer for lateral flow test cassette Handle Connector for power supply Type Plate (for more information refer to chapter Symbols on the Quantum Blue Reader Instrument) ®... -
Page 10: 1 Hardware
UNPACKING AND SET-UP PROCEDURES The drawer must be completely inserted into the instrument for instrument start- up and for performing measurements Do not switch drawers between different Quantum Blue Reader instruments ® 5.2 Delivered Content Quantum Blue Reader instrument • ®... -
Page 11: Installation
INSTALLATION 7 INSTALLATION 7.1 Requirements The location of the Quantum Blue Reader should be preferably on a desk or any other stable and leveled ® surface with enough surrounding space in order to easily insert the test cassette or unplug the device In case of emergency or under abnormal operating conditions the location should at any time provide enough space to allow the easy disconnection of the device. -
Page 12: General Operation
GENERAL OPERATION 8 GENERAL OPERATION 8.1 Powering the Quantum Blue Reader On and Off ® Switch on the device by pressing the power button (Pos 2 Figure 1, chapter Hardware) The device will show a standard black screen and then switches to a boot screen After successful initialization of all components, the home screen is visible Switch off by pressing the power button for at least 1 second The Quantum Blue Reader will ask for... -
Page 13: 5 Menu Structure
GENERAL OPERATION 8.5 Menu Structure Figure 5 shows the menu structure of the Quantum Blue Reader The grey shaded box indicates menus, ® which are available for administrators only For more information on administrator settings refer to chapter 11 4 5 User Management Startup Info Menu... -
Page 14: Instrument Usage
INSTRUMENT USAGE 9 INSTRUMENT USAGE 9.1 The Two Modes of Operations Two modes of operations are available on the Quantum Blue Reader: Fail Safe Mode and Fast Track Mode ® The mode of operation can be configured by users with administrator rights in the menu under System/Settings/Admin Areas/Mode of Operation (see chapter System and Settings) -
Page 15: 2 Starting A Test In The Fail Safe Mode
INSTRUMENT USAGE 9.2 Starting a Test in the Fail Safe Mode Please read the instructions below carefully before starting your measurement Make sure to apply your sample at the appropriate time point to ensure the correct test-specific incubation time To start a new run, press the START NEW TEST button on the home screen (1) Step 1:... - Page 16 INSTRUMENT USAGE Step 3: Some test methods may require a selection of the specimen type and/or the sample dilution If prompted, choose your specimen type and/or appropriate sample dilution from the submenu Step 4: A summary window appears on the screen displaying all test specific parameters (e g test method, product ID, Lot ID, expiration date, incubation time setting etc )
- Page 17 INSTRUMENT USAGE Step 6: Apply your sample onto the test cassette according to the test-specific instruction for use Ensure that the test cassette is placed in the correct orientation (refer to the test cassette relief within the drawer) Close the drawer and immediately continue by Start Measurement pressing ...
-
Page 18: 3 Starting A Test In The Fast Track Mode
INSTRUMENT USAGE 9.3 Starting a Test in the Fast Track Mode START NEW TEST To start a new run, press the button on the home screen (1) Step 1a: The “Select Method” screen, shows all installed test methods that were previously uploaded to the reader ... - Page 19 INSTRUMENT USAGE Step 2: Some test methods may require a selection of the specimen type and/or the sample dilution If prompted, choose your specimen type and/or appropriate sample dilution from the submenu Step 3: On the SKIP INCUBATION screen, select whether the incubation time of your test cassette is done via an external timer (press YES) or whether the incubation time should be counted down by the...
- Page 20 INSTRUMENT USAGE Step 5: Enter the sample ID either via the screen keyboard, or via an external barcode scanner (see chapter Hardware Installation / Accessories) Continue The button appears if at least 3 characters are entered Press Continue to go to the last screen to start the measurement Step 6a:...
- Page 21 INSTRUMENT USAGE Step 6b: If SKIP INCUBATION YES was selected (= an external timer is used to count down the incubation time): Apply your sample onto the test cassette according to the test-specific instruction for use Set an external timer manually for the test-specific incubation time as indicated in the corresponding instruction for use ...
-
Page 22: Review Results
REVIEW RESULTS 10 REVIEW RESULTS By pressing the Results button, the result screen is displayed with an overview of the last acquired results The result screen shows all test results in a tile view Different actions are available to view and search results (see table below). -
Page 23: System And Settings
SYSTEM AND SETTINGS 11 SYSTEM AND SETTINGS The system menu offers four main sections: • Status (1) for the display of current reader information like software (SW) version, IP address or serial number • Update test menu (2) • Change of device settings (3) •... -
Page 24: 11 2 Update Tests
SYSTEM AND SETTINGS 11.2 Update Tests Enter this menu, to update the Quantum Blue Reader with new test methods ® Methods can be added by all users The deletion of already installed methods is only possible by administrators The menu shows an overview of all installed test methods It can be filtered for specific test methods by using New Test the search field (1) To import a new test method, press (2) The Quantum Blue... -
Page 25: 11 3 Settings
SYSTEM AND SETTINGS 11.3 Settings The setting menu consists of the following submenus: • Preferences (1), which is accessible to all users • Admin Area (2), which is only accessible to administrators 11.3.1 Preferences Within the menu Preferences, the user can adjust the screen brightness (80% is the default setting) (1 1) and the reader language can be selected (1 2) Apply the desired language by pressing the appropriate tile on the language selection screen Quantum Blue... -
Page 26: 11 3 2 Admin Area
SYSTEM AND SETTINGS 11.3.2 Admin Area This menu can only be accessed by administrators when the user management is activated (refer to chapter 11 4 5 User Management) The folllowing settings can be changed within this menu: Date & Time (1) settings of the Quantum Blue Reader •... -
Page 27: 11 4 2 Manage Data
SYSTEM AND SETTINGS 11.4.2 Manage Data In this menu you can delete data or export the result data base The following functions are available: Delete Methods (1) • Delete Results (2) • Delete Unsent Results (3) • Delete Event Log (4) •... -
Page 28: 11 4 3 Delete Unsent Results
SYSTEM AND SETTINGS 11.4.3 Delete Unsent Results If the Quantum Blue Reader is connected to an external computer and/or to a laboratory information system ® (for more information refer to the Quantum Blue Connect Software manual), the submenu displays all unsent ®... -
Page 29: 11 4 5 User Management
SYSTEM AND SETTINGS 11.4.5 User Management The User Management is activated by default (1) It protects the reader against non-authorized access and use If the User Management is turned off (2), no login credentials are required when turning on the device and the Admin Area is freely accessible Be aware that if the User Managment is off, generated results are not linked to the programmed users Two user roles are available:... -
Page 30: 11 4 6 Update Software
SYSTEM AND SETTINGS 11.4.6 Update Software You will be informed by your local BÜHLMANN Laboratories AG distributor about current software updates Under this submenu, the instrument software version can be updated and/ or additional languages can be added to the language selection section by plugging in an USB stick containing an instrument SW update or a language update Confirm the successfully completed update by pressing the tick symbol 11.4.7 Mode of Operation... -
Page 31: 11 4 9 Communication Settings
SYSTEM AND SETTINGS Please note that the Quantum Blue Reader will shut down and restart ® automatically when performing a manufacturer reset 11.4.9 Communication Settings In this menu, the administrator can manage network connections and is able to set up a connection to the Quantum Blue Connect Software and, an external server/client solution to manage and view results from ®... -
Page 32: Submenu Connect Within Communication Settings
SYSTEM AND SETTINGS Submenu Connect within Communication Settings For the reader to report results to the Quantum Blue Connect Software, the Connect functionality needs to ® be turned on (1) The Connect server IP address and port number need to be entered and changes need to be saved (2) By pressing Test... -
Page 33: 11 4 10 Shutdown Settings
MAINTENANCE AND CLEANING 11.4.10 Shutdown Settings An automated log off followed by an automated device shut down increases the securtiy level of the Quantum Blue Reader, preserves components like the display and saves energy ® You can select between three different time periods of Quantum Blue Reader inactivity after which it will ®... -
Page 34: 12 2 Maintenance
MAINTENANCE AND CLEANING 12.2 Maintenance In case the Quantum Blue Reader displays a warning during self-check (refer to Figure 11 of chapter ® 12 3 Device Self-Check for more information), stating that the optical system has only partially met or not met the required values, the user can clean the internal reference material with dry swabs In the Maintenance menu, a live view of the inside of the device is shown on the screen and the light inside the system is turned on (Figure 10C) The user can now clean the internal reference material and restart the Quantum Blue... -
Page 35: 12 3 Device Self-Check
MAINTENANCE AND CLEANING Make sure that you do not touch the camera or lights of the Quantum Blue ® Reader which are located at the top side of the inside chamber The maintenance mode can only be exited by performing a hard shutdown - the power button needs to be pressed for at least 6 seconds until the device turns off After restart, the Quantum Blue Reader will perform a self-check and the home... -
Page 36: 13. Technical And Scientific Support
TECHNICAL AND SCIENTIFIC SUPPORT 13. TECHNICAL AND SCIENTIFIC SUPPORT If technical or scientific support is required, please directly contact your local BÜHLMANN Laboratories AG distributor Our local distributors will give you the initial assistance to find an immediate solution for your issue If needed, our local distributor will escalate your questions or issues to the Customer Support Department at BÜHLMANN Laboratories AG In case you need to return the Quantum Blue... -
Page 37: Troubleshooting And Messages
TROUBLESHOOTING AND MESSAGES 14. TROUBLESHOOTING AND MESSAGES The following table lists information on error messages and potential mitigation measures Message on Graphical User Potential Root Cause Possible user action Interface «Barcode not found Check No barcode card is in the drawer Check that the barcode card in the barcode on test card and drawer and try again (see also chapter... -
Page 38: Technical Data
TECHNICAL DATA 15. TECHNICAL DATA BÜHLMANN Laboratories AG reserves the right to change specifications at any time 15.1 Dimensions and Weight of the Instrument Dimensions H / W / D: 150 x 150 x 150 mm (6 x 6 x 6 inch) Weight Approx 1 2 kg (2 6 lb) 15.2 Mechanical Data and Hardware Features... -
Page 39: 15 4 Optics
TECHNICAL DATA 15.4 Optics Optical system 5 Mpix camera (8Bit) Signal detection Colorimetric Colloidal gold, colored latex beads, carbon particles, Colorimetric detection Measurement time < 20 seconds Surveillance Internal reference check using solid standards 15.5 Power requirements of the instrument Input: 100–240 V AC, 0 5 A, 50-60 Hz;... -
Page 40: 15 7 Applicable Standards
APPLICABLE STANDARDS 15.7 Applicable Standards CE conformity to IVD Directive 98 / 79 / EC DIN EN 61326-2-6:2013 Electrical equipment for measurement, control and laboratory Electromagnetic + IEC 61326-2-6:2012 use - EMC requirements - Part 2-6: Particular requirements - compatibility In vitro diagnostic (IVD) medical equipment (EMC) requirements... -
Page 41: 16. Warranty And Obligations
WARRANTY 16. WARRANTY AND OBLIGATIONS For product and service inquiries, please contact: BÜHLMANN Laboratories AG Baselstrasse 55, 4124 Schönenbuch, Switzerland Tel.: + 41 61 487 12 12 Fax: + 41 61 487 12 34 Email: support@buhlmannlabs.ch Customer and product service are available during standard office times (Monday to Friday, 8 a m to 5 p m Central European Time (CET)) 16.1 Product Warranty A manufacturers’... -
Page 42: 16 3 Waste Electrical And Electronic Equipment (Weee)
APPENDIX 16.3 Waste Electrical and Electronic Equipment (WEEE) This section provides information about disposal of waste electrical and electronic equipment by users in the European Union The European Directive 2002/96/EC on WEEE requires proper disposal of electrical and electronic equipment when it reaches its end of life The crossed-out wheeled bin symbol (see below) indicates that this product must not be disposed off with other waste;... -
Page 43: 17. Declaration Of Conformity
DECLARATION OF CONFORMITY 17. DECLARATION OF CONFORMITY Quantum Blue Reader - User Manual Version A1 ® Release Date: 2020-11-04... - Page 44 Notice All rights reserved The information contained in this document is subject to change without notice Trademarks Trademarks and labels used in this document are property of their respective owners Copyright Information Quantum Blue Reader User Manual ® Document Version: VA1 ©...
Need help?
Do you have a question about the Quantum Blue Reader and is the answer not in the manual?
Questions and answers