
Related Manuals for NX NX-HD16100W


Summary of Contents for NX NX-HD16100W
- Page 1 ENGINEERED FOR THE NEXT GENERATION™ FHD DRONE WITH OPTICAL FLOW, WIFI AND 100M RANGE USER MANUAL NX-HD16100W...
-
Page 3: Table Of Contents
GENERAL SAFETY ...................2 2.0 PRODUCT CONTENTS ................3 PRODUCT OVERVIEW ..................3 CONTROLLER OVERVIEW ................4 3.0 BATTERY SAFETY ..................5 4.0 SETTING UP YOUR NX DRONE ..............7 INSTALLING THE BATTERY ................7 REPLACING ROTOR BLADES .................7 INSTALLING ROTOR GUARDS ...............8 REMOTE CONTROL ..................9 FLIGHT SAFETY....................9... -
Page 4: Welcome
• For information outside Australia please visit the website of your local aviation authority. • Do not attempt to modify the NX Drone or any of its components in any way, doing so will void your warranty and may affect the operation of the drone. -
Page 5: Product Contents
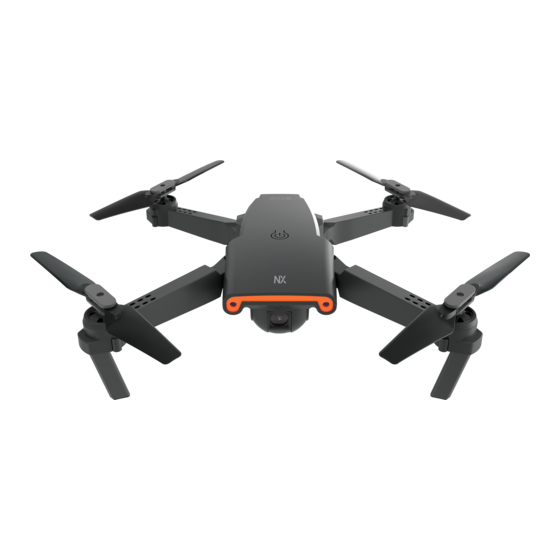
PRODUCT CONTENTS 1. NX Drone 5. USB AC Wall Charger 6. USB Charging Cable 2. Remote Control 3. Rotor Blades x 4 7. Screw Driver 4. Rotor Guards x 4 8. User Manual PRODUCT OVERVIEW 1. Camera 2. Rotor Blades 3. -
Page 6: Controller Overview
CONTROLLER OVERVIEW 1. Speed 7. Photo 2. Reverse 8. Video 3. Left Control Stick (Pulse / 9. Headless Mode Descend, Yaw Left / Right) 10. 360 Flip 4. One Key Take Off / Landing 11. LED Power ON 5. Emergency Stop 12. -
Page 7: 3.0 Battery Safety
When handled incorrectly, Lithium polymer batteries can be dangerous and can potentially harm and do damage to persons or property. NX does not accept any liability for damage to persons or property if the battery is not correctly charged, stored or protected. - Page 8 Overcharging will damage the battery and effect the flight time. The NX battery can take up to 120 minutes to fully charge. If the battery has been on charge for any longer than 2.5 hours and indicator on the charging cable is not showing that the battery is charged, please remove the battery from the charger.
-
Page 9: Setting Up Your Nx Drone
REPLACING ROTOR BLADES If your rotor blades become damaged or the NX drone is no longer flying straight, the rotor blades may need to be replaced. To replace the NX's rotor blades please follow the directions below. -
Page 10: Installing Rotor Guards
1. To install the rotor guards please insert the rotor guards' pegs into the designated holes near the motors on the NX's arms. 2. To remove the rotor guard, please press the middle part of rotor guard first, then take the... -
Page 11: Remote Control
• Closing the right controller arm will turn off the controller. FLIGHT SAFETY Before flying your NX make sure that you are in a safe setting. CASA restrictions regarding flying drones require the drone to be no closer than 5.5kms from any airport or airfield while flying. Drones should also not be flown over populated areas or any closer than 30 meters from vehicles, people or animals. -
Page 12: Syncing Your Nx Drone
SYNCING YOUR NX DRONE 1. Press the ON/OFF button on the top of the drone to turn the drone on, the LED light of drone will blink a blue colour (front) and a red colour (rear). 2. Extend the arms of the controller downwards, the controller will make a beeping sound and the LED indicator will Power On the controller. -
Page 13: Flying Your Nx Drone
You can only use this trim function when drone is airborne. 1. Make sure that the Remote Control and NX drone are switched on and correctly paired. 2. With the right control stick centered, push down on it, once you hear the stick button click, release it. -
Page 14: Speed Mode
SPEED MODE The NX Drone has 3 speed modes . To cycle through the Speed Modes, use the speed button on the top left of the controller. -
Page 15: Camera / Video Features
CAMERA / VIDEO FEATURES CAMERA MODE 1. With the drone turned on and paired, press the Photo button. 2. The remote control will beep once and the LED lights of drone will blink once to indicate that a photo was taken. VIDEO MODE 1. -
Page 16: Headless Mode
HEADLESS MODE 1. Press the headless mode button on the controller (shown in the diagram to the right). The remote control will start beeping once indicating that headless mode has been enabled. To stop headless mode, press the headless mode button again; the controller will beep again. -
Page 17: Emergency / Stop
Optical flow position is a way to keep your drone flying stable, which ensures the drone takes pictures /video in high quality. 1. For the Optical Flow feature, the NX drone is fitted with two cameras. 2. One camera is positioned at the front and is has a 1080P resolution, the other camera is positioned at the bottom of the drone and has a 480P resolution. -
Page 18: App
13.0 The NX drone has a built in WIFI connection which is used to wirelessly connect your smart-phone to your NX drone allowing you to view the cameras live view, trigger recording, control and fly your NX drone. 1. To connect your smart-phone to the NX drone please follow the instructions below. -
Page 19: App Instruction
13.1 APP INSTRUCTION 1. Back 9. Record Video 2. Camera Change 10. Take Photo 3. Folder 11. Speed 30% / 60% / 100% 4. One Key Take Off / Landing 12. Headless Mode 5. Throttle 13. Invert View 6. Emergency Stop 14. -
Page 20: Drone Maintenance
DRONE MAINTENANCE Avoid exposing your NX Drone and it's accessories to dust, sand and moisture as these can damage the NX Drone. If the NX Drone is exposed to dust or sand, use a soft brush to remove any visible particles. -
Page 21: Warranty Terms & Conditions
The retailer will contact you when the product is ready for collection. All costs involved in claiming this warranty, including the cost of the retailer sending the product to NX, will be borne by you. NX Address: 115-119 Link Road, Melbourne Airport Australia Ph: +61 03 8331 4800 Email: info@nx-tech.com.au... - Page 22 ACCURACY OR RELIABILITY OF ANY INFORMATION OBTAINED THROUGH THE NX SERVICES (INCLUDING THIRD PARTY CONTENT), THAT ANY DEFECTS IN THE NX SERVICES WILL BE CORRECTED OR THAT THE NX PRODUCTS OR NX SERVICES WILL BE COMPATIBLE WITH ANY OTHER SPECIFIC HARDWARE OR SERVICE. FURTHER, NX DOES NOT...
-
Page 23: Limitations Of Nx Liability
EXCLUDED. 19.0 LIMITATIONS OF NX LIABILITY UNDER NO CIRCUMSTANCES WILL NX BE LIABLE IN ANY WAY FOR ANY CONTENT, INCLUDING, BUT NOT LIMITED TO, THE LOSS OF CONTENT, ANY ERRORS OR OMISSIONS IN ANY CONTENT, OR ANY LOSS OR DAMAGE OF ANY KIND INCURRED IN CONNECTION WITH USE OF OR EXPOSURE TO ANY CONTENT POSTED, EMAILED, ACCESSED, TRANSMITTED, OR OTHERWISE MADE AVAILABLE VIA THE NX APP. - Page 25 20.0 NOTES...
- Page 28 ENGINEERED FOR THE NEXT GENERATION™ All Images, Information and Content are Copyright © 2020 Directed Electronics www.nx-tech.com.au | www.nx-tech.co.nz Australia Pty Ltd. All Rights Reserved.
Need help?
Do you have a question about the NX-HD16100W and is the answer not in the manual?
Questions and answers