Table of Contents
Advertisement
Available languages
Available languages
Quick Links
Advertisement
Table of Contents

Related Manuals for Grundig Micro 75 DAB+


Summary of Contents for Grundig Micro 75 DAB+
- Page 1 PORTABLE RADIO Micro 75 DAB+...
- Page 2 GRUNDIG Kundenberatungszentrum Haben Sie Fragen? Montag bis Freitag von 8.00 bis 18.00 Uhr Unser Kundenbera- Deutschland: 0911 / 590 597 30 tungszentrum steht Österreich: 0820 / 220 33 22 * Ihnen werktags stets * gebührenpflichtig (0,145 €/Min. aus dem Festnetz, von 8.00 –...
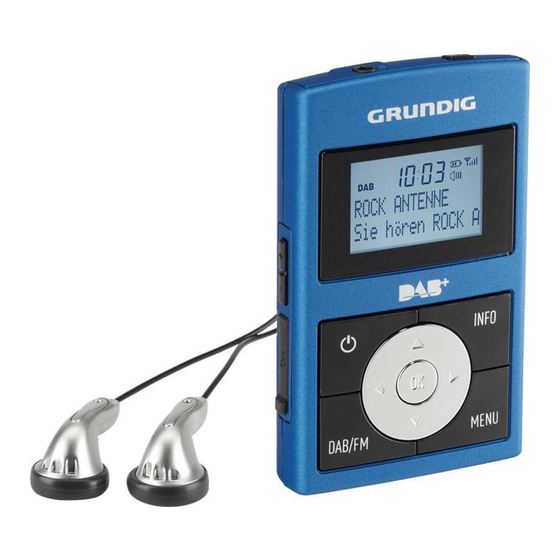
- Page 3 _________________________________ Display INFO MENU ● + – DAB/FM...
- Page 4 _________________________________ DEUTSCH 05 -22 ENGLISH 23 - 38 FRANÇAIS 39 - 56 DANSK 57 - 73...
- Page 5 SICHERHEIT ___________________ Dieses Gerät ist für die Wiedergabe von Tonsi- ■ gnalen bestimmt. Jede andere Verwendung ist aus- drücklich ausgeschlossen. Schützen Sie das Gerät vor Feuchtigkeit (Tropf und ■ Spritzwasser). Stellen Sie keine mit Flüssigkeit gefüllten Gefäße (Va- ■ sen oder ähnliches) auf das Gerät. Gefäße könnten umkippen und mit der auslaufenden Flüssigkeit die elektrische Sicherheit beeinträchtigen.
-
Page 6: Auf Einen Blick
AUF EINEN BLICK _____________ Die Abbildung des Gerätes finden sie auf Seite 3. Drücken und gedrückt halten schaltet das Gerät ein und aus. Anschlussbuchse für den mitgelieferten Stereo-Ohrhörer (3,5mm Stereo-Stecker); Antenne für DAB-/ und FM-Empfang. Länger drücken, sperrt und entsperrt die Tasten des Gerätes. -
Page 7: Akku Aufladen
VORBEREITEN _________________ Akku aufladen Das Gerät wird einem integrierten Lithium-Polymer- Akku 1 x 3,7 V, 1000 mA betrieben. Den Akku des Gerätes laden Sie am Computer oder über ein handelsübliches USB-Ladegerät auf. Hinweis: Beim Aufladen über ein handelsübliches USB-La- ■ degerät bleibt das Gerät betriebsbereit. -
Page 8: Kopfhörer Anschließen
VORBEREITEN _________________ Achtung: Bei unsachgemäßem Austausch des Akkus besteht ■ Explosionsgefahr. Der Akku kann nicht ausgetauscht werden. ■ Kopfhörer anschließen Kopfhörer an die Kopfhörerbuchse » « (ø 3,5 mm) anschließen. Achtung: Ständige Benutzung der Kopfhörer bei hoher Laut- ■ stärke kann zu Gehörschädigungen führen. Hinweis: Das Anschlusskabel des Kopfhörers dient dem Ge- ■... - Page 9 EINSTELLUNGEN ______________ DAB-Rundfunk-Programme einstellen und speichern – automatisch Sie können den automatischen Programm-Suchlauf starten, wenn Sie nach DAB-Rundfunk-Programmen suchen wollen. Das Gerät einschalten, dazu » « drücken und ge- drückt halten. – Anzeige: »00:00« blinkt, »DAB« und »<Full scan>« werden angezeigt. Menüpunkt »<Full scan>«...
- Page 10 EINSTELLUNGEN ______________ » « drücken und gedrückt halten. – Anzeige: »Preset Store« und der erste Pro- grammplatz. Gewünschten Programmplatz mit » « wählen und mit »OK« bestätigen. – Anzeige: »Preset 1 stored«. DAB-Rundfunk-Programme einstellen und speichern – manuell Programmquelle DAB mit »DAB/FM« wählen. Das Menü...
- Page 11 EINSTELLUNGEN ______________ FM-Rundfunk-Programme einstellen und speichern Programmquelle FM mit »DAB/FM« wählen. Das Menü mit »MENU« aufrufen. – Anzeige: »FM« und »<Scan settin g >«. Menüpunkt »<Scan settin g >« mit »OK« bestä- tigen. – Anzeige: »<Stron g stations>«. Hinweis: Wählen Sie, ob nach empfangsstarken Rundfunk- ■...
- Page 12 EINSTELLUNGEN ______________ » « drücken und gedrückt halten. – Anzeige: »Preset Store« und der erste Pro- grammplatz. Gewünschten Programmplatz mit » « wählen und mit »OK« bestätigen. – Anzeige: »Preset 1 stored«. Uhrzeit aktualisieren – automatisch Die Uhrzeit wird automatisch aktualisiert, wenn ein Rundfunk-Programm ein Zeitsignal sendet.
-
Page 13: Betrieb
BETRIEB ________________________ Allgemeine Funktionen Ein- und ausschalten Das Gerät einschalten, dazu » « drücken und ge- drückt halten. Lautstärke ändern –« einstellen. Gewünschte Lautstärke mit »+ Klang einstellen Das Menü mit »MENU« aufrufen. Menüpunkt »<S y stem>« mit » « wählen und mit »OK«... - Page 14 BETRIEB ________________________ Gespeicherte Programme aufrufen Gewünschtes Programm der Stationstasten » « aufrufen; oder gewünschtes Programm aus der Programmliste mit » « wählen. DAB-Programminformationen einblenden Informationen zum aktuellen DAB-Programm kurzzei- tig einblenden, dazu »INFO« wiederholt drücken. – Folgende Informationen werden angezeigt: Infos vom Programmanbieter (z.B.
- Page 15 BETRIEB ________________________ Dynamic Range Control (DRC) für DAB- Programme einstellen Wenn Sie Dynamic Range Control aktivieren, können Sie leise Passagen in einer lauten Umgebung besser hören. Das Menü mit »MENU« aufrufen. Menüpunkt »<DRC>« mit » « wählen und mit »OK« bestätigen. –...
- Page 16 Hinweise: Es kann einige Zeit dauern, bis alle RDSInformatio- ■ nen übertragen worden sind. GRUNDIG hat keinen Einfluss auf die Richtigkeit ■ dieser Informationen. »INFO« wiederholt drücken. – Die folgenden Informationen werden eingeblen- det: Der Name des Rundfunk-Programmes, Radio-...
- Page 17 SONDERFUNKTIONEN _______ Beleuchtung der Anzeige einstellen Sie können wählen, ob die Anzeige andauernd be- leuchtet ist oder nach der eingestellten Zeit erlischt. Das Menü mit »MENU« aufrufen. Menüpunkt »<S y stem>« mit » « wählen und mit »OK« bestätigen. Menüpunkt »<Backli g ht>« mit » «...
- Page 18 SONDERFUNKTIONEN _______ Alle Einstellungen löschen (Reset) Durch diesen Systemreset kann das Gerät in seinen Auslieferungszustand zurückgesetzt werden. Hierbei gehen alle Einstellungen verloren. Das Menü mit »MENU« aufrufen. Menüpunkt »<S y stem>« mit » « wählen und mit »OK« bestätigen. Menüpunkt »<Factor y Reset>« mit » «...
-
Page 19: Software Update
SONDERFUNKTIONEN _______ Menüpunkt »<Prune>« mit » « wählen und mit »OK« bestätigen. – Eine Sicherheitsabfrage wird eingeblendet. Die Option »Yes« (Ja) mit » « wählen. Hinweis: Zum Abbrechen die Option »No« (Nein) mit » « ■ wählen. Einstellung mit »OK« bestätigen. Einstellung mit »MENU«... - Page 20 SONDERFUNKTIONEN _______ Hinweis: Zum Abbrechen des Updates die Option »No« ■ (Nein) mit » « wählen. Update-Programm am PC starten. Nach erfolgreichem Update die Verbindung zum PC entfernen. Tastensperre aktivieren und aufheben » « drücken und gedrückt halten. – Anzeige: »Ke y s Locked« und das Symbol » «. –...
-
Page 21: Technische Daten
INFORMATIONEN ____________ Technische Daten Das Typenschild befindet sich auf der Unterseite des Gerätes. Dieses Gerät ist funkentstört entspre- chend der geltenden EU-Richtlinien. Dieses Produkt erfüllt die europäischen Richtlinien 2004/108/EC und 2011/65/EU. Spannungsversorgung: Akku: 1 x 3,7 V, Lithium-Polymer 1000 mA Empfangsbereich: DAB/DAB+ 174,928 ...239,200 MHz FM 87,5 –... - Page 22 INFORMATIONEN ____________ Umwelthinweis Dieses Produkt wurde aus hochwertigen Materialien und Teilen hergestellt, die für das Recycling tauglich sind und wieder verwendet werden können. Das Produkt darf daher am Ende seiner Lebensdauer nicht über den normalen Hausmüll ent- sorgt werden, sondern muss an einem Sammelp unkt für das Recycling von elektrischen und elektronischen Geräten abgegeben werden.
- Page 23 SAFETY ________________________ This device is designed for the playback of audio ■ signals. Any other use is expressly prohibited. Make sure the device is protected from dripping or ■ splashing water. Do not place any vessels such as vases on the de- ■...
- Page 24 OVERVIEW ____________________ See the figure on page 3. Press and hold down switches the device on and off. Earphone socket (3.5 mm stereo plug). Antenna for DAB-/ and FM reception. Press and hold down, locks and unlocks buttons of the device. Display Shows various information such as channel name, time, volume and the menu.
-
Page 25: Charging The Battery
PREPARATION ________________ Charging the battery The device operates with the integrated lithium-polymer battery 1 x 3.7 V, 1000 mA. Charge the battery for the device on a computer or using a USB adapter. Note: When charging with a standard USB adapter, the ■... -
Page 26: Connecting Earphones
PREPARATION ________________ Caution: There is a risk of explosion if the battery is not re- ■ placed properly. Only use the same type of battery or an equiva- ■ lent. Connecting earphones Connect the headphones to the » « headphone jack (ø... - Page 27 SETTINGS ______________________ Tuning and storing DAB and FM radio stations – automatically You can activate the Auto Tuning System if you will search DAB radio stations. Press and hold down » « to switch on the device. – Display: »00:00« flashes, »DAB« and »<Full scan>«...
- Page 28 SETTINGS ______________________ Programming DAB radio stations – manually Select the input source DAB with »DAB/FM«. Open the menu with »MENU«. – Display: »DAB« and »<Full scan>«. Select the option »<Manual tune>« with » « and confirm by pressing »OK«. – Display: e.g. »5A I74.928MHz« (channel and frequency of a DAB radio station).
-
Page 29: Updating The Time - Automatically
SETTINGS ______________________ Note: You can select whether the device will scan ra- ■ dio stations with weak signal (display »Stron g stations onl y «) or all radio stations (display: »All stations«). Select the desired option with » « and confirm by pressing »OK«. -
Page 30: General Functions
OPERATION ___________________ General functions Switching on and off Press and hold down » « to switch the device on and off. Adjusting the volume –«. Adjust the volume using »+ Adjusting the tone Open the menu with »MENU«. Select the option»<S y stem>« with » «... -
Page 31: Operation
OPERATION ___________________ Selecting stored stations Select the station you want to use » « from pre- sets; select the station you want to use » « from the program list. Displaying DAB station information To display information on the current DAB station, press »INFO«... - Page 32 FM stations. Notes: It may take some time before all RDS information ■ is available. GRUNDIG has no influence on the correctness of ■ such information. Press »INFO« repeatedly. – The following display appears in succesion: The...
-
Page 33: Special Functions
SPECIAL FUNCTIONS _________ Set the display illumination You can choose whether the display is lit continuously or whether it disappears after the specified period. Open the menu with »MENU«. Select the option »<S y stem>« with » « and confirm by pressing »OK«. Select the option »<Backli g ht>«... - Page 34 SPECIAL FUNCTIONS _________ Deleting all settings (Reset) This function enables you to reset all custom settings back to the default settings. All setings are lost when you do this. Open the menu with »MENU«. Select the option »<S y stem>« with » «...
- Page 35 SPECIAL FUNCTIONS _________ Select the option »<Prune>« with » « and con- firm by pressing »OK«. – A safety confirmation is displayed. Select the option »Yes« with » «. Note: To cancel the function select the option »No« with ■ »...
-
Page 36: Activating And Deactivating The Key Lock
SPECIAL FUNCTIONS _________ Note: To cancel the function select the option »No« by ■ pressing » «. Start the update program on the PC. Once the software is updated successfully, remove the device from the PC. Activating and deactivating the key lock Press and hold down »... -
Page 37: Technical Data
INFORMATION _______________ Technical data The type plate is located on the bottom of the device. This device is noise-suppressed according to the applicable EU directives. This prod- uct fulfils the European directive 2004/108/EC and 2011/65/EU. Power supply: Rechargeable battery: 1 x 3.7 V lithium polymer 1000 mA Frequency band: DAB/DAB+ 174.928 ...239.200 MHz... -
Page 38: Environmental Note
INFORMATION _______________ Environmental note This product has been manufactured with high quality parts and materials which can be reused and are suitable for recycling. Therefore, do not dispose the product with normal domestic waste at the end of its service life. Take it to a collection point for the recycling of electri- cal and electronic equipment. - Page 39 SÉCURITÉ ______________________ Cet appareil est conçu pour la lecture des signaux ■ audio. Son utilisation à d'autres fins est formellement interdite. Assurez-vous que l'appareil est protégé contre les ■ éclaboussures ou les gouttes d'eau. Évitez de poser des récipients tels que les vases sur ■...
-
Page 40: Vue D'ensemble
VUE D'ENSEMBLE _____________ Voir le schéma en page 3. Appuyez et maintenez enfoncés les inter- rupteurs pour mettre l'appareil sous et hors tension. Prise d'écouteur (prise stéréo de 3,5 mm). Antenne pour réception DAB-/ et FM. Appuyez et maintenez enfoncé pour verrouiller et déverrouiller les boutons de l'appareil. -
Page 41: Chargement De La Batterie
VUE D'ENSEMBLE _____________ DAB/FM Bascule entre les sources d'entrée DAB et Port USB permettant de raccorder le lecteur à un ordinateur, un chargeur USB standard disponible dans le commerce avec prise USB utilisant un câble USB. + – Règle le volume. PRÉPARATION ________________ Chargement de la batterie... -
Page 42: Raccordement Des Écouteurs
PRÉPARATION ________________ Allumez l'ordinateur ou branchez le chargeur à l'ali- mentation électrique. – L'affichage de lecteur indique la progression de la re- - charge. Le temps de charge est d'environ cinq heures. » « s'affiche à l'écran lorsque la batterie est pleine. - Page 43 RÉGLAGES ____________________ Réglage et mémorisation des stations de radio DAB et FM – automatiques Vous pouvez activer le Système de syntonisation auto- matique si vous souhaitez rechercher des stations de radio DAB. Appuyez et maintenez » « pour mettre le lecteur en marche.
- Page 44 RÉGLAGES ____________________ Appuyez sur la touche » « et maintenez-la enfon- cée. – Affichage : »Preset Store« et le premier pré- réglage. Sélectionnez le préréglage avec » «, puis confir- mez en appuyant sur »OK«. – Affichage : »Preset 1 stored«. Programmation manuelle des stations de radio DAB Sélectionnez la source d'entrée DAB à...
- Page 45 RÉGLAGES ____________________ Réglage et mémorisation des stations de radio FM Sélectionnez la source d'entrée FM à l'aide du bou- ton »DAB/FM«. Ouvrez le menu à l'aide du bouton »MENU«. – Affichage : »FM« et »<Full scan>«. Confirmez l'option »<Scan settin g >« en ap- puyant sur le bouton »OK«.
- Page 46 RÉGLAGES ____________________ Appuyez sur la touche » « et maintenez-la enfon- cée. – Affichage : »Preset Store« et le premier pré- réglage. Sélectionnez le préréglage avec » «, puis confir- mez en appuyant sur »OK«. – Affichage : »Preset 1 stored«. Mise à...
- Page 47 FONCTIONNEMENT __________ Fonctions d'ordre général Mise en marche et à l'arrêt Appuyez et maintenez » « pour mettre le lecteur en marche ou l'arrêter. Réglage du volume –«. Réglez le volume à l'aide du bouton »+ Réglage de la tonalité Ouvrez le menu à...
- Page 48 FONCTIONNEMENT __________ Mode DAB Il importe de brancher les écouteurs pour garantir la meilleure réception DAB possible. Le câble de connexion du casque peut également servir d'antenne DAB. Sélection de la source d'entrée DAB Sélectionnez la source d'entrée DAB à l'aide du bou- ton »DAB/FM«.
- Page 49 FONCTIONNEMENT __________ Réglage du Dynamic Range Control (DRC) pour les stations DAB Quand vous activez le Dynamic Range Control (DRC), vous pouvez mieux entendre les sons faibles dans un environnement bruyant. Ouvrez le menu à l'aide du bouton »MENU«. Sélectionnez l'option »<DRC>« à l'aide du bouton »...
- Page 50 FM. Remarques : La disponibilité de toutes les informations RDS peut ■ nécessiter du temps. GRUNDIG ne saurait authentifier l'exactitude de ■ ces informations. Appuyez plusieurs fois sur »INFO«. – L'affichage suivant apparaît successivement : Le nom de la station de radio, le texte radio (le cas échéant), le type de station (PTY), la fréquence, le...
-
Page 51: Fonctions Spéciales
FONCTIONS SPÉCIALES ______ Régler l'éclairage de l'écran Vous pouvez choisir si l'écran reste allumé en continu ou s'il s'éteint au bout d'une période définie. Ouvrez le menu à l'aide du bouton »MENU«. Sélectionnez l'option »<S y stem>« à l'aide du bouton »... - Page 52 FONCTIONS SPÉCIALES ______ Effacer tous les réglages (Réinitialisation) Cette fonction vous permet de réinitialiser tous les réglages personnalisés à leurs paramètres par défaut. Avec cette opération, tous les réglages sont perdus. Ouvrez le menu à l'aide du bouton »MENU«. Sélectionnez l'option »<S y stem>« à l'aide du bouton »...
-
Page 53: Mise À Jour Du Logiciel
FONCTIONS SPÉCIALES ______ Sélectionnez l'option »<Prune>« à l'aide du bou- ton » « et confirmez en appuyant sur »OK«. – Une confirmation de sécurité s'affiche. Sélectionnez l'option »Yes« à l'aide du bouton » «. Remarque : Pour annuler la fonction, sélectionnez l'option ■... - Page 54 FONCTIONS SPÉCIALES ______ Remarque : Pour annuler la fonction, sélectionnez l'option ■ »No« en appuyant sur » «. Démarre le programme de mise à jour sur le PC. Lorsque la mise à jour du logiciel est réussie, débranchez l'appareil du PC. Activer et désactiver le verrouillage Appuyez sur la touche »...
-
Page 55: Données Techniques
INFORMATIONS ______________ Données techniques La plaque signalétique se trouve sur la face inférieurede l’appareil. Cet appareil est antiparasité confor- mément aux directives européennes en vigueur. Le présent appareil est conforme à la directive européenne 2004/108/EC et 2011/65/EU. Alimentation en courant : Batterie rechargeable : 1 x 3,7 V, lithium-polymère 1000 mA Gammes d’ondes:... -
Page 56: Remarque Relative À L'environnement
INFORMATIONS ______________ Remarque relative à l'environnement Ce produit a été fabriqué avec des pièces de qualité supérieure et des matériaux suscep- tibles d'être réutilisés. Ils sont donc appro- priés pour le recyclage. Par conséquent, il est conseillé de ne pas jeter cet appareil avec des ordures ménagères à... - Page 57 SIKKERHED ___________________ Dette apparat er beregnet til afspilning af lydsigna- ■ ler. Enhver anden anvendelse er udtrykkeligt forbudt. Sørg for at apparatet er beskyttet mod vanddråber ■ eller -stænk. Undlad at placere beholdere, som f.eks. vaser, oven ■ på apparat. De kan vælte og spilde væske på de elektroniske komponenter, hvilket vil udgøre en sik- kerhedsrisiko.
- Page 58 OVERSIGT _____________________ Se tegningen på side 3. Tryk og hold nede tænder og slukker ap- paratet. Stik til øretelefoner (3,5 mm stereostik). Antenne til DAB-/ og FM-modtagelse. Tryk og hold nede, låser og aflåser knap- per på apparatet. Display Viser forskellige informationer, såsom kanalnavn, tid, alarmtid, volumen og me- nuen.
-
Page 59: Opladning Af Batteriet
FORBEREDELSE ________________ Opladning af batteriet Apparatet drives af det integrerede litium-polymer bat- teri 1 x 3,7 V, 1000 mA. Oplad apparatets batteri på en computer ved brug af en USB adapter. Bemærk: Når du oplader batteriet ved brug af en standard ■... - Page 60 FORBEREDELSE ________________ Forsigtig: Der er en risiko for eksplosion, hvis patteriet ikke ■ udskiftes korrekt. Brug kun den samme batteritype eller en tilsva- ■ rende. Tilslutning af øretelefoner Slut høretelefoner til » « høretelefonstikket (Ø 3,5 mm). Forsigtig: Overdrevet lydtryk fra høretelefoner eller headset ■...
- Page 61 INDSTILLINGER _______________ Indstilling og lagring af DAB- og FM-radiostationer – automatisk Du kan aktivere Auto Tuning System, hvis du vil søge DAB-radiostationer. Tryk og hold » « for at tænde apparatet. – Display: »00:00« blinker, »DAB« og »<Full scan>« vises. Bekræft indstillingen »<Full scan>«...
- Page 62 INDSTILLINGER _______________ Programmering af DAB radiostationer – manuelt Vælg inputkilden DAB med »DAB/FM«. Åbn menuen med »MENU«. – Display: »DAB« og »<Full scan>«. Vælg indstillingen »<Manual tune>« med » « og bekræft ved at trykke på »OK«. – Display: f.eks. »5A I74.928MHz«...
- Page 63 INDSTILLINGER _______________ Bemærk: Du kan vælge, om apparatet skal scanne radio- ■ stationer med stærkt signal (display »Stron g stations onl y «) eller alle radiostationer (dis- play: »All stations«). Vælg den ønskede indstilling med » « og bekræft ved at trykke på »OK«. Tryk og hold»...
-
Page 64: Generelle Funktioner
FUNKTION ____________________ Generelle funktioner At tænde og slukke Tryk og hold » « for at tænde eller slukke apparatet. Justering af lydstyrke –«. Juster lydstyrken med »+ Indstilling af tone Åbn menuen med »MENU«. Vælg indstillingen »<S y stem>« med » «... - Page 65 FUNKTION ____________________ DAB funktion Høretelefoner skal være tilsluttet for at få den bedste DAB-modtagelse. Forbindelseskablet til øretelefoner fungerer også som en DAB-antenne. Valg af indgangskilde DAB Vælg inputkilden DAB med »DAB/FM«. – Display: »DAB Mode«, derefter navnet på en DAB-radiostation. Valg af gemte stationer Vælg den station, du ønsker at bruge »...
- Page 66 FUNKTION ____________________ Indstilling af Dynamic Range Control (DRC) for DAB stationer Når du aktiverer Dynamic Range Control, kan du høre lavere lyde bedre i høje omgivelser. Åbn menuen med »MENU«. Vælg indstillingen »<DRC>« med » « og bekræft ved at trykke på »OK«. –...
- Page 67 Bemærk: Det kan tage noget tid, inden alle RDS informatio- ■ ner er tilgængelige. GRUNDIG har ingen indflydelse på korrektheden ■ af sådanne informationer. Tryk på »INFO« flere gange. – Følgende vises i træk: Navnet på radiostationen, radio-tekst (hvis tilbydes), stationstype (PTY), fre- kvens, mono- eller stereosignal, den aktuelle tid og dato.
-
Page 68: Special Functions
SPECIAL FUNCTIONS _________ Indstille belysning af display Du kan vælge, om displayet lyser konstant eller lyset forsvinder efter en bestemt tidsperiode. Åbn menuen med »MENU«. Vælg indstillingen »<S y stem>« med » « og bekræft ved at trykke på »OK«. Vælg indstillingen »<Backli g ht>«... - Page 69 SPECIAL FUNCTIONS _________ Slette alle indstillinger (nulstilling) Den funktion lader dig nulstille alle brugerdefinerede indstillinger tilbage til fabriksindstillingerne. Alle indstil- linger mistes, når du gør dette. Åbn menuen med »MENU«. Vælg indstillingen »<S y stem>« med » « og bekræft ved at trykke på »OK«. Vælg indstillingen »<Factor y Reset>«...
- Page 70 SPECIAL FUNCTIONS _________ Vælg indstillingen »<Prune>« med » « og be- kræft ved at trykke på »OK«. – Der vises en sikkerhedsbekræftelse. Vælg indstillingen »Yes« med » «. Bemærk: For at annullere funktionen, vælg indstillingen ■ »No« med » «. Tryk på...
- Page 71 SPECIAL FUNCTIONS _________ Bemærk: For at annullere funktionen, vælg indstillingen ■ »No« ved at trykke på » «. Start opdatering af programmet på pc'en. Når softwaren er opdateret, fjern apparatet fra pc'en. Aktivering og deaktivering af tastelåsen Tryk og hold » «.
-
Page 72: Tekniske Data
INFORMATION _______________ Tekniske data Typeskiltet er placeret i bunden af appara- tet. Dette apparat er støjdæmpet i henhold til de gældende EU direktiver. Dette produkt opfylder EU-direktivet 2004/108/EF og 2011/65/ Strømforsyning: Genopladeligt batteri: 1 x 3,7 V, litium-polymer 1000 mA Frekvensbånd: DAB/DAB+ 174,928 ...239,200 MHz FM 87,5 –... - Page 73 INFORMATION _______________ Miljømæssig bemærkning Dette produkt er fremstillet af dele og materi- aler af høj kvalitet, som kan genbruges og er velegnede til recirkulering. Derfor bør du ikke bortskaffe apparatet sam- men med almindelig husholdningsaffald, når levetiden er slut. Tag det med til et indsamlingssted til recirkule- ring af elektrisk og elektronisk udstyr.
- Page 74 Grundig Intermedia GmbH Beuthener Strasse 41 90471 Nürnberg www.grundig.com 72011 411 8700 14/13...
Need help?
Do you have a question about the Micro 75 DAB+ and is the answer not in the manual?
Questions and answers