Table of Contents
Advertisement
Available languages
Available languages
Quick Links
MOTOCOLTIVATORE
180 - EXPLORER
Prima di iniziare ad operare con la macchina, leggere attenta-
mente le istruzioni per l'uso.
Before starting to work with the machine, operation read the
instructions for use.
IT
USO E MANUTENZIONE
EN
INSTRUCTION AND MAINTENANCE
ISTRUZIONI ORIGINALI
con traduzioni delle istruzioni originali
COD. 18711404 - Edizione Gennaio 2015
Advertisement
Chapters
Table of Contents

Subscribe to Our Youtube Channel
Related Manuals for Fort EXPLORER 180


Summary of Contents for Fort EXPLORER 180
- Page 1 MOTOCOLTIVATORE 180 - EXPLORER USO E MANUTENZIONE INSTRUCTION AND MAINTENANCE Prima di iniziare ad operare con la macchina, leggere attenta- ISTRUZIONI ORIGINALI mente le istruzioni per l’uso. con traduzioni delle istruzioni originali COD. 18711404 - Edizione Gennaio 2015 Before starting to work with the machine, operation read the instructions for use.
-
Page 2: Dichiarazione Di Conformità "Ce
EC Declaration of conformity Declaração CE de conformidade The company FORT S.r.l. Unipersonale declares on its A firma FORT S.r.l. Unipersonale declara sob a sua pró- own responsibility that the machine below listed com- pria responsabilidade que a máquina abaixo indicada plies with following regulations: está... - Page 3 FORT Srl Unipersonale SOSSANO (Vicenza) ITALIA - 36040 Via Seccalegno, 29 Tel. 0039 444 788000 - 0039 444 885085 MOD. ANNO MASSA Kg POTENZA kW MATRICOLA SERIEN NR. XXXXXX SERIAL No MATRICULE Fig. 1...
- Page 4 Fig. 2 Versione fresa Versione barra falciante Version rotary hoe Version cutter bar 1000-1340 1100-1440 1850 1950 Fig. 3 Fig. 4...
- Page 5 Fig. 6 Fig. 5 Fig. 7...
- Page 6 Fig. 8 Fig. 9 Fig. 10...
- Page 7 Fig. 11...
-
Page 8: Table Of Contents
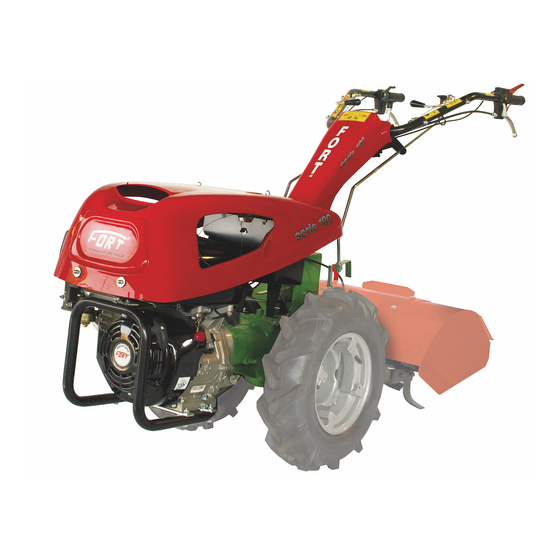
Presentazione ............9 DESCRIZIONE FIGURE Garanzia ..............9 Fig. 1 - Motocoltivatore Explorer 180. - 1) Targhetta di 1.2.1 Esclusioni dalla garanzia ........9 identificazione. - 2) Numero di matricola. - 3) Stegole di Identificazione della macchina ......10 guida. - 4) Motore. - 5) Ruote motrici. - 6) Cofano motore.- Descrizione della macchina ed impiego 7) Gruppo fresa. -
Page 9: Presentazione
La Ditta Costruttrice garantisce i suoi prodotti nuovi «180 ed EXPLORER» in seguito chiamata anche mac- di fabbrica per un periodo di 12 (dodici) mesi dalla china, prodotta dalla «FORT» di Sossano (Vicenza) data di acquisto. Italia, in seguito chiamata anche Ditta Costruttrice. -
Page 10: Identificazione Della Macchina
ITALIANO - qualora il danno fosse imputabile ad insufficiente - chiave a tubo da 19; manutenzione; chiave fissa per viti testa esagonale da 13-17; - qualora venissero montati sulla macchina acces- - chiave fissa per viti testa esagonale da 17-19; sori o applicazioni non forniti o testati dalla Ditta - chiave fissa per viti testa esagonale da 22-24;... -
Page 11: Posto Di Controllo E Comando
ITALIANO 5.0x10 con disco registrabile; - PER ESSERE UTILIZZATA ENTRO LOCALI CHIUSI 5.00x12 con disco registrabile; O POCO ARIEGGIATI. 6,5/80x12 con disco registrabile (serve prolunga È ASSOLUTAMENTE VIETATO L’USO DELLA MAC- per fresa): CHINA IN ATMOSFERA INFIAMMABILE O ESPLOSIVA 18.00x9.50x8 con disco fisso; E/O DENTRO LOCALI CHIUSI. -
Page 12: Livello Vibrazioni
ITALIANO Livello di pressione acustica al posto di guida LpA (dB): stegole. Trasmissione: ad ingranaggi in bagno d’olio MOTORE Livello di pressione Livello di Cambio: - 4 marce avanti + 3 RM (versione fresa) sonora al posto potenza sonora - 3 marce avanti + 3 RM (versione falce) di guida LwA (dB) secondo... -
Page 13: Sezione 2 - Sicurezza E Prevenzione
ITALIANO SEZIONE 2 • CENTRO DI ASSISTENZA AUTORIZZATO: Il Centro di Assistenza autorizzato è la struttura, legalmente Sicurezza e prevenzione autorizzata dalla Ditta Costruttrice, che dispone di personale specializzato e abilitato ad effettuare tutte le operazioni di assistenza, manutenzione e 2.1 SICUREZZA riparazione, anche di una certa complessità, che L’addetto deve essere istruito sui rischi derivanti da... -
Page 14: Sicurezza Nell'uso E Manutenzione
ITALIANO possibili soluzioni per la salvaguardia e la sicurezza 2.3 SICUREZZA NELL’USO E NELLA di chi vi opera. Nonostante ciò la macchina può MANUTENZIONE presentare rischi residui; quei rischi cioè che non è stato possibile eliminare completamente in certe condizioni di utilizzo. ATTENZIONE Questi potenziali rischi vengono indicati sulla mac- - Usare un abbigliamento idoneo. -
Page 15: Trasporto
ITALIANO lubrificanti usati in conformità con le disposizioni SEZIONE 3 di legge antinquinamento. Trasporto - Al termine delle operazioni di manutenzione e ripa- razione, prima di riavviare la macchina, accertarsi che i lavori siano conclusi, le sicurezze riattivate e 3.1 TRASPORTO che siano state rimontate le protezioni. -
Page 16: Prima Dell'uso
ITALIANO tra loro. ed in particolare quanto riportato nella «Sezione 2» Ci si deve accertare inoltre che la zona in cui si agi- dedicato alla sicurezza. sce, sia sgombra e che vi sia uno «spazio di fuga» Prima di iniziare il lavoro inoltre, verificare che la sufficente, cioè, una zona libera e sicura, in cui macchina sia in ordine e che tutti gli organi soggetti potersi spostare rapidamente nell’eventualità... -
Page 17: Pneumatici E Regolazione Carreggiata
ITALIANO macchina (11 Fig. 5). rappresentato in Fig. 7 rif. A e B. Nel caso i cavi tendano ad attorcigliarsi, accom- Inserire quindi la parte terminale delle aste nelle pagnarli manualmente. relative sedi (6 Fig. 5) e bloccarle con le apposite Ruotando le stegole di 180°, vengono invertite spine elastiche (1 Fig. -
Page 18: Verifiche Preliminari
ITALIANO 4.1.5 VERIFICHE PRELIMINARI freddo. Prima di riavviare il motore, controllare che non vi siano perdite d’olio o carburante nel Prima di iniziare il lavoro: qual caso pulire accuratamente ed asciugare. Se - Verificare che il cambio sia provvisto di olio e è... -
Page 19: Avviamento A Strappo Motore Diesel
ITALIANO 3) Posizionare la leva acceleratore (8 Fig. 1) a fine è avviato rilasciarla; la chiave ritorna automati- corsa camente al primo scatto. Se al primo tentativo 4) Verificare che la leva di comando frizione (16 Fig. il motore non si avvia ripetere l’operazione dopo 1) si trovi in posizione verticale qualche secondo. -
Page 20: Interruttore Fari
ITALIANO Nel caso si riscontrassero difficoltà ad inserire la marcia desiderata, provvedere con la mano sinistra a premere leggermente verso il basso la ATTENZIONE leva comando frizione mentre con la mano destra Durante il lavoro, impugnare saldamente le stegole si tira o si spinge l’asta di selezione marce. per evitare che la macchina possa sfuggire di mano 5) Accelerare il motore fino al regime di giri e controllare costantemente che tutt’intorno all’area... -
Page 21: Uso Della Macchina Su Pendenze
ITALIANO blocca automaticamente. Il bloccaggio del differenziale si ottiene portando in- - Gli ostacoli vanno superati a velocità ridotta ed ogni dietro verso l’operatore la leva (15 Fig. 1) in posizione reazione di manovra dovrà essere controllata. «BLOCCATO», dopo avere ridotto il numero di giri del - Non partire bruscamente con la macchina. -
Page 22: Arresto Del Motore
ITALIANO 4.8 DOPO L’USO Dopo l’uso, posizionare la macchina in piano, al ATTENZIONE coperto ed effettuare una accurata pulizia. Per il funzionamento ottimale del motocoltivatore Una macchina pulita e ben tenuta darà sempre il in versione barra falciante, mantenere un regime massimo della resa. -
Page 23: Manutenzione Macchina
ITALIANO 5.3 MANUTENZIONE MACCHINA Fig. 1) completamente abbassata e appoggiata alla manopola della stegola, la leva frizione del Periodicamente eseguire il lavaggio completo della cambio (4 Fig. 4) deve sfiorare la testa della vite di macchina e procedere ad un’accurata pulizia di ogni riferimento (distanza massima consentita 2 mm. -
Page 24: Smantellamento Macchina
ITALIANO 5.6 SMANTELLAMENTO MACCHINA la parte metallica a massa e tirare lentamente la fune dell’autoavvolgente del motore, come per Qualora si dovesse decidere per lo smantellamento avviarlo. Se non si vede scoccare la scintilla tra i della macchina, si dovrà procedere alla separazione due elettrodi, provare a controllare i collegamenti dei suoi componenti in parti omogenee che andranno del cavo della candela e se la corrente non arriva... - Page 25 ENGLISH TABLE OF CONTENTS Setting at rest ..........40 Machine dismantling ........40 DECLARATION OF CONFORMITy ........ 2 Spare parts ........... 40 SECTION 1 - Description and specifications of the Troubleshooting ..........41 machine Foreword............26 DESCRIPTION OF FIGURES Warranty ............
-
Page 26: Section 1 - Description And Specifications Of The
The engine is warranted in compliance with the terms ter also called machine or vehicle, manufactured by and conditions established by the Manufacturer «FORT» from Sossano (Vicenza), Italy, hereinafter himself. also referred to as Manufacturer. We suggest checking the integrity of the machine when you receive it. -
Page 27: Identification Of The Machine
ENGLISH tested by the Manufacturer were assembled on the - 22-24 Allen wrench; machine; - Spanner for sparking plug (only for fuel engines). - in case, further to repairs carried out by the user - PVC cap, PTO protection. without the Manufacturer’s permission or in case, Both above mentioned manuals are to be considered due to the assembly of non-genuine spare parts, an integral part of the machine and they must be... -
Page 28: Control And Driving Position
ENGLISH night-lights and for this reason it must not be used - Extension for cutter unit; at night-time. - Ballast for wheels; - Front ballast; - Synchronized PTO for trailer with driving wheels; - Drum brakes unit; DANGER IT IS ABSOLUTELY FORBIDDEN TO TRANSPORT 1.4.3 CONTROL AND DRIVING POSITION PEOPLE ON THE MACHINE. -
Page 29: Vibrations Level
ENGLISH 1.5.2 VIBRATIONS LEVEL Safety devices: - Special safety clutch that allows the movements The vibrations level was recorded with the engine of the machine and the drive of the work tools running at the max rpm. and is equal to: only with a “dead man”-type lever placed on the handlebars (16, Fig. -
Page 30: Section 2. Safety And Prevention
ENGLISH SECTION 2 carry out the maintenance, to clean and to transport the machine. Safety and prevention • AUTHORIZED SERVICE CENTER: The authorized service center is the structure legally authorized by the Manufacturer that has skilled personnel able 2.1 SAFETY to perform all the service, maintenance and repair The personnel shall be instructed on the risks result- operations, also the most difficult ones, which are... -
Page 31: Safety Signals
ENGLISH 2.2 SAFETY SIGNALS 2.3 SAFETY WHILE OPERATING AND The machine was designed by adopting all possible MAINTAINING THE MACHINE solutions for the safeguard and safety of the operator. Notwithstanding this, the machine may show some residual hazards; that is those hazards that were WARNING not possible to eliminate completely under certain - Use suitable clothes. -
Page 32: Section 3: Transport
ENGLISH After using them, wash your hands thoroughly. SECTION 3 Dispose of the used lubricants according to the Transport antipollution regulations. - At the end of the maintenance and repair operations, make sure that all operations are completed, that 3.1 TRANSPORT the safety devices and the guards are back in place The machine is packed in cartons. -
Page 33: Section 4: Use
ENGLISH safe area where it is possible to move quickly in case SECTION 4 the load falls. Before loading, make sure that the body of the means of transport is large enough to transport the machine 4.1 BEFORE USING THE MACHINE DANGER The area where you intend to load the machine shall WARNING... -
Page 34: Tyres And Wheel Thread Adjustment
ENGLISH gear lever and the power takeoff lever. 4.1.3 ASSEMBLY OF THE BAR AND SELECTION 2) Remove the control rods (2 and 3 Fig. 5) and put OF THE SPEED RATES AND THE INSERTIO PTO them aside. 3) Deeply pull the lever (5 Fig. 5) and rotate the For reasons of packing, the rods (2 and 3, Fig. -
Page 35: Preliminary Checks
ENGLISH approved by the manufacturer, under penalty of cap and wait till it is cool enough. warranty voiding. Before starting the engine, make sure that there are no oil or fuel leaks, otherwise carefully clean and dry them. If some fuel is spilt on the machine 4.1.5 PRELIMINARY CHECKS parts, dry it. -
Page 36: Electric Starter On Machine With Lights
ENGLISH slowly until there is some resistance. Now pull - Check what previously reported for other gasoline the cord with a strong and decisive pull.. or diesel engines; - Turn clockwise the key in the start-up panel and release it as soon as the engine starts. - After starting the engine, move the accelerator CAUTION lever to idle and run the engine for a few minutes... -
Page 37: Forward Movement - Shifting
ENGLISH hands and always check that no people or animals tube of the handlebar; are within the operating range of the machine. 4) Then press the control clutch lever slowly up in support of the knob and hold it for as long as it takes. -
Page 38: Parking
ENGLISH 4.4.2 PARKING - Lower slowly the control clutch lever, after turning off its locking system; - Accelerate gradually to the desired rpm. WARNING Do not park the machine near yielding grounds, near slopes, ditches or steep grounds. WARNING Never let the machine unattended when stopped. In the cutter unit model (Fig. -
Page 39: After Use
ENGLISH accidentally (on keys that have them). SECTION 5 Ordinary maintenance PERICOLO 5.1 GENERAL INFORMATION - For safety reasons, it is strictly forbidden to leave the machine with the starting key on. As it was designed, the Motor hoe does not need special maintenance. -
Page 40: Adjustment Of The Clutch Control
ENGLISH - We suggest to disassemble the cutter unit or other 5.3.2 ADJUSTMENT OF THE assembled accessory from the machine. ACCELERATOR CONTROL - For your convenience, we suggest to disassemble It is strictly forbidden to change the limits set by the the rotary hoe unitor any other attachment from manufacturer. -
Page 41: Troubleshooting
ENGLISH 5.8 TROUBLESHOOTING to check this and eventually change the clutch, call the nearest Service. A) The engine does not start at all: check what follows: D) The speeds or the PTO are engaged with difficulty: 1) the fuel level reaches at least the half of the fuel 1) Check that the control clutch lever (16, Fig. - Page 44 FORT Srl Unipersonale 36040 SOSSANO (Vicenza) Italia - Via Seccalegno, 29 Tel. (+39) 0444 788000 - Fax (+39) 0444 788020 web page http://www.fort-it.com e-mail: info@fort-it.com...
Need help?
Do you have a question about the EXPLORER 180 and is the answer not in the manual?
Questions and answers