Table of Contents
Advertisement
Quick Links
Advertisement
Table of Contents

Related Manuals for Thumpstar TSE 12


Summary of Contents for Thumpstar TSE 12
- Page 1 MANUAL # 3941...
- Page 2 THUMPSTAR BALANCER, FOR AGES 3-12 IMPORTANT: READ MANUAL CAREFULLY BEFORE OPERATING We care about the safety and comfort of our customers. This manual will guide you through proper techniques in operating your THUMPSTAR balancer. For any additional information, please visit: www.ThumpstarUSA.com NOTE: Manual illustrations are for demonstration purposes only.
-
Page 3: Table Of Contents
Electric Balancer Components .............. Power Mode ..................How to Change the Modes of the Balancer ..........Safely Approaching or Re-Mounting the Thumpstar ......Loading and Unloading Thumpstar into a Vehicle ......... Pre-Ride Inspection and Checklist ............After Riding ..................Charging .................... -
Page 4: Quick Reference
Quick Reference Model Version TSE 12 VR:1 TSE 16 VR:1 Grips Universal MX Handlebars Fat Bar 1 1/8 Clamp x 540mm Footpeg Thumpstar P/N 3933 Rear Brake Cable Thumpstar P/N 7822 Tires TSE 12 - 12”x2.25 TSE 16 - 16”x2.125... -
Page 5: Introduction
Introduction Congratulations on the purchase of your new TSE Balancer! With proper assembly and maintenance, it will offer you years of enjoyable riding! IMPORTANT: Carefully read and follow this manual (and any other materials included with this bike) before riding. Please retain this manual for future use. If this bike was purchased for a child, it is the responsibility of the purchaser to verify the bike has been properly assembled, and that the user has been properly trained and instructed in use of the bike. - Page 6 If you have any questions or do not understand something, take responsibility for your safety and contact Thumpstar customer service at 330-298-5107 or support@thumpstarusa.com ALWAYS WEAR A PROPERLY FITTED HELMET WHEN YOU RIDE YOUR...
-
Page 7: A Few Words About Safety
A Few Words About Safety Your safety, and the safety of others, is very important and operating this electric balancer safely is an important responsibility. You could be SERIOUSLY HURT if you don’t follow instructions. You could be HURT if you don’t follow instructions. -
Page 8: Electric Balancer Pre-Riding Safety
Electric Balancer Pre-Riding Safety CAUTION: For your safety you must carefully read this manual and follow its instructions. Your bicycle may come with additional instruction sheets that cover features unique to your bike. Please ensure that you read and become familiar with their contents and retain them with this manual for future reference. -
Page 9: Before Riding
Electric Balancer Pre-Riding Safety BEFORE RIDING WARNING - ON AND OFF ROAD CONDITIONS: The condition of the riding surface is very important to your safety. If the surface is wet, or has sand, leaves, small rocks or other loose debris on the surface where you plan to ride, carefully decrease the speed of the bicycle and ride with extra caution. - Page 10 Electric Balancer Pre-Riding Safety CAUTION: WET WEATHER WARNING: Check your brakes frequently. The ability to stop is critical to your safety. Roads are slippery in wet weather so avoid sharp turns and allow more distance for stopping. Brakes become less efficient when wet. Leaves, loose gravel and other debris on the road can also lengthen stopping distance.
- Page 11 Electric Balancer Pre-Riding Safety TO AVOID INJURY, THIS PRODUCT MUST BE PROPERLY ASSEMBLED BEFORE USE. WE STRONGLY RECOMMEND THAT YOU REVIEW THE COMPLETE ASSEMBLY GUIDE AND PERFORM CHECKS SPECIFIED IN THE OWNER’S MANUAL BEFORE RIDING. Just a minute spent before each ride can significantly improve your safety and the enjoyment of your ride.
-
Page 12: Safety Equipment
Electric Balancer Pre-Riding Safety SAFETY EQUIPMENT Thumpstar promote the use of safety equipment during the use of your electric balancer; the following list is an advisory guideline of the equipment that should be obtained before using your electric balancer for the first time, and to be used for every ride regardless of experience and skill level. -
Page 13: Message To Riders
Message To Riders Your safety is very important to Thumpstar. That’s why we urge you to read this message before riding this electric balancer. You can help prevent accidents by making good decisions about if, when, and how you ride this electric balancer. -
Page 14: Loading, Accessories & Modifications
Loading, Accessories & Modifications Thumpstar designed a rider-only electric balancer. It was not designed to carry a passenger or cargo. A passenger or cargo could interfere with your ability to move around to maintain your balance and control of the electric balancer. - Page 15 Loading, Accessories & Modifications ACCESSORIES We strongly recommend that you use only Thumpstar Genuine Parts and Accessories that have been specifically designed or approved and tested for your electric balancer. Because Thumpstar cannot test all other accessories, you must be personally responsible for proper selection, installation, and use of non-Thumpstar accessories.
-
Page 16: Safety Labels
Safety Labels... -
Page 17: Important Information
Important Information FRONT WHEEL INSTALLATION INSTALL THE FRONT AXLE IN THE ORDER SHOWN ABOVE the 16in requires two washers outside; not shown NOTE: HANDLE BAR ASSEMBLY Attach the handle bars as shown. There are 4 screws to assemble or remove the handlebar. Be sure to rotate the handlebar so the ON/ OFF SW is easy to reach. -
Page 18: Operating And Riding The Electric Balancer
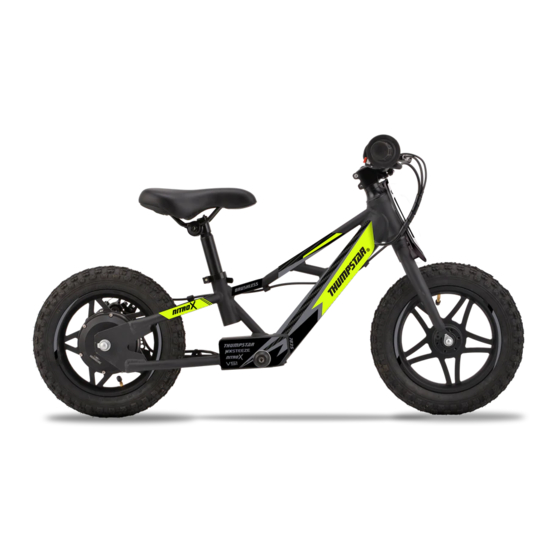
Operating and Riding the Electric Balancer Please familiarize yourself with the components below. 1. Frame 10. Front axle 19. Brake Disc 2. Handlebar 11. Charge Port 3. Handlebar grip 12. Footrest 4. Brake lever 13. Seat 5. Throttle 14. Seat Post 6. - Page 19 Operating and Riding the Electric Balancer 20. Battery 21. Controller Box Cover Screw 22. Controller...
-
Page 20: Power Mode
Operating and Riding the Electric Balancer IMPORTANT INFORMATION Non-powered training: We recommend that you teach your child how to balance the Balancer first before you add power. They should be proficient at kicking and balancing the Balancer before turning the power switch on. - Page 21 Operating and Riding the Electric Balancer Do not add full power, full torque and non-kick all at the same time. The first change you should make is to remove the kick-start mode. After they get comfortable with the twist and go, you can change to full power mode.
-
Page 22: How To Change The Modes Of The Balancer
Operating and Riding the Electric Balancer HOW TO CHANGE THE MODES OF THE BALANCER - Remove the screw for the plastic cover located at the bottom of the position. You have to remove the silicone that covers the screw head. The cover opens from the front (round part) and will require you to pry it open from the front area. - Page 23 Operating and Riding the Electric Balancer To easier locate the wires, we wrapped the wires with a white tube and zip-tied the group together. The words ‘Zero Start Switch’ , ‘Torque Switch’ and ‘Speed Limit Switch’ are on each set of the wires. See wiring diagram below for reference.
-
Page 24: Safely Approaching Or Re-Mounting The Thumpstar
Operating and Riding the Electric Balancer SAFELY APPROACHING OR RE-MOUNTING THE THUMPSTAR ELECTRIC BALANCE -Teach children to approach the Balancer with caution; before use or while standing back up if knocked over. - Ensure the power switch is turned off. -
Page 25: Pre-Ride Inspection And Checklist
Operating and Riding the Electric Balancer CHECK AND MAINTAIN Before use, check that the THUMPSTAR electric balancer is in proper working order. The balancer should be maintained and repaired in accordance with the manufacturer’s specifications, using only the manufacturers authorized replacement parts, and should not be modified from the manufacturer’s original design and configuration. -
Page 26: After Riding
Operating and Riding the Electric Balancer Adjust the height of the seat. AFTER RIDING - Check the battery capacity with the power on. - It is recommended to charge the battery when the red light comes on. If the balancer does not seem to have power, plug it in and let it charge, this could be from the rider using the past the red light warning, however, it does shorten the battery life cycle. -
Page 27: Charging
Operating and Riding the Electric Balancer CHARGING - Insert the charger into the 110V/220V wall socket; the light on the charger will turn green. - Insert the plug from the charger into the charger port on the frame of the Balancer (you might see a small spark or hear a pop, this is normal). -
Page 28: Repair And Maintenance
- Read instructions. - Ensure the power switch to the “OFF” position. - Ensure THUMPSTAR electric balancer has had adequate time to cool (up to 30 minutes) - Secure the THUMPSTAR electric balancer for repair or maintenance. -
Page 29: Test Brake
Repair and Maintenance TEST BRAKE - Squeeze brake and hold. - Push the Balancer forward. The rear wheel should not spin if the brake is adjusted properly. - If rear wheel spins when pushing forward or the lever engages prematurely, refer to “Adjust Brake” ADJUST BRAKE - To adjust brake cable: - Twist brake lever adjust in or out, ¼... -
Page 30: Battery Removal
Repair and Maintenance BATTERY REMOVAL Step one: Use a Phillips screwdriver (provided in the tool kit) and remove the screw at the bottom of the large round tube (position 21. First pic below). Get a flat head screwdriver or anything that is flat and pry the front of the cover up near the area of the screw hole as shown below, pulling it up towards you. - Page 31 Repair and Maintenance Step three: Remove the small screws of the changing port near the top of the tube. Carefully pull the charging point out and unplug the red connector. Step four: Push the wires, string and charging port back into the hole. Do NOT plug it back together.
- Page 32 Repair and Maintenance Step five: Find the cloth strap inside the controller box that is attached to the battery (see pic). Slowly pull on the cloth strap, you might have to pull a bit hard, and slide the battery out. When the battery is almost out use caution because the battery charge wires are connected to the charging port with the string attached to it.
-
Page 33: Battery Installation
Repair and Maintenance BATTERY INSTALLATION Install the battery in reverse order. Below are instructions just in case you forgot. Step one: Lay the battery on the side of the tire and frame with the yellow connector facing the rear of the Balancer and the small charging wires towards the front. - Page 34 Repair and Maintenance Once the battery is halfway in, pull on the throttle wire and brake wire so the connectors are about 30-40mm past the battery (see pic). Repeat this step with the brake switch wire but this time hold the string, so you do not pull on the charger wire as well (see pic below) Step three: Hold the top of the battery and pinch the wires with your thumb and fingers to stop the wires from sliding up and out as you push...
- Page 35 Repair and Maintenance After you have removed the slack out of the wire, and pulled the charge wire out of the hole, you can push the battery in all the way. Put your 2 thumbs on top of the battery and push the battery inside (see pic below). Be careful not to push the battery in too far because you will pinch the 2 sets of wires coming out of the hole near the handle bars side (12in only) however it needs to go in far enough so the controller can fit in.
-
Page 36: Battery Disposal
BATTERY DISPOSAL Your THUMPSTAR product uses sealed lithium 18650 cell batteries, which must be recycled or disposed of in an environmentally-friendly manner. Do not dispose of a lithium cell battery in a fire; the battery may explode or leak. -
Page 37: Troubleshooting Guide
Stopped working while riding it Loose battery or wire Recharge or replace battery connection(s) Power switch faulty Contact your local THUMPSTAR authorized service center for Throttle faulty diagnosis and repair Motor or electrical system damage Rider weight/ Terrain too steep... -
Page 38: Cleaning And Appearance Care
Cleaning and Appearance Care Frequent cleaning and polishing will keep your TSE Balancer looking newer longer. Frequent cleaning also identifies you as an owner who values your electric balancer. A clean electric balancer is also easier to inspect and service. While you’re cleaning, be sure to look for damage and wear. - Page 39 TIPS Here’s helpful advice on how to prepare for an off-road adventure, how to transport and store your Thumpstar electric balancer, and how to be an environmentally responsible electric balancer owner. Spraying WD40 or similar product on metal parts will help protect the...
-
Page 40: Controller Diagram
Controller Diagram... - Page 41 Controller Diagram FUNCTION WIRE COLOR WIRE VOLTAGE REFERENCE Connect to Battery Black Negative Connect to Motor Yellow 1.5MM When motor running, 12v. Stop 0v Green 1.5MM Blue 1.5MM Orange 0.3MM 5v with Power ON Yellow 0.3MM When motor running, 12v. Stop 0v Green 0.3MM Blue 0.3MM White 0.3MM...
-
Page 42: Specification
Specifications TSE 12 ENGINE AND TRANSMISSION Engine 250w Brushless Battery Li 24v 5.2A-5c Speed Mode 6 Speed (3 x Learning Speeds + 3 x Racing Speeds) Starter Throttle / Kick (Kick can be turned on/off) Running Time 2 Hours Charge Time... - Page 43 Specifications TSE 16 ENGINE AND TRANSMISSION Engine 250w Brushless Battery Li 24v 5.2A-5c Speed Mode 6 Speed (3 x Learning Speeds + 3 x Racing Speeds) Starter Throttle / Kick (Kick can be turned on/off) Running Time 2 Hours Charge Time 2-4 Hours Final Drive Hub Drive Motor (No Chain)
-
Page 44: Spare Part Catalogue
Spare Part Catalogue Model Version - TSE 12 VR:1 | TSE 16 VR:1... - Page 45 Spare Part Catalogue...
- Page 46 Spare Part Catalogue...
- Page 47 Spare Part Catalogue...
- Page 48 Spare Part Catalogue...
- Page 49 Spare Part Catalogue...
-
Page 50: Parts Finder
Parts Finder Finding Parts at our website Websites https://www.thumpstarelectricbalancebike.com https://www.thumpstar.com.au/ https://www.thumpstar.co.nz/ • Go to our website then copy the part number or ERP CODE in our Spare Part Catalogue and paste it in the search bar then press enter or click the search icon beside it. -
Page 51: Warranty
This Limited Warranty does not cover any damage, failure or loss caused by improper assembly, maintenance, or storage. THUMPSTAR is not liable for incidental or consequential loss or damage due directly or indirectly to the use or misuse of this product. -
Page 52: Disclaimer
Disclaimer Thumpstar will not be held liable under any circumstance for incidental or consequential loss or damage or injury, due direct or indirect use of this product, including any malfunction or defect. Adult guardians assume all responsibilities associated with the use of these products by minors. - Page 53 © by Thumpstar. All rights reserved.
Need help?
Do you have a question about the TSE 12 and is the answer not in the manual?
Questions and answers