Advertisement
Quick Links
THUMPSTAR BALANCE BIKES
PLEASE READ MANUAL CAREFULLY BEFORE OPERATING
We care about the safety and comfort of our customers. This manual will guide you through proper
techniques in operating your THUMPSTAR balance bike.
For any additional information, please visit:
www.ThumpstarBalanceBike.com
THUMPSTAR electric balance bike models TSE12 and TSE16.
Read the entire manual before allowing a child to use this product.
NOTE: Manual illustrations are for demonstration purposes only. Illustrations may not reflect the exact
appearance of the actual product. Specifications are subject to change without notice. Please have your
product Serial Number (S/N) and a copy of your receipt before contacting us for warranty assistance
and/or replacement parts.
WARNING: Riding a TSE BALANCE BIKE does present potential risks and caution is required. L ike any riding
product, a TSE BALANCE BIKE has inherent hazards associated with its use (for example, falling off or riding it
into a hazardous situation). When riding the TSE BALANCE BIKE, it is possible to lose control or otherwise get
into dangerous situations. Both children and the adults responsible for supervising them, must recognize that
if such hazards occur, a rider can be seriously injured or die even when using safety equipment and other
precautions. R IDE AT YOUR OWN RISK.
IMPORTANT INFORMATION
This manual has very detailed and important information on how to operate your electric balance bike.
PLEASE TAKE A FEW MOMENTS AND READ IT CAREFULLY BEFORE OPERATING THE BIKE.
1
Advertisement

Related Manuals for Thumpstar TSE12

Summary of Contents for Thumpstar TSE12
- Page 1 For any additional information, please visit: www.ThumpstarBalanceBike.com THUMPSTAR electric balance bike models TSE12 and TSE16. Read the entire manual before allowing a child to use this product. NOTE: Manual illustrations are for demonstration purposes only. Illustrations may not reflect the exact appearance of the actual product.
- Page 2 Front Wheel Installation Install the front axle in the order shown above. (Note: the 16in requires 2 washers outside; not shown)
- Page 3 WARNING: THESE MODELS ARE NOT SUITABLE FOR CHILDREN UNDER AGE 2 OR HEAVIER THAN 120 LB (APPROX. 60KG). N o children should ride any THUMPSTAR BIKE if they cannot sit on the seat and touch both feet flat on the ground at the same time. Because products, like THUMPSTAR BIKES, can and do present potential hazards associated with their use.
- Page 4 Keep a safe distance from cars and motor vehicle traffic at all times. Never ride your THUMPSTAR BIKE on public streets, roads, highways, at night or when visibility is limited. ● Do not twist the throttle on the handgrip unless you are sitting on the THUMPSTAR BIKE and in a safe environment, suitable for riding. ●...
- Page 5 POWERED AND ROTATING PARTS WARNING: Do not allow hands, feet, hair, any body parts, clothing, or similar articles to contact with any rotating or moving parts, such as wheels, or drive train components. IF YOUR CHILD HAS LONG HAIR, PLEASE TUCK IT IN THEIR SHIRT OR SECURE IT OUT OF THE WAY OF THE WHEELS.
- Page 6 20. Battery 21. Controller box cover screw 22. Controller IMPORTANT INFORMATION Non-powered training: W e recommend that you teach your child how to balance the bike first before you add power. They should be proficient at kicking and balancing the bike before turning the power switch on. There are many videos on YouTube which can teach them to kick and balance a bike.
- Page 7 Power Mode: The 12in bike comes in the lowest settings and ½ power. We programmed the beginner mode so that the bike does not move too fast and you can briskly walk next to your child while training. The throttle is not very responsive and has a delay built in and takes a few seconds to start moving.
- Page 8 Inspect for any obvious damage. Perform a Pre-Ride Inspection (below) Have rider mount the THUMPSTAR BIKE, gripping the handlebars with both hands and sitting on the seat with both feet on the ground. Please press the power switch to the ‘ON’ position.
- Page 9 CHECK AND MAINTAIN Before use, check that the THUMPSTAR BIKE is in proper working order. The bike should be maintained and repaired in accordance with the manufacturer’s specifications, using only the manufacturers authorized replacement parts, and should not be modified from the manufacturer’s original design and configuration.
-
Page 10: Repair And Maintenance
Tools include in the kit: ● 2.5, 4, 5, 6 and 8 mm Allen Wrench ● 14,16,19 mm socket or open spanner Turn power switch to “OFF” position, allow THUMPSTAR BIKE to be cool before beginning repair or maintenance: ● Read instructions. ●... - Page 11 Test Brake: Squeeze brake and hold. Push the bike forward. The rear wheel should not spin if the brake is adjusted properly. If rear wheel spins when pushing forward or bike lever engages prematurely, refer to “adjust Brake” Adjust Brake: To adjust brake cable: Twist brake lever adjust in or out, ¼...
- Page 12 Step two: After you have removed the cover, take some pictures. C arefully pull out the wires of the controllers and only unplug the three pin throttle wires (org,green,blk), 2 pin power switch (pink and blk), 2 pin Brake switch (blue,blk), yellow XR60 connector for battery. Do not disconnect the large black round plug or the wires that are zip tied together.
-
Page 13: Battery Installation
Step five: F ind the cloth strap inside the controller box that is attached to the battery (see pic). Slowly pull on the cloth strap, you might have to pull a bit hard, and slide the battery out. When the battery is almost out use caution because the battery charge wires are connected to the charging port with the string attached to it. - Page 14 is halfway in, pull on the throttle wire and brake wire so the connectors are about 30-40mm past the battery (see pic). Repeat this step with the brake switch wire but this time hold the string so you do not pull on the charger wire as well (see pic below) Step three: ...
- Page 15 Step four: Put the controller back in the box, backside first (no wires side) goes in first. If you disconnected the motor wire plug it in first (don’t forget to align the arrows and push hard), lay the large black wire on the right side as shown in the pic below, make sure all the wires go under the large black wire or the black wire wraps around the outside of all the wires.
- Page 16 Battery Disposal : Your THUMPSTAR product uses sealed lithium 18650 cell batteries, which must be recycled or disposed of in an environmentally-friendly manner. Do not dispose of a lithium cell battery in a fire; the battery may explode or leak. Do not dispose of a lithium cell battery in your regular household trash. Recycle...
-
Page 17: Troubleshooting Guide
Bike stopped working while riding it Loose battery or wire connection(s) Recharge or replace battery Power switch faulty Contact your local THUMPSTAR authorized service center for diagnosis and repair Throttle faulty Motor or electrical system damage... -
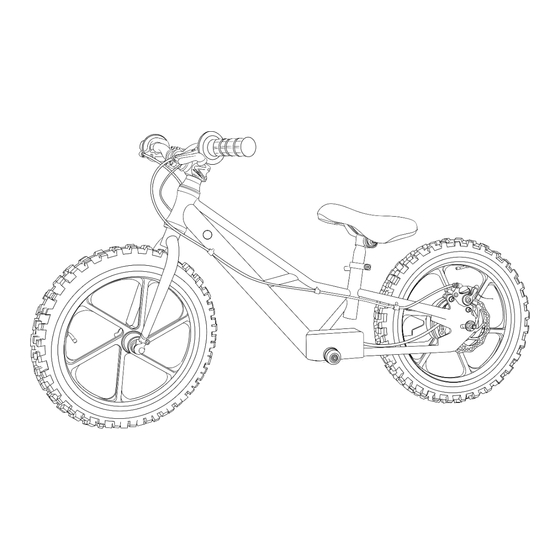
Page 18: Product Parts
This Limited Warranty does not cover any damage, failure or loss caused by improper assembly, maintenance, or storage. THUMPSTAR is not liable for incidental or consequential loss or damage due directly or indirectly to the use or misuse of this product. - Page 19 Controller diagram for reference THUMPSTAR i s not liable for incidental or consequential loss or damage due directly or indirectly to the use or misuse of this product.
Need help?
Do you have a question about the TSE12 and is the answer not in the manual?
Questions and answers