Table of Contents
Advertisement
Advertisement
Table of Contents

Related Manuals for Tactacam REVEAL X


Summary of Contents for Tactacam REVEAL X
- Page 1 INSTRUCTION MANUAL REVEALCELLCAM.COM...
- Page 2 D O W N L O A D T H E TACTACAM REVEAL APP V I S I T Y O U R A P P S T O R E T O D O W N L O A D...
- Page 3 TABLE OF CONTENTS TABLE OF CONTENTS INTRODUCTION Front View Bottom View of Camera Internal and Side View of Camera QUICK START What is in the Box? Get Camera and App Ready Add Camera to the App Account Start Using the Reveal CAMERA SETTINGS SPECIFICATION TROUBLESHOOTING...
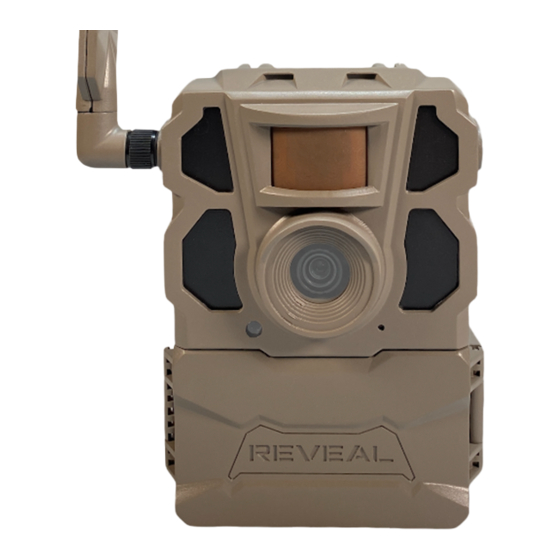
- Page 4 INTRODUCTION PIR Motion Sensor Antenna Lens IR LEDs Camera Working Status Indicator (Red) WiFi Indicator Light (Blue) SD Card Indicator (Red/Green) Device Status Indicator Light (Green/Blue) SIM Slot (DO NOT REMOVE) Power Switch (ON/SETUP/OFF) Battery Eject Button Microphone Battery Level Indicator 4G Signal Indicator SD Card Slot Test Button...
- Page 5 • Recommended Brands: Tactacam, • (1) Antenna Lexar, SanDisk (Other brands of lower end SD cards are • (1) Pre-Installed SIM Card incompatible with the Reveal X and will yield (DO NOT REMOVE) unexpected results) RECOMMENDED CAMERA ACCESSORIES (NOT INCLUDED) SOLAR PANEL VIEW AND PURCHASE ALL ACCESSORIES AT REVEALCELLCAM.COM...
- Page 6 3. Install 12 AA batteries. • To install the batteries, press the EJECT button on the Reveal X. Be sure to install the batteries in the correct orientation on the front and back of the tray. • See battery details on page 13 under Best Practices.
- Page 7 QUICK START GUIDE SETTING UP THE CAMERA (CONTINUED) 4. DO NOT REMOVE the SIM Card that is Pre-installed in the Reveal X 5. Turn the power switch to SETUP • Check the indicator LED status lights; you will see all green when the camera is ready.
- Page 8 QUICK START GUIDE ADD CAMERA TO THE APP (CONTINUED) • Two ways to activate your camera • Scanning the QR Code • QR code will be inside the door of the camera • Pair over WiFi Connection • Does not require your phone or camera to be hooked up to your home or work WiFi •...
- Page 9 QUICK START GUIDE SENDING A TEST PICTURE (CONTINUED) • After the camera has connected, push the test button to send a photograph. • You will see the status light blinking as the image is sending. • When the test picture sends successfully, the status light will turn green.
- Page 10 SETTINGS / SPECIFICATIONS Camera Mode Photo; Photo+Video Day/Night Mode Daytime: Color, Nighttime: B+W IR Range 96+ Feet PIR Angle Flash 4 Infrared High Power LED bulbs; 850mn-High Power IR LED Operating Keys (2) 1x Power slide switch; 1x Test button Lens F=6mm;...
- Page 11 SETTINGS / SPECIFICATIONS Operation Power 9-12V Battery 12xAA Cartridge Optional external power source (12V external battery pack or solar panel) - Recommended 3000mAh - Barrel plug reducer size 4x1.7mm External DC 12V-2A Transfer Picture via 4G High, detailed thumbnail images sent to app Request HD Photo via 4G Only in supported locations Upload Frequency/Send Type...
- Page 12 BEST PRACTICES MOTION SENSORS (PIR SENSORS) Motion sensors (PIR sensors) are actually heat and motion sensors. This is why on a hot and windy day, people get false triggers. People and animals are not the only objects that will trigger your camera; vegetation and precipitation can act as a moving target as well.
- Page 13 60% of their useful life. 3. Expected picture count with the proper batteries (in greater than freezing temps) are: • Lithium: 4000+ pictures • Alkaline: 2500+ pictures 4. Always good and beneficial to pair a good battery with the Tactacam Lithium Solar Panel.
- Page 14 BEST PRACTICES CAMERA STOPS TAKING IMAGES OR WON’T TAKE IMAGES 1. Please make sure that the SD card is not full. If the SD card is full, the camera will stop taking images. Users can turn on SD Loop to avoid such problems.
- Page 15 PRODUCT CARE INTERNAL CONDENSATION ON LENS The Reveal is IP66 rated waterproof. This means the camera is water resistant against powerful jets. The only way the Reveal can get condensation in or behind the lens is if the antenna is not screwed in all the way, or if there is dirt or debris on the seal.
- Page 16 HOW LONG DOES THIS COVERAGE LAST? 1. One year from the date of purchase. 2. Be sure to register your Reveal under warranty at www.tactacam.com/warranty WHAT IS COVERED? 1. This limited warranty covers: manufacturer defects in materials and workmanship including but not limited to: •...
- Page 17 FCC REGULATIONS...
- Page 18 Radiation Exposure Statement To comply with FCC RF exposure compliance requirements, this grant is applicable to only mobile configurations. The antennas used for this transmitter must be installed to provide a separation distance of at least 20cm from all persons and must not be co-located or operating in conjunction with any other antenna or transmitter.
- Page 19 DO NOT RETURN THIS PRODUCT TO YOUR RETAILER PLEASE CALL 218-282-5650 EMAIL SUPPORT@REVEALCELLCAM.COM for any warranty issues or help filming your hunts with the Reveal X. 110 N Sunset Blvd, Caledonia, MN 55921 www.revealcellcam.com...
Need help?
Do you have a question about the REVEAL X and is the answer not in the manual?
Questions and answers
formatting sd card
To format the SD card for the Tactacam REVEAL X, follow these steps:
1. Insert the SD card into the camera.
2. If prompted, confirm that the camera recognizes the SD card.
3. If no prompt appears, turn off the camera, reinsert the SD card, and turn it back on.
4. Navigate to the camera's menu (press the menu button, often marked with three lines or a gear icon).
5. Look for an option like "Format SD Card," "Delete All," or "Clear Memory" (wording may vary).
6. Select this option and confirm when prompted (e.g., select "Yes").
7. The camera will erase all data on the SD card, so ensure you have backed up important files.
8. Once formatting is complete, check the available space to confirm the SD card is clear.
Alternatively, you can format the SD card using a computer.
This answer is automatically generated
Trying to remove a broken camera from my account