Table of Contents
Advertisement
Quick Links
Advertisement
Table of Contents

Related Manuals for Apricorn ADT 500GB


Summary of Contents for Apricorn ADT 500GB
- Page 1 User Guide eader in ersonaL Torage...
- Page 2 Copyright © Apricorn, Inc. 2009. All rights reserved. Windows is a registered trademark of Microsoft Corporation. All other trademarks and copyrights referred to are the property of their respective owners. Anytime (GB) is used in this document: One gigabyte (GB) = one billion bytes;...
- Page 3 6. c ontActInG ecHnIcAl rmA p olIcy ArrAnty ondItIonS 7. FAq TABLE OF CONTENTS prIcorn product eSktop ! ... IStA rIve wItH lone rIve wItH reAte mAGe onItor For IndowS IndowS oFtwAre For rIve rIve eGIS eSktop upport IZArd www.apricorn.com...
-
Page 4: System Requirements
1. INTRODUCTION Thank you for purchasing your Aegis Desktop system. Engineered for desktop and notebook applications, the Aegis Desktop offers both eSATA & USB 2.0 external connections for a wider range of compatibility. The Aegis Desktop is for use with SATA (Serial Advanced Technology Attachment) hard drives connected to any system that offers a eSATA or USB Type B port for USB 2.0/1.1 compatibility. -
Page 5: A Pricorn Product
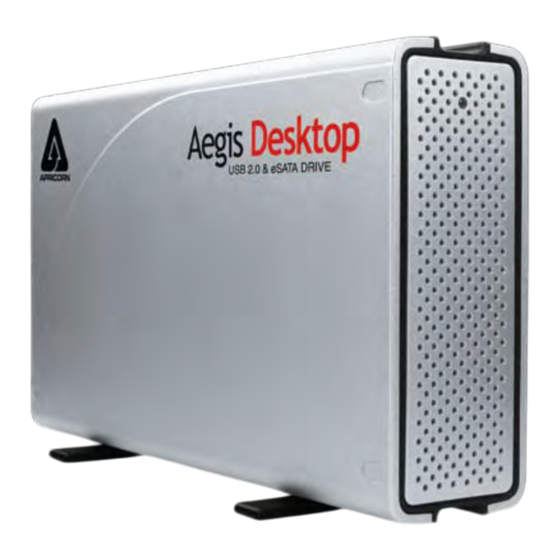
GETTING TO KNOW YOUR APRICORN PRODUCT Package Contents Aegis Desktop Enlosure EZ Gig II Backup & Disaster Recovery Software SMART-ER - Hard Drive Monitor Microsoft SyncToy® 1.4 download ShirtPocket SuperDuper! - Backup Software Synchronize! X - Synchronization software Apricorn Data Protection Suite... - Page 6 Front Panel Rear Panel The Leader in Personal Storage LED activity/ Power Indicator Light On/Off Switch eSATA Cable Connection USB Cable Connection AC Adapter Connection...
-
Page 7: Hard Drive Installation
3. Lay the case on a flat surface and slide the hard drive completely away from the connector before gently lift it out of the case. Slide the HDD 2. Gently lift off the cover to expose the existing hard drive. (upgrade only) skip to step 5 if you are installing a new disk. www.apricorn.com... - Page 8 4. Remove drive from bracket and replace with new drive. 6. Set hard drive in case and push the hdd drive firmly into connector. 7. Place the case back on the The Leader in Personal Storage 5. Place hard drive with label side up and connector side away from the hard drive stop and replace srews.
-
Page 9: D Esktop
3. Turn the Aegis Disktop ON using the ON/OFF switch located on the rear panel. The indicator light will come on to let you know that the Aegis Desktop is powered. www.apricorn.com... -
Page 10: Before You Backup
4. SOFTWARE Before You Backup! With more of your work and personal life becoming digitized, backups are essential. Backups protect and preserve precious data, music files, digital photos, digital videos and other important computer documents from being lost forever. The following next few steps are recommendations to consider before backing up, to help the process run smoothly: 1. -
Page 11: Vista:
“Choose when to turn off display” and make the changes as listed below. Turn Display Off Put computer to sleep Once you have completed the backup go to “Power Options” and restore the default settings. Never Never www.apricorn.com... - Page 12 EZ Gig II for Windows 1. Insert Apricorn CD into your CD-ROM drive. 2. Setup screen will pop up. Click Install EZ GIG II button. 3. EZ Gig II installation screen will pop up. 4. Follow instructions for installation. The Leader in Personal Storage...
-
Page 13: Cloning Your Hard Drive With Disk Clone
1. Ensure your Apricorn product is connected to your computer. 2. To start EZ Gig II, click Start > Programs > Apricorn > EZ Gig II and click on Apricorn EZ Gig II. This will open the main screen of EZ Gig II. - Page 14 4. When you see the Welcome to the Disk Clone Wizard! screen. Click Next to continue. 5. The Clone Mode screen will appear. Select typical and click Next to continue. 6. If the hard disk drive to receive the cloned data is new or blank, proceed to step 10.
- Page 15 The interface and disk size can be used to help identify the correct disk number. Click Next to continue. 8. The Destination Hard Disk screen will appear. Select the appropriate destination hard disk. The destination hard disk is typically your new hard disk drive. Click Next to Continue. www.apricorn.com...
- Page 16 9. The Nonempty Destination Hard Disk screen will appear when you have selected to transfer data to a drive that already contains data. If you have chosen the proper source and destination drives, then select the “Delete partitions on the destination hard disk” button. Click Next to continue. Note: If you need to confirm that you have selected the proper source and destination drives, click the Back button to check.
- Page 17 When the congratulations screen appears, turn off your computer using the power button. Then unplug the Apricorn product from the computer. DO NOT REBOOT THE COMPUTER WITH A CLONED HARD DRIVE IN THE Apricorn product.
-
Page 18: Imaging Your Hard Drive With Create Image Wizard
2. To start EZ Gig II, click Start > Programs click on Apricorn EZ Gig II. This will open the main screen of EZ Gig II. You can also click on the Apricorn EZ Gig II icon on the Desktop. - Page 19 Click Next to continue. 6. At the Backup Image Location window, find your Apricorn product (it may have the name Apricorn, and the drive letter will vary depending on the configuration of your computer). www.apricorn.com...
- Page 20 Note: For detailed instructions on how to set the options manually read Chapter 5 “Creating Backup Archives” in the “Apricorn EZ Gig II User Guide” located on the Apricorn software CD that came with your Apricorn product. Alternately if you have installed EZ...
- Page 21 (such as the imaging date, computer, operating system, etc.). Click Next to continue. 10. This will open the Apricorn Disk Image Archive File Creation Script window. Verify the operations listed in the white box. If there are corrections to be made, click the Back button to change selected options.
-
Page 22: M Onitor For W Indows
12. BACKUP COMPLETE!!! The Apricorn product now contains a complete image of the selected drive or partition(s). SMART-ER Hard Drive Monitor for Windows 1. Insert Apricorn CD into CD-ROM drive. 2. Setup screen will pop up. Click SMART-ER button. 3. The SMART-ER Setup program will appear (pictured below) with a text file containing your serial number. -
Page 23: For W Indows
Microsoft Download Center. The easy to use, customizable application helps you copy, move, rename, and delete files between folders and computers. To make it easy for you to find and download, we have created a link that is accessible from the Apricorn Software CD. www.apricorn.com... -
Page 24: Superduper! Backup Software For Mac
SuperDuper! Backup Software for Mac 1. Insert Apricorn CD into your CD-ROM drive 2. When the Apricorn CD appears on your desktop, double click to open. 3. Double click on the SuperDuper!.dmg icon 4. This will open the package and mount a drive on your desktop. -
Page 25: Synchronize! X For Mac
Synchronize! X for Mac 1. Insert Apricorn CD into your CD-ROM drive 2. When the Apricorn CD appears on your desktop, double click to open. 3. Double click on the Synchronize!X.dmg icon 4. This will open the package and mount a drive on your desktop. -
Page 26: Initializing Your Hard Drive
Initializing Your Hard Drive 1. To initialize your hard drive, you will need to go to Disk Management in Windows. To get to Disk Management in Windows 2000, XP and Vista, right click “ My Computer” and click on “Manage” in the list. If you purchased an Aegis Desktop that already has a hard drive, you do not need to use this section because the drive is already formatted for FAT32. - Page 27 5. You will then need to decide on a partition size. Enter a partition size in the box provided. Click Next . 6. Select Assign a drive letter . Fill in the drive letter. Be sure to select a drive letter that is not in use. Click Next . www.apricorn.com...
- Page 28 7. “Format this partition with the following settings” is selected by default. File System: Allocation unit size: Volume Label: Perform a Quick Format: Enabling Perform a Quick Format reduces the format time significantly. However a Quick Format is less thorough and does not scan for or mark bad sectors.
-
Page 29: Reformatting Your Hard Drive
Go to My Computer or Windows Explorer , right click on the Aegis Desktop drive, and select Properties from the list. b. This will open the Aegis Desktop hard drive properties. The File System should now read NTFS. www.apricorn.com... - Page 30 To Reformat in OS 9.x: Caution: This will destroy any data on the hard drive. Backup any data before you continue with the reformatting of the Aegis Desktop hard drive. 1. Make sure the Aegis Desktop is plugged into the USB port. 2.
- Page 31 9. Click the Erase button to start the formatting process. 10. To confirm that the Aegis Desktop hard drive is properly formatted, Select the Aegis Desktop drive, then Select: File, Get Info . The format should read Mac OS Extended. www.apricorn.com...
-
Page 32: Egis D Esktop
5. DISCONNECTING Windows 2000, XP and Vista 1. Click on the Safely Remove Hardware icon 2. Follow the computer screen instructions to remove your Aegis Desktop from your computer. To protect against unexpected data loss, Windows verifies that all files on the disk are closed before allowing the USB or FireWire device to be removed. -
Page 33: Contacting Technical Support
1. Simply call Apricorn’s technical support department with your Aegis Desktop part number and a description of the problem(s) you are experiencing. 2. If the Apricorn representative finds cause for a return, they will issue an RMA number. Please write this number down. -
Page 34: Warranty Conditions
NO OTHER WARRANTY, EITHER EXPRESS OR IMPLIED, INCLUDING ANY WARRANTY OR MERCHANTABILITY AND FITNESS FOR A PARTICULAR PURPOSE, HAS BEEN OR WILL BE MADE BY OR ON BEHALF OF APRICORN OR BY OPERATION OF LAW WITH RESPECT TO THE PRODUCT OR ITS INSTALLATION, USE, OPERATION, REPLACEMENT OR REPAIR. - Page 35 SATA standards on the first release of their products. If you are experiencing problems when trying to hot swap your Aegis Desktop, check with your motherboard manufacturer for a bios update or a SATA controller patch to fix the problem. www.apricorn.com...
- Page 36 6. The Aegis Desktop power LED is on, but the drive is not automatically detected by the operating system. a. The mass storage device drivers are not installed correctly or there is a resource conflict in the system. Use the Windows Add New Hardware Wizard to detect the drive, or, if the drive has already been installed, use the Windows Update Device Driver Wizard.
- Page 37 Yes. EZ Gig II allows you to mount an image as a “virtual” hard drive. You can access this “virtual” drive as if it were a physical hard drive. You would use your Windows Explorer or My Computer and copy the file or folder and paste it on to your hard drive. www.apricorn.com...
- Page 38 11. Why am I unable to save a file larger then 4GB on to my Aegis Desktop? Fat 32 has a file size limitation of 4GB. If you are using Windows 98 SE or ME, FAT32 is the only option you have available. If you are using Windows 2000 or XP, you can reformat the drive to NTFS.
- Page 39 Microsoft Download Center. The easy to use, customizable application helps you copy, move, rename, and delete files between folders and computers. To make it easy for you to find and download, we have created a link that is accessible from the Apricorn Software CD. SyncToy 1.4 download? ®...
- Page 40 12191 Kirkham Road Poway, CA, U.S.A. 92064 1-858-513-2000...
Need help?
Do you have a question about the ADT 500GB and is the answer not in the manual?
Questions and answers