Advertisement
Quick Links
English
This manual is written in accordance with the council directive MDD93/42/EEC
for medical device and harmonized standards.
User Manual
Ver 1.0
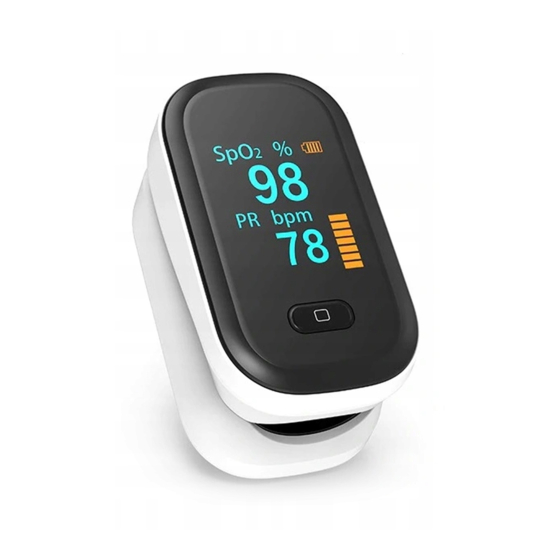
Fingertip Pulse Oximeter
This Fingertip Pulse Oximeter is a kind of innovated medical device with
non-invasive and continuous features for artery SPO2 and PR detection.
Being portable, it is able to measure SPO2 and PR values quickly and
precisely.
General Description
Haemoglobin Saturation is the percentage between the capacity of
Oxyhemoglobin (HbO2) that compounded with oxygen and that of all
combinativable haemoglobin (Hb) obin (HbO2) in blood. In other words, it
is the saturation of Oxyhemoglobin in blood. It is a very important
physiological parameter for Respiratory and Circulation Systems. Many
respiratory diseases could reduce haemoglobin saturation in human blood.
Moreover, factors such as Automatic Organic Regulation Malfunction
caused by anaesthesia, trauma resulted from major operation and some
medical examination can also cause problems in oxygen supply, which
might reduce human haemoglobin saturation. As a result, such symptoms
as megrim, vomiting and asthenia might appear to patients. Hence, it is
very important to know hemoglobin saturation of patient timely in clinical
medical aspects.
The fingertip pulse oximeter features in small volume, low power
consumption, convenient operation and portability. It is only necessary for
patient to put one finger into fingertip photoelectric sensor for diagnosis,
and the display screen will directly show measured value of hemoglobin
saturation. It has been proved in clinical experiments that it possesses
rather high precision and repeatability.
Measurement principle
The principle of the oximeter is as follows: An experience formula of data
process is established by exerting Lambert Beer Law according to
Spectrum Absorption Characteristics of Reductive hemoglobin(R Hb) and
oxyhemoglobin (O2 Hb) in glow and near-infrared zones. Operation
principle of the instrument is to combine Photoelectric Oxyhemoglobin
Inspection Technology with Capacity Pulse Scanning and Recording
Technology, so that two lights with different wavelength (660nm glow and
940nm near infrared light) can be focused onto human nail through
perspective clamp finger-type sensor. Then measured signal can be
obtained by a photosensitive element, information acquired through which
will be shown on two groups of LEDs through process in electronic
circuits and microprocessor.
Diagram of Operation Principle
1. Infrared-ray receiving tube
2. Infrared-ray transmitting tube
Precautions for use
1.Do not use the Fingertip Pulse Oximeter together with MRI or CT equipment.
2.Explosion hazard: Do not use the Fingertip Pulse Oximeter in an explosive
atmosphere.
3.The Fingertip Pulse Oximeter is intended only as an adjunct in patient
assessment. Doctors should make diagnosis in conjunction with clinical
manifestation and symptoms.
4.Check the Fingertip Pulse Oximeter sensor application site frequently to
make sure that the circulation and skin integrality of patient are under
good condition.
5.Do not stretch the adhesive tape while applying the Fingertip Pulse
Oximeter sensor. This may cause inaccurate reading or skin blisters.
6.Please read the manual carefully before your operation.
7.The Fingertip Pulse Oximeter has no SpO2 prompt, it is not for
continuous monitoring.
8.Prolonged use or the patient's condition may require changing the
sensor site periodically. Change sensor site and check skin integrality,
circulatory status, and correct alignment at least every 2 hours.
9.Inaccurate measurements may be caused by autoclaving, ethylene
oxide sterilizing, or immersing the sensors in liquid.
10.Significant levels of dysfunctional hemoglobins (such as carboxyl-
hemoglobin or methemoglobin) may cause inaccurate reading.
11.Intravascular dyes such as indocyanine green or methylene blue
may cause inaccurate reading.
12.SpO2 measurements may be adversely affected in the presence of high
ambient light. Please shield the sensor area (with a surgical towel or
direct sunlight, for example) if it is necessary.
13.Unexpected action may cause inaccurate reading.
14.Medical signal with high frequency or interference caused by defibrillator
may lead to inaccurate reading.
15.Venous pulsations may cause inaccurate reading.
16.It may cause inaccurate reading when the positions of sensor and
blood pressure cuff are on the same arterial catheter or intravascular line.
17.Hypotension, severe vasoconstriction, severe anemia, or hypothermia
may cause inaccurate reading.
18.It may cause inaccurate reading by giving use of cardiotonic to patient
after his cardiac arrest or when he is in quiver.
19.Bright nail or painted nail may cause inaccurate SpO2 reading.
Follow local ordinances and recycling instructions regarding to disposal
or recycling of the device and device components, including batteries.
Scope of application / Intended use
The fingertip pulse oximeter can be used to measure human haemoglobin
saturation and pulse rate through finger , it can be used in hospitals, families,
schools and medical centers.
contraindication:not found
note:1.The image in the instruction may have slight differences with
the actual instruments。
2.Technical parameters and appearance change, without prior notice。
Product include:main machine and SPO2 sensor。
Features
OLED display
Product adopts double color OLED display,can show the six different
display mode
★If the hand movements, under the effect of accelerometer, the
interface can have four different kinds of display mode (suitable for
matching accelerometer function instrument)
Low-power consumption, continuously work for more than six hours with
two AAA batteries
Low voltage indicator
In the absence of signals, the product will be in after 8 seconds to enter
standby state
Small in volume, light in weight, and convenient to carry
★Instrument has 5s automatic signal detection function, when you
insert finger, timely will automatically start;Automatic startup function
instrument (applicable to Automatic startup function instrument)
Operation Instructions
1.Install two AAA batteries into battery cassette before covering its cover.
2.Plug one finger into rubber hole of the Oximeter (it is best to plug the
finger thoroughly) before releasing the clamp with the nail upwards.
3.Press button on the front panel;(Note: if equipped with automatic
startup function refers to clamp oximeter, need not press the button,
the instrument has 5 s automatic signal detection function, directly
inserted into the finger, instrument is automatically switched on timely)
4.Don't tremble your finger when the Oximeter is working. Your body is
not recommended on moving status.
5.Press the button on the front panel, if we want change display direction;
(Note: if equipped with accelerometer function of instrument then don't
press the button, hand movements, the instrument with the accelerometer
has four corresponding interface switch)
6.Read relevant datum from display screen.
7. The instrument has the function of sleep, no signal will enter standby
state of sleep;
8.Please replace new batteries when OLED indicates the batteries are
in low power.
When plugging your finger into the Oximeter, your nail surface must be
upward.
Declaration: Please use the medical alcohol to clean the rubber before
each test and clean the tested finger with alcohol before and after the test.
(The rubber inside of the Oximeter adopts medical rubber, which has no
toxin, no harm, and brings no side effect such as allergy to the our skin ).
Battery installation
1, According to the positive and negative identity right will be two AAA
batteries into the battery
2, In the direction of the arrow at the bottom of the level of battery back
cover.
Please note: pay attention to the battery positive and negative polarity,
must be installed correctly, otherwise it may cause damage to instrument.
Hang rope installation
1, Put the rope thin end through the hole.
2, Put the rope coarser end through its already wearing thin end part and
tighten。
Brief Description of Front Panel
OLED display:
OLED display:
Battery cover
Power button / Mode switch
OLED display modes:
1.
2.
3.
4.
5.
6.
Advertisement

Related Manuals for ProLinx YK-80B


Summary of Contents for ProLinx YK-80B
- Page 1 English 19.Bright nail or painted nail may cause inaccurate SpO2 reading. This manual is written in accordance with the council directive MDD93/42/EEC for medical device and harmonized standards. Follow local ordinances and recycling instructions regarding to disposal or recycling of the device and device components, including batteries. User Manual Scope of application / Intended use Ver 1.0...
- Page 2 ● If any problem,please call us in 9:00 am to 5:30 pm from Monday to Friday(except national holiday),call us:400-828-6667 Product Accessories Model: YK-80B 1.One hang lace Xuzhou Yongkang Electronic Science Technology Co., Ltd 2.One user manual 4F Building C8 , 40 Jingshan Road , Economic and Technological Development Zone, 221000 Xuzhou , PEOPLE’S REPUBLIC OF CHINA...
Need help?
Do you have a question about the YK-80B and is the answer not in the manual?
Questions and answers