Table of Contents
Advertisement
Available languages
Available languages
Advertisement
Table of Contents

Related Manuals for Haverland HyPE 2.0


Summary of Contents for Haverland HyPE 2.0
- Page 1 HyPE 2.0...
- Page 3 MANUAL DE INSTRUCCIONES HyPE 2.0 Ventilador de pie Lea las instrucciones antes de usar este ventilador - 1 -...
-
Page 4: Advertencias Generales
ADVERTENCIAS GENERALES INSTRUCCIONES DE SEGURIDAD IMPORTANTES Al usar aparatos eléctricos, siempre se deben tomar precauciones básicas para reducir el riesgo de incendio, descarga eléctrica y lesiones a personas, incluidas las siguientes: * NO use este ventilador para ventilar las áreas donde se utilizan, almacenan o están presentes líquidos o vapores inflamables, como pinturas, gasolina, barnices, productos para el acabado de pisos o solventes. - Page 5 ADVERTENCIAS GENERALES * NUNCA use un solo cable de extensión para operar más de un ventilador u otro dispositivo eléctrico. * NO use este ventilador en una ventana. La lluvia puede producir un peligro eléctrico. * NO use este ventilador si está dañado o no funciona correctamente. * NO utilice el ventilador con un cable y / o con una clavija de alimentación defectuosa.
-
Page 6: Especificaciones
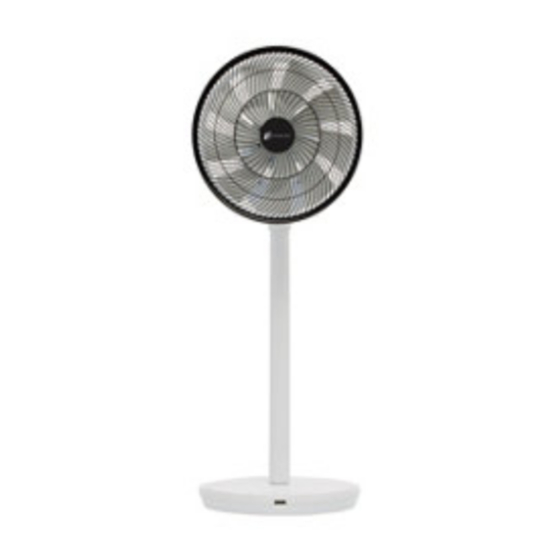
FUNCIONAMIENTO PARTES Cabezal Oscilante Poste Panel de control Receptor remoto AC/DC ADAPTADOR ESPECIFICACIONES * Tensión nominal: DC 12V * Consumo de energía: 27 W * Tamaño: 34 cm x 34 cm x 73 cm * Peso: 4,3 Kg. - 4 -... - Page 7 FUNCIONES ON / OFF Temporizador Modos Velocidad del ventilador Funcionamiento Oscilación vertical Oscilación horizontal ON / OFF Modo Sueño Temporizador ascendente Velocidad ventilador ascendente Velocidad ventilador descendente Temporizador descendente Modos funcionamiento Oscilación horizontal Oscilación vertical - 5 -...
- Page 8 FUNCIONAMIENTO • Desembale la unidad y retire los materiales de embalaje de la unidad. Almacene los materiales de embalaje de forma segura para un posible transporte futuro. • Monte la rejilla frontal y fije la unidad en la base (consulte la página 7 para obtener más información).
- Page 9 ENSAMBLA TU UNIDAD Siga los siguientes pasos para ensamblar su unidad: 1. Ensamble el poste a la base. 2. Monte la carcasa del ventilador en el motor como se muestra en la imagen. Fije la carcasa. Poste Base 3. Monte las palas del ventilador en el 4.
- Page 10 INSTRUCTION MANUAL HyPE 2.0 Standing fan Read all instructions before using this fan - 8 -...
-
Page 11: Important Safety Instructions
WARNINGS IMPORTANT SAFETY INSTRUCTIONS When using electrical appliances, basic precautions should always be followed to reduce the risk of fire, electric shock, and injury to persons, including t he following: * DO NOT use this fan to ventilate areas where flammable liquids or vapors are used, stored or are present, including paints, gasoline, varnishes, floor refinishing products or solvents. - Page 12 WARNINGS * DO NOT use this fan in a window. Rain may create an electrical hazard. * DO NOT use this fan if it has been damaged or is not functioning properly. * DO NOT operate any fan with a damaged cord or plug. * Do not hang or mount fan on ceiling.
-
Page 13: Product Instructions
PRODUCT INSTRUCTIONS UNIT DIAGRAM Swing Pole Control Panel Remote Receiver AC/DC ADAPTOR SPECIFICATIONS *Rated Voltage : DC 12V *Power Comsuption : 27 W *Size: 34cm x 34 cm x 73 cm *Weight: 4.3 Kg - 11 -... - Page 14 OPERATION SURFACE Power Modes Fan Speed Timer Vertical Swing Horizontal Swing Sleep Mode Power Timer up Fan Speed up Fan Speed down Timer down Modes Horizontal Swing Vertical Swing - 12 -...
-
Page 15: Operation
OPERATION • Unpack the unit and removing the packing materials from the unit. Store the packing materials safely for possible future transportation. • Assemble the front grill and fix the unit on the base (see page 14 for details). • Plug in the DC plug of the adaptor to the DC connector locates on the fan’s base. •... - Page 16 ASSEMBLE YOUR UNIT Follow bellow steps to assemble your unit: 1. Plug the Pole to the Base. 2. Assemble the fan shell to the motor as showed in the picture. Pole Base 3. Assemble the fan blade to the 4. Fix the fan blade to the motor as motor.
-
Page 17: Manuel D'instructions
MANUEL D’INSTRUCTIONS HyPE 2.0 Ventilateur debout Lisez toutes les instructions avant d’utiliser ce ventilateur - 15 -... - Page 18 ATTENTION INSTRUCTIONS IMPORTANTES DE SÉCURITÉ Lors de l’utilisation d’appareils électriques, des précautions élémentaires doivent toujours être prises pour réduire les risques d’incendie, de choc électrique et de blessures corporelles, notamment les suivantes: * NE PAS utiliser ce ventilateur pour ventiler des zones où des liquides ou des vapeurs inflammables sont utilisés, stockés ou présents, tels que des peintures, de l’essence, des vernis, des revêtements de sol ou des solvants.
- Page 19 ATTENTION * NE placez PAS le cordon d’alimentation dans ou à travers des zones telles que les portes ou des endroits où le câble pourrait être endommagé ou causer un risque de chute. * N’utilisez JAMAIS une seule rallonge pour faire fonctionner plusieurs ventilateurs ou autres appareils électriques.
-
Page 20: Caractéristiques
INSTRUCTIONS PRODUIT DIAGRAMME UNITAIRE Balançoire Pôle Panneau de contrôle Récepteur à distance ADAPTATEUR AC/DC CARACTÉRISTIQUES * Tension évaluée: DC 12V * Puissance consommée: 27 W * Taille: 34cm x 34 cm x 73 cm * Poids: 4,3 kg - 18 -... - Page 21 SURFACE D’OPÉRATION Power Minuteur Modes Vitesse du ventilateur Balançoire verticale Balançoire horizontale Power Mode veille Minuterie vers le haut Vitesse du ventilateur vers le haut Vitesse du ventilateur vers le bas Minuterie vers le bas Modes Balançoire horizontale Balançoire verticale - 19 -...
-
Page 22: Opération
OPÉRATION • Déballer l’appareil et retirer les matériaux d’emballage de l’appareil. Conservez les matériaux d’emballage en toute sécurité pour un éventuel transport ultérieur. • Assemblez la grille avant et fixez l’appareil sur la base (voir page 21 pour plus de détails). •... - Page 23 ASSEMBLEZ VOTRE UNITÉ Suivez les étapes ci-dessous pour assembler votre appareil: 1. Monte o post na base. 2. Assemblez la coque du ventilateur au moteur comme indiqué sur la photo. Poteau Base 3. Assemblez la pale du ventilateur au 4. Fixez la pale du ventilateur au moteur.
-
Page 24: Manual De Instruções
MANUAL DE INSTRUÇÕES HyPE 2.0 Ventilador de pie Leia todas as instruções antes de usar este ventilador - 22 -... -
Page 25: Instruções Importantes De Segurança
ADVERTÊNCIA INSTRUÇÕES IMPORTANTES DE SEGURANÇA Ao usar aparelhos elétricos, precauções básicas devem sempre ser tomadas para reduzir o risco de incêndio, choque elétrico e ferimentos a pessoas, incluindo as seguintes: * NÃO use este ventilador para ventilar as áreas onde são usados, armazenados ou estão presentes líquidos ou vapores inflamáveis como tintas, gasolina, vernizes, produtos para o acabamento de pavimentos ou solventes. - Page 26 ADVERTENCIAS * NUNCA use um único cabo de extensão para operar mais de um ventilador ou outro dispositivo elétrico. * NÃO use este ventilador numa janela. A chuva pode criar um risco elétrico. * NÃO use este ventilador se estiver danificado ou não funcionar corretamente. * NÃO opere nenhum ventilador com um cabo ou ficha danificados.
- Page 27 INSTRUÇÕES DO PRODUTO DIAGRAMA DA UNIDADE Oscilação Poste ajustável Painel de controlo Recetor remoto ADAPTADOR AC/DC ESPECIFICAÇÕES * Tensão nominal: DC 12V. * Consumo de energia: 27 W * Tamanho: 34 cm x 34 cm x 73 cm * Peso: 4,3 Kg. - 25 -...
- Page 28 OPERAÇÕES Power Temporizador Modos Velocidade do ventilador Oscilação Vertical Oscilação Horizontal Modo noturno Power Temporizador ascendente Velocidade do ventilador ascendente Velocidade do ventilador descendente Temporizador descendente Modos Oscilação horizontal Oscilação vertical - 26 -...
- Page 29 OPERAÇÃO • Desembale a unidade e remova os materiais de embalagem da unidade. Armazene os materiais de embalagem de forma segura para um possível transporte futuro. • Monte a grade frontal e fixe a unidade na base (consulte a página 28 para obter mais informações).
- Page 30 MONTE A SUA UNIDADE Siga os seguintes passos para montar a sua unidade: 1. Conecte o poste na base e fixe-o 2. Monte a carcaça do ventilador no com o botão de plástico. motor, conforme mostrado na figura. Poste Base 3.
- Page 31 BEDIENUNGSANLEITUNG HyPE 2.0 Standventilator Lesen Sie alle Anweisungen, bevor Sie diesen Lüfter verwenden - 29 -...
-
Page 32: Wichtige Sicherheitshinweise
WARNUNG WICHTIGE SICHERHEITSHINWEISE Bei der Verwendung von Elektrogeräten sollten immer grundlegende Vorkehrungen getroffen werden, um das Risiko von Feuer, Stromschlag und Verletzungen von Personen zu verringern, einschließlich der folgenden: * Verwenden Sie diesen Lüfter NICHT zum Lüften von Bereichen, in denen brennbare Flüssigkeiten oder Dämpfe verwendet werden, wie zum Beispiel Farben, Benzin, Lacke, Bodenbeläge oder Lösungsmittel. - Page 33 WARNUNG * Platzieren Sie das Netzkabel NICHT in oder durch Bereiche wie Türen oder Orte, an denen das Kabel beschädigt werden oder eine Stolpergefahr verursachen kann. * Verwenden Sie NIEMALS ein Verlängerungskabel, um mehr als einen Lüfter oder ein anderes elektrisches Gerät zu betreiben. * Verwenden Sie diesen Lüfter NICHT in einem Fenster.
-
Page 34: Spezifikationen
PRODUKTANWEISUNGEN DIAGRAMM DER EINHEIT Oszillation Pfosten Bedienfeld Fernbedienungsempfänger AC/DC ADAPTER SPEZIFIKATIONEN * Nennspannung: DC 12V * Größe: 34 cm x 34 cm x 73 cm * Gewicht: 4,3 kg - 32 -... -
Page 35: Betrieb
BETRIEB Power Timer Betriebsarten Lüftergeschwindigkeit Vertikale Schwingung Horizontale Schwingung Schlafmodus Power Aufsteigender Timer Lüftergeschwindigkeit erhöhen Lüftergeschwindigkeit runter Absteigender Timer Betriebsarten Horizontale Schwingung Vertikale Schwingung - 33 -... - Page 36 BETRIEB • Packen Sie das Gerät aus und entfernen Sie das Verpackungsmaterial vom Gerät. Bewahren Sie das Verpackungsmaterial für einen möglichen zukünftigen Transport sicher auf. • Montieren Sie das Frontgitter und befestigen Sie das Gerät an der Basis (weitere Informationen finden Sie auf Seite 35). •...
- Page 37 MONTIEREN SIE IHRE EINHEIT Folgen Sie den nachstehenden Schritten, um Ihr Gerät zusammenzubauen: 1. Montieren Sie die Stange an der 2. Montieren Sie das Lüftergehäuse am Basis. Motor wie es in der Abbildung gezeigt wird. Stange Basis 3. Montieren Sie den Lüfterflügel am 4.
- Page 38 This warranty applies only to the Product. To repair the device, the consumer must dial the Technical Assistance Service at 0330 3651940 or send an email to haverland@haverland.co.uk and ask for the information needed about the procedure to follow: For a replacement, cancellation or price reduction, when in order, the consumer must go the establishment where the device was purchased.
- Page 39 Pour la réparation de l’appareil, le consommateur devra s’adresser au Service d’Assistance Technique en contactant le + 34 91 324 40 60 (Horaire : du lundi au vendredi, de 9 h à 20 h) ou envoyer un email à postventa@haverland.com en sollicitant l’information nécessaire de la démarche à...
- Page 40 Diese Garantie wird nur auf das Produkt angewendet. Für eine Reparatur des Geräts muss der Endverbraucher den Kundendienst unter der Nummer 91 324 40 60 anrufen (Geschäftszeit: Montag bis Freitag von 9 bis 20 Uhr) oder eine E-Mail an postventa@haverland.com schicken, in der die nötige Information über die weiteren Schritte beantragt wird.
Need help?
Do you have a question about the HyPE 2.0 and is the answer not in the manual?
Questions and answers
how do you operate the controls?
My HyPE 2.0 switch on & off by itself. Sometimes the fan switch off direct after I started by the remote control! Is it possible to do "factory reset"?