
Subscribe to Our Youtube Channel
Related Manuals for Zuchetti Bellagio ZB2422


Summary of Contents for Zuchetti Bellagio ZB2422
- Page 2 MOD. 1 INSTALLAZIONE / INSTALLATION / УСТАНОВКА Predisporre la piantana 1, inserendo il dado 2, la ranella 3 e la guarnizione 4. GB - Prepare the side valve 1, by inserting the nut 2, the washer 3 and the seal 4. Préparer la pièce de raccordement 1, en insérant l’écrou 2, la rondelle 3 et le joint 4.
- Page 3 MOD. 1 INSTALLAZIONE / INSTALLATION / УСТАНОВКА Inserire a pressione la maniglia 9 sull’asta della piantana. Serrare con una chiave da 32 mm il dado 2. GB - Insert with pressure the handle 9 in the side valve rod. Tighten the nut 2 with a 32 mm Key. Introduire à...
- Page 4 MOD. 3 INSTALLAZIONE / INSTALLATION / УСТАНОВКА Avvitare i raccordi eccentrici 1 (fino alla fine del filetto), sulle tubazioni di alimentazione. Servirsi dell’apposita dima 2, per ottenere l’interasse dovuto. Verificare la perpendicolarità. GB - Screw the S-tail pieces 1 (till the end of the thread) on the water inlet pipes in the wall. Use the paper template 2 that you find in the box to obtain the necessary inter axes.
- Page 5 MOD. 4 INSTALLAZIONE / INSTALLATION / УСТАНОВКА Avvitare il perno filettato 1 sul corpo del monoforo / monocomando 2. Inserire l’asta di scarico 3 nell’apposito foro. GB - Screw the threaded pin 1 on the body of the single hole / single lever tap 2. Insert the pop-up waste rod 3 in the appropriate hole.
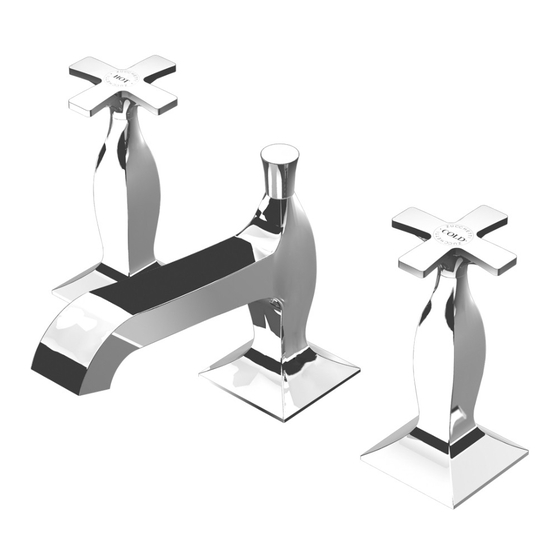
- Page 6 MOD. 5 INSTALLAZIONE / INSTALLATION / УСТАНОВКА Allacciare il corpo incasso alle tubature seguendo le indicazioni presenti sul pezzo (HOT, COLD). Incassare il corpo in modo che la superficie delle piastrelle venga a trovarsi tra i riferimenti MIN e MAX presenti sulla prote zione.
- Page 7 MOD. 5 INSTALLAZIONE / INSTALLATION / УСТАНОВКА Inserire il corpo scorrevole nel corpo incassato facendo entrare i tubetti nelle rispettive sedi. Spingere il corpo scorrevole fino in battuta sulla superficie delle piastrelle. Avvitare le due viti 4 con una chiave a brugola da 2,5 mm.
- Page 8 MOD. 6 INSTALLAZIONE / INSTALLATION / УСТАНОВКА Infilare sul corpo scorrevole 1 la piastra 2 ed inserirlo nel corpo incassato 3 facendo entrare i tubetti nelle rispetti ve sedi (spingerlo fino in battuta sulle piastrelle). Avvitare le due viti 4 con una chiave a brugola da 2,5 mm. GB - Slide the plate 2 onto the sliding body 1 and fit it into the flush-mounted casing 3, slotting the pipes into their re spective seats (and pushing the body right down against the surface of the tiles).
- Page 9 PORTATE / FLOWRATE / РАСХОД ZB1425 ZB1315 L/min 10,8 13,3 16,7 L/min 12,3 ZB1018 ZP3193 - ZP3343 L/min 11,3 13,6 15,6 17,2 L/min 10,3 11,6 ZB1228 ZP3116 L/min 21,8 34,7 bocca L/min L/min 11,3 13,8 doccia...
- Page 10 CONDIZIONI DI UTILIZZO - PULIZIA Pressione minima: 1 bar Pressione massima: 5 bar Pressione consigliata: 2-3 bar Differenza di pressione acqua calda/fredda: 1 bar max. Temperatura massima: 80°C Temperatura consigliata: 60-65°C La rubinetteria Zucchetti può essere impiegata con scaldabagni elettrici ad accumulo, a gas istantanei, impianti centralizzati, caldaie murali a gas miste e teleriscaldamento. Prima di collegare la rubinetteria si raccomanda di spurgare l’impianto;...
Need help?
Do you have a question about the Bellagio ZB2422 and is the answer not in the manual?
Questions and answers