Table of Contents
Advertisement
Quick Links
OPERATING/INSTALLATION INSTRUCTIONS
Armaturenwerk Hötensleben GmbH
Schulstr. 5-6
D-39393 Hötensleben, Germany
Telephone:
+49 39405 92-0
Fax:
+49 39405 92-111
E-mail:
info@awh.eu
Website:
http://www.awh.eu
(Translation)
Container cleaning device
TANKO
MX125/150 jet cleaner
®
A Member of the NEUMO Ehrenberg Group
ID no.: 664BAMX0000EN – 2019/08 Rev. 0
Advertisement
Table of Contents

Related Manuals for AWH TANKO MX125

Summary of Contents for AWH TANKO MX125
- Page 1 Container cleaning device TANKO MX125/150 jet cleaner ® Armaturenwerk Hötensleben GmbH Schulstr. 5-6 D-39393 Hötensleben, Germany Telephone: +49 39405 92-0 Fax: +49 39405 92-111 E-mail: info@awh.eu Website: http://www.awh.eu ID no.: 664BAMX0000EN – 2019/08 Rev. 0 A Member of the NEUMO Ehrenberg Group...
- Page 2 NOTE These instructions are an essential part of the device and must be available to operating and maintenance personnel at all times throughout its entire life cycle. The safety precautions contained therein must be observed. If the device is resold, the instructions must always be transferred to the new owner. Translation The operating instructions must be written in an official European Community language acceptable to the manufacturer of the machinery in which the partly completed machinery will be assembled, or to his...
-
Page 3: Table Of Contents
Jet Cleaner TANKO-MX Contents Contents ..............................I List of Figures ............................III List of Tables.............................. III Abbreviations and Units ..........................IV 1 Introduction ............................1 1.1 Means of Presentation ......................... 1 1.1.1 Explanation of Signal Words....................... 1 1.1.2 Explanation of the Warnings ...................... 2 1.1.3 Pictograms and Symbols ...................... - Page 4 Jet Cleaner TANKO-MX 6 Commissioning ............................. 44 6.1 Safety Instructions for Commissioning ....................44 6.2 Functional Check / Trial Run ......................46 6.3 Switch-on procedure ........................... 47 6.4 Operation ............................. 48 7 Maintenance ............................52 7.1 Safety Instructions for Maintenance ....................52 7.2 Switch-off Procedure ..........................
- Page 5 Jet Cleaner TANKO-MX List of Figures Picture 2.5-1: Type Plate Position ......................... 15 Picture 3.1-1: Overview of MX125 ........................ 16 Picture 3.1-2: MX150 overview ........................17 Picture 3.3-1: Chart - MX125-G14 flow ......................21 Picture 3.3-2: Chart - MX150-G14 flow ......................22 Picture 3.3-3: Chart - MX150-G12 flow ......................
-
Page 6: Abbreviations And Units
Jet Cleaner TANKO-MX Abbreviations and Units Abbreviations ATEX ATmosphère EXplosible; Synonym for the ATEX Directive of the European Union; comprises measures for explosion protection for explosive atmospheres Assembly approx. approximately Assembly group Armaturenwerk Hötensleben GmbH BetrSichV Betriebssicherheitsverordnung (German industrial safety ordinance); ordinance concerning health and safety when using work equipment;... - Page 7 Jet Cleaner TANKO-MX min. minimum “MX” device series Jet cleaner with internal media actuator and interior gears National Pipe Thread; USA thread standard for pipe fittings PC [PA] Process Connection In the context of these instructions, this colloquial term describes the interface used in cleaning technology for the connection to the process from the device to the container.
- Page 8 Jet Cleaner TANKO-MX Units of Measure The following indicated factors are intended for orientation and the conversion of the SI units to common units of measure for the American market. Unit of measure for pressure p [bar] All pressure [bar] specifications stand for overpressure [bar o] = positive pressure [bar g], unless expressly described otherwise (e.g.
-
Page 9: Introduction
The instructions must be kept at the location of use of the device so that they are available in legible condition at all times. If the device is resold, the instructions must always be transferred to the new owner. Download the instructions, if necessary, from the http://www.awh.eu/de/downloads Internet page. 1.1 Means of Presentation 1.1.1 Explanation of Signal Words The warnings are introduced with a signal word which describes the extent of the hazard. -
Page 10: Explanation Of The Warnings
Jet Cleaner TANKO-MX 1.1.2 Explanation of the Warnings Section-related Warnings The section-related warnings apply not only to one particular action, but rather to all actions within a section. In addition, the pictograms and symbols indicate a general or specific danger. DANGER This warning warns of a hazard with a high level of risk! Failure to observe it can lead to death or severe physical injury. - Page 11 Jet Cleaner TANKO-MX Further Means of Presentation INSTRUCTION This note contains specific safety-relevant instructions and/or working steps for operational procedures and switch-off processes that are to be strictly complied with. Non-compliance prevents operational safety, thus leading to hazards. The "Info" symbol provides useful information, additional tips and recommendations. Texts which follow this mark are bulleted lists.
-
Page 12: Pictograms And Symbols
Jet Cleaner TANKO-MX 1.1.3 Pictograms and Symbols The following pictograms and symbols are used as a supplementary measure in these instructions to clarify the sources of dangers and measures. They can appear at all levels of danger. Warning about Warning about Warning about Warning about electrical voltage... -
Page 13: Warranty And Liability
– Disclaimer AWH reserves the right to make alterations to this document at any time and without prior notice. AWH provides no guarantee (neither expressed nor implied) with regard to all information in this document, including but not limited to the implied warranty of merchantability and suitability for a particular purpose. -
Page 14: Safety
For maintenance and repair, we recommend a training course provided by the manufacturer or a person authorized by the manufacturer. If questions or doubts about handling the cleaning device arise during maintenance, please contact AWH. 6/102 Operating/Installation Instructions 2019/08 2 Safety... -
Page 15: Intended Use
Jet Cleaner TANKO-MX Built-in Safety Systems The built-in safety devices used by the higher-level plant in which the device is installed are to be tested at regular intervals. WARNING Dangerous situations arising from changing or disabling safety devices! Only functional safety devices can ensure safe operation and prevent inadmissible operating conditions. - Page 16 This also applies to hazardous substances that may arise during work processes. – Refer to the order confirmation / parts list from AWH for the materials used in the device. The TANKO-MX is a rotating cleaning device and belongs to the group of jet cleaners. The device is driven by the cleaning medium.
- Page 17 Jet Cleaner TANKO-MX The device was developed, engineered and built exclusively for industrial and commercial use. It must not be used for private use. The device is constructed so that it can be operated safely within the specified technical parameters (see Section 3.3 Technical Data).
-
Page 18: Spare Parts, Replacement Parts And Accessories
Use only the manufacturer's original spare parts. We expressly draw attention to the fact that spare parts and accessories NOT supplied by AWH have NOT been checked or approved by AWH. The installation and/or use of such products could therefore, under certain circumstances, result in changes with negative results to the properties of the device specified by its design and the higher-level plant. -
Page 19: Duties Of The Operating Company
Jet Cleaner TANKO-MX 2.3 Duties of the Operating Company The device is used in the commercial sector. The operating company is thus subject to the legal obligations regarding occupational safety. In the EEA (European Economic Area), the national implementation of the Framework Directive 89/391/EEC on carrying out measures for improving safety and protecting the health of employees during work, as well as the associated individual directives shall be observed and complied with in their current valid versions. - Page 20 Jet Cleaner TANKO-MX The operating company must provide personnel with personal protective equipment and make sure – that this is used (see Section 2.4.1 Personal Protective Equipment). The operating company must make sure that the danger area of the higher-level plant in which the –...
-
Page 21: Requirements For Personnel
Jet Cleaner TANKO-MX 2.4 Requirements for Personnel The device must only be operated, maintained and repaired by persons with the appropriate qualifications. These persons must be familiar with this manual and act in accordance with them. The respective authorizations for personnel must be clearly defined. The following qualifications are designated in the manual for various fields of activity: Expert/Specialist Personnel An expert is a person whose professional training, knowledge, and experience and knowledge of the... -
Page 22: Personal Protective Equipment
Jet Cleaner TANKO-MX 2.4.1 Personal Protective Equipment Personal protective equipment must be used in accordance with the respective task when working on the device in order to minimize health hazards. Protective work clothing Protective work clothing is tight-fitting work clothing with low resistance to tearing, with close-fitting sleeves and without protruding parts. -
Page 23: Labeling
Jet Cleaner TANKO-MX 2.5 Labeling 2.5.1 Type Designation Example: Jet Cleaner TANKO – MX125 – G14 1) Brand of the cleaning devices: TANKO 2) Type/series: Media actuator X 3) Size: Installation opening ≈ 125 mm 4) Variant: G for “gleitgelagert” (with slide bearing) 5) Number of nozzle carriers: 6) Number of nozzles: 2.5.2 Type Plate... -
Page 24: Construction And Function
Jet Cleaner TANKO-MX 3 Construction and Function For the development of the device, importance was attached to simple shape and functional design for the operating company. The outer appearance of the device is harmonious and compact. To protect the innovation, the design of the devices was registered with the relevant authorities. –... -
Page 25: Mx150 Structure
Jet Cleaner TANKO-MX 3.1.2 MX150 Structure The Container Cleaning Device comprises the following Main Components: AU actuator unit AU cleaning head Picture 3.1-2: MX150 overview 3.2 General Function Description The jet cleaner of the TANKO-MX series is a cleaning device design with an internal actuator. The materials of the device are stainless steel and plastic. - Page 26 Jet Cleaner TANKO-MX The orbital movement of the jet creates a closed cleaning pattern on the inner surface of the container, the mesh size of which depends on the number of teeth on the bevel gears, the number of nozzles and the distance from the container wall.
-
Page 27: Mx Function
Jet Cleaner TANKO-MX 3.2.1 MX Function The item numbers shown in brackets refer to Picture 7.5-1: Internal structure (Example MX125). The cleaning fluid enters through the connection cover (01) of the device and flows through the bores of the inflow disk (14) and into the actuator unit at a certain angle. In the process, the fluid meets the rotor impeller (15) which is connected fixedly to the shaft of the spur gear (18). -
Page 28: Technical Data
Jet Cleaner TANKO-MX 3.3 Technical Data The estimated safe service life of the device is 10 years with single-shift operation and the use of drinking water. The prerequisites for this are that the device must be maintained properly at the intervals specified in Section 7.4 Maintenance , and the wear parts must be replaced regularly. -
Page 29: Picture 3.3-1: Chart - Mx125-G14 Flow
Jet Cleaner TANKO-MX Designation TANKO-MX125-G14 TANKO-MX150-G14 TANKO-MX150-G12 Noise pressure level Dependent on the properties of the container! The sound pressure level may exceed the permitted Outside the container – exposure value of L = 85 dB(A). EX,8h Miscellaneous Materials in contact with media 1.4404/08 (AISI 316L) 1.4404/08 (AISI 316L) 1.4404/08 (AISI 316L) -
Page 30: Picture 3.3-2: Chart - Mx150-G14 Flow
Jet Cleaner TANKO-MX MX150-G14 Variants (3 – 8 bar / 43.5 – 116 psig) TANKO-MX150-G14 1 x 4 nozzles Ø 7.0 mm – TANKO-MX150-G14 1 x 4 nozzles Ø 8.0 mm – l/min gpm (US) A = 4x Ø 8 mm B = 4x Ø... -
Page 31: Cleaning Media
The operating company holds sole responsibility for the type of cleaning media, their use and handling. For this reason, AWH can provide the owner with a few reference points and notes (for a device in a container) but only as a precautionary measure, which must be observed and integrated into the owner’s risk assessments. - Page 32 Jet Cleaner TANKO-MX CAUTION Danger as a result of use of incorrect cleaning media! Due to their material resistance, the materials used in the device impose certain limitations on the cleaning media used. Failure to observe these restrictions can result in the failure of components or a device malfunction, causing material damage and consequential damages.
- Page 33 In practice, the special types of corrosion of rust-proof steels cannot always be prevented, but can be significantly minimized and delayed. If you have any questions or uncertainties about this, please consult AWH! 3 Construction and Function Operating/Installation Instructions 2019/08...
-
Page 34: Transportation And Storage
Jet Cleaner TANKO-MX 4 Transportation and Storage AWH products are checked carefully before they are dispatched, and are packaged in accordance with the respective transportation and storage conditions. However, it is NOT possible to rule out the possibility of damage during transportation completely. -
Page 35: Packaging
Jet Cleaner TANKO-MX 4.1 Packaging The device is supplied fully assembled. The packaging is selected to suit the conditions of transportation. Required accessories, spare parts, operating or installation instructions and technical documents are packaged separately and enclosed with the delivery. The packaging should protect the device up until the time of installation against transport damage, corrosion and other damage. -
Page 36: Storage
Jet Cleaner TANKO-MX 4.3 Storage The packaging used for the device, the components and the replacement/wear parts is designed to be stored for 3 months. NOTE Risk of damage to the device as a result of incorrect storage! Incorrect storage can cause damage to the device and its components and lead to premature aging (e.g. -
Page 37: Installation
Jet Cleaner TANKO-MX 5 Installation 5.1 Safety Instructions for Installation WARNING Risk of falling when working at heights! When carrying out assembly/disassembly work on parts of the plant at heights, there is a risk of falling. There is a risk of death or severe physical injury. Do not perform any work at heights except with a safety platform with cage or suitable ... - Page 38 Jet Cleaner TANKO-MX CAUTION Risk from protruding sharp edges on the device! Depending on the design, the device may have protruding sharp edges which can be dangerous when handling it. There is a risk of minor cuts. Wear protective gloves when working on the device. ...
- Page 39 Jet Cleaner TANKO-MX WARNING Danger as a result of static charge! Containers may become statically charged during cleaning operation. There is a risk of electric shock or electrical irritation in case of contact with the hand, which could cause a startled reaction. There is a risk of death or severe physical injury.
-
Page 40: Installation
Jet Cleaner TANKO-MX 5.2 Installation The safety instructions in Section 5.1 Safety Instructions for Installation must be adhered to before installation of the device in the container. CAUTION Failure due to incorrect installation position/location of the device! Installation of the device which is NOT performed properly can cause damage to the device which puts the functional safety and reliability at risk when it is commissioned. -
Page 41: Interfaces
Jet Cleaner TANKO-MX 5.2.1 Interfaces 5.2.1.1 MX125 Installation Dimensions and Interfaces Ø 63 mm / Ø 2½ in 41 mm / 1⅔ in Ø 125 mm / Ø 5 in Top view (min. Ø of the installation opening) 92 mm / 3⅔ in 41 mm / 1⅔... -
Page 42: Picture 5.2-2: Interfaces Of The Mx125 Device
Jet Cleaner TANKO-MX Actuator / Energy Supply Media connection [MC] ] (connection of the downpipe [DP] to the device) Device / Container Process connection [PC] ] (connection of the downpipe [DP] to the container) Space for Movement / Installation Space Cleaning head with nozzles (space for orbital nozzle movement and outlet of cleaning agent) -
Page 43: Picture 5.2-3: Installations Dimensions Of The Device Mx150-G14
Jet Cleaner TANKO-MX 5.2.1.2 Installation Dimensions and Interfaces of the MX150-G14 55 mm / 2⅙ in Ø 63 mm / Ø 2½ in Ø190mm / Ø 7½ in Top view (min. Ø of the installation opening) 55 mm / 2⅙ in 96 mm / 3⅘... -
Page 44: Picture 5.2-4: Interfaces Of The Device Mx150-G14
Jet Cleaner TANKO-MX Actuator / Energy Supply Media connection [MC] ] (connection of the downpipe [DP] to the device) Device / Container Process connection [PC] ] (connection of the downpipe [DP] to the container) Space for Movement / Installation Space Cleaning head with nozzles (space for orbital nozzle movement and outlet of cleaning agent) -
Page 45: Picture 5.2-5: Installation Dimensions Of The Device Mx150-G12
Jet Cleaner TANKO-MX 5.2.1.3 Installation Dimensions and Interfaces of the MX150-G12 55 mm / 2⅙ in Ø63 mm / Ø2½ in Ø115 mm / Ø4½ in Top view (min. Ø of the installation opening) 55 mm / 2⅙ in 96 mm / 3⅘ in Ø150 mm / Ø6 in Front view Top view... -
Page 46: Picture 5.2-6: Interfaces Of The Device Mx150-G12
Jet Cleaner TANKO-MX Actuator / Energy Supply Media connection [MC] ] (connection of the downpipe [DP] to the device) Device / Container Process connection [PC] ] (connection of the downpipe [DP] to the container) Space for Movement / Installation Space Cleaning head with nozzles (space for orbital nozzle movement and outlet of cleaning agent) -
Page 47: Installation Position
Jet Cleaner TANKO-MX 5.2.2 Installation Position 1) Aligned vertically with the Cleaning Head pointing downwards (Standard): The device is designed for vertical installation as the preferred position. This installation position means that the device can self-drain. 2) Different Installation Position from the Standard: A different installation position to the standard position means that the device may NOT always be able to self-drain. - Page 48 Jet Cleaner TANKO-MX WARNING Connections that are NOT screwed, such as separable connections with a clamp or grid design can be unexpectedly loosened or mistakenly removed! Liquids may penetrate or spray out and be carried over between zones. There is a risk of severe physical injury. Fluid and process connections in clamped or detent configuration must: ...
-
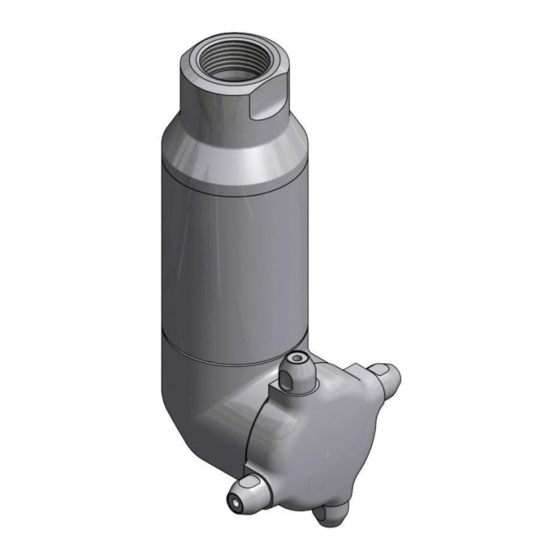
Page 49: Picture 5.2-7: Threaded Connection (Example Mx125)
Jet Cleaner TANKO-MX Threaded Connection NOTE Risk of damage to the device during assembly! Installing a strap wrench/belt pipe at the housing or tightening using a wrench flat at the housing with an open-ended wrench or adjustable pliers wrench is NOT suitable for attaching and loosening of the device at the pipe for the media supply! The threaded connection between the housing and the connection cover may become damaged as a result of excessive tightening torque. - Page 50 Jet Cleaner TANKO-MX Interface B The connection to the container must be designed so that it is compatible with the process connection [PC] for the downpipe [DP]. The process connection [PC] has to be fastened permanently and leak-tight to the connection on the container (e.g. screwed or clamped) and secured to prevent it from coming loose.
- Page 51 Jet Cleaner TANKO-MX Stationary device NOTE The following must be noted regarding the installation opening. Depending on the design of the device, the nozzle carrier must be installed in either a rigid or movable way. If the nozzle carrier is installed in a movable way, then the nozzles can rotate to an angle of 180° between two impact points.
-
Page 52: Commissioning
Jet Cleaner TANKO-MX 6 Commissioning Before the device is commissioned in Germany, the operating company of the plant must adhere to the Industrial Safety Ordinance (BetrSichV). In other countries, the respective national guidelines, statutes and country-specific regulations regarding occupational safety and accident prevention must be complied with. WARNING Hazardous situations as a result of incorrect installation of the device! If the device is not installed properly, unpredictable situations may arise during... - Page 53 (e.g. install devices for ventilation and exhaust or pressure equalization). As a result of the variety of practical applications and uses for the cleaning device, AWH CANNOT specify a noise level for the device under load, i.e. installed in the container and operating with cleaning fluid.
-
Page 54: Functional Check / Trial Run
Jet Cleaner TANKO-MX CAUTION Insufficient lighting in the working environment! The device DOES NOT have illumination. Insufficient lighting when working on the device can cause accidents. There is a risk of minor or moderate injuries. Make sure that there is sufficient and even lighting in all areas of the plant in which ... -
Page 55: Switch-On Procedure
Jet Cleaner TANKO-MX 6.3 Switch-on procedure In accordance with the type of device activation and how it is integrated (e.g. manual or automatic) on the cleaning plant, the switch-on procedure has to be integrated and the following instructions have to be observed when switching on. -
Page 56: Operation
Jet Cleaner TANKO-MX NOTE Risk of breakage due to material overload! Pressure surges when switching the cleaning medium on or off, in particular pressure surges which exceed the operating pressure, and gas components in the cleaning medium may cause hammering in the cleaning device. There is a risk of material damage or destruction of plant parts, (e.g. - Page 57 Jet Cleaner TANKO-MX WARNING Risk if the operating/working area is accessed by unauthorized persons! Unauthorized persons ARE NOT familiar with the hazards in the working area as described in these instructions. There is a risk of death or severe physical injury. Permit only authorized specialist personnel who are qualified and trained for the ...
- Page 58 Jet Cleaner TANKO-MX WARNING Danger caused by ejection of the cleaning medium! If the cleaning medium is unexpectedly ejected after a system failure (e.g. pressure drop due to interruption of the pressure supply) there is a risk of accident. There is a risk of death or severe physical injury. Do NOT remove the device if the cleaning medium has failed.
- Page 59 Jet Cleaner TANKO-MX If you notice vibrations on the plant that are NOT generated by the device while commissioning the device, these must be prevented with suitable measures so that the vibrations CANNOT be transmitted to the device. If this is NOT possible, the maintenance intervals must be shortened in accordance with Section 7.4.1 Maintenance Intervals.
-
Page 60: Maintenance
(see Section 6.2 Functional Check / Trial Run). If questions or doubts about handling the cleaning device arise during maintenance, please contact AWH. 7.1 Safety Instructions for Maintenance DANGER Danger to life due to live components! Activated electrical components are live with dangerous electrical voltage and may perform uncontrolled movements. - Page 61 Jet Cleaner TANKO-MX WARNING Risk of accident caused by incorrectly performed maintenance and repair work! Improper maintenance, falling components or failure to adhere to the listed safety instructions can lead to accidents. There is a risk of death or severe physical injury. Only allow experts to perform work on the device.
- Page 62 Jet Cleaner TANKO-MX WARNING Risk of crushing when carrying out maintenance, cleaning and repair work! The container and the interfaces of the device (e.g. media connections) may be pressurized. There is a risk of death or severe physical injury. Before starting work, depressurize the container and all lines. ...
-
Page 63: Switch-Off Procedure
Jet Cleaner TANKO-MX 7.2 Switch-off Procedure In accordance with the type of device activation and how it is integrated (e.g. manual or automatic) on the cleaning plant, the switch-off procedure must be integrated and the following instructions must be observed when switching off. WARNING Risk from sudden, unforeseeable or unauthorized reactivation of the device (e.g. -
Page 64: Removal
Jet Cleaner TANKO-MX 7.3 Removal The safety instructions in Section 7.1 Safety Instructions for Maintenance must be adhered to before removing the device from the container. WARNING Risk of chemical burns and burns when opening the container! The supply line is pressurized. The person may be struck by cleaning jets or come into contact with residual fluid from the supply line and device. -
Page 65: Removing The Device
Jet Cleaner TANKO-MX 7.3.1 Removing the Device Installation Opening of the Container The use of the device (mobile or stationary) is the decisive factor for the required size of the installation opening. The specified installation dimensions in Table 3.3-1: Operating parameters of the device recommended minimum dimensions for the installation opening and for installing the device in the container and removing it from the container in assembled condition. - Page 66 Jet Cleaner TANKO-MX Interface B NOTE Excessively small installation openings on the container! Risk of damage to the device or its surroundings. Before unfastening the process connection [PC], check whether the device can be lifted out through the installation opening of the container with the cleaning head (see Section 3.3 Technical Data).
-
Page 67: Maintenance
Jet Cleaner TANKO-MX Stationary device NOTE The following must be noted regarding the installation opening. Depending on the design of the device, the nozzle carrier must be installed in either a rigid or movable way. If the nozzle carrier is installed in a movable way, then the nozzles can rotate to an angle of 180° between two impact points. -
Page 68: Maintenance Intervals
Jet Cleaner TANKO-MX 7.4.1 Maintenance Intervals NOTE Component failure due to vibration damage! During operation, vibration can cause screw and clamp connections to work loose or the device to be subjected to severe strain, thus possibly leading to component failure. The failure of components or a device malfunction can cause material damage and consequential damages. -
Page 69: Picture 7.4-1: Maintenance Points Tanko-Mx (Example Mx125)
Jet Cleaner TANKO-MX Maintenance Points A Connection Media connection [MC] / Process connection [PC] Connection cover / Housing B Plain bearings Spur gear SR with shaft / flow-in disk C Connection Spur gear SR with shaft / impeller D Plain bearings Spur gear SR with shaft / planetary carrier E Gearing Spur gear SR / spur gear PR / spur gear HR... - Page 70 Jet Cleaner TANKO-MX Inspection and Maintenance Work Check that the media connection [MC] / process connection [PA] and the connection cover / housing connection are firmly attached. Replace parts in the event of wear or damage. Properly reattach loosened screw connections. ...
-
Page 71: Tools And Tightening Torque Values
Jet Cleaner TANKO-MX Check the plain bearings to make sure they are fully functional and for wear. Clean or replace the collar bushings as necessary. Check the threaded connection to make sure that it is firmly in place. Properly reattach loosened screw connections. ... - Page 72 Jet Cleaner TANKO-MX All the screw connections on the device are firmly tightened in the factory with a corresponding tightening torque. This ensures that the required clamping force between the components to be joined is also present during the time of maximum application of operating forces. All relevant tightening torques for the screw connections are listed in Section 7.5 Spare Parts and Customer...
- Page 73 Jet Cleaner TANKO-MX If the device is fitted with a rinsing ring (07.1), protective jaws with prisms for clamping the device in the vise are recommended. The rinsing ring (07.1) can be positioned freely within the prisms and is thus NOT crushed. It is also possible to attach the device in the vise with the mounting aid for clamping for the pipe.
-
Page 74: Disassembling The Device
Jet Cleaner TANKO-MX 7.4.3 Disassembling the Device NOTE Risk of damage to the device as a result of improper assembly/disassembly work! Assembly/disassembly of the device which is NOT performed properly can cause damage to the device which puts the functional safety and reliability at risk when re- commissioning. - Page 75 Jet Cleaner TANKO-MX 1) Disassembly - Cleaning Head Assembly Group 1. Fasten the device in the vise with the nozzle carrier (27) facing upwards, horizontally on the housing (02) and the shaft-axle connection (24). 2. Unfasten the nozzle (12) or nozzle extension (12.1) directly at the “bore for self-cleaning” with an open-end wrench or pliers wrench and unscrew with the jet concentrator (13).
- Page 76 Jet Cleaner TANKO-MX 5. Remove the collar bushing (07) from the nozzle carrier (27). 6. Slide the sliding disk (11) from the driver shaft (25). 7. Lever the spiral circlip (30) in front of the bearing plate (28) out of the internal groove on the shaft- axle connection (24), by inserting the flat tip of a small screwdriver on the removal notch, and screw it out in a spiral pattern.
- Page 77 Jet Cleaner TANKO-MX 10. Slide the bearing plate (28) with the collar bushing (08) from the driver shaft (25). 11. Push the collar bushing (08) out of the bearing plate (28) with an auxiliary tool (e.g. drift). 12. Lever the spiral circlip (31) out of the internal groove on the driver shaft (25), by inserting the flat tip of a small screwdriver on the removal notch, and screw it out in a spiral pattern.
- Page 78 Jet Cleaner TANKO-MX NOTE Left-hand thread of the connection! Turning the incorrect direction can damage the threaded connection. Make sure that the threaded connection is turned in the correct direction “LH” (left-hand). Unfasten the actuator unit assembly using an open-end wrench on the flats WAF 14 of the shaft ...
- Page 79 Jet Cleaner TANKO-MX Note regarding Devices with Nozzle Extension (12.1): Unfasten nozzle extension (12.1) with the nozzle (12) and unscrew it from the nozzle carrier (27). Clamp the nozzle extension (12.1) with the nozzle (12) in the vise. Unfasten the nozzle (12) and unscrew it from the nozzle extension (12.1).
- Page 80 Jet Cleaner TANKO-MX 2) Disassembly - Actuator Unit Group Before you can start with disassembly of the actuator unit assembly, the cleaning head assembly unit first has to be removed! NOTE Incorrect clamping in the vise can cause threaded connections to become jammed and deformed unintentionally! The threaded connection cannot be screwed and may become damaged.
- Page 81 Jet Cleaner TANKO-MX 7. Remove the spur gear (22) together with the collar bushing (05) from the housing (02). 8. Pull the collar bushing (05) from the spur gear (22) with a set of pliers. 9. Remove the planetary carrier (16) assembly with spur gear (19; 20); axle for the planetary gear wheel (17);...
- Page 82 Jet Cleaner TANKO-MX 14. Remove the spur gear (18), together with the impeller (15) and the set screw (33) from the housing (02). 15. Unfasten the set screw (33) with a hexagon socket wrench size 2.5 mm and unscrew it from the impeller (15).
-
Page 83: Assembling The Device
Jet Cleaner TANKO-MX 20. Remove the flow-in disk (14) from the connection cover (01). 21. Push the collar bushing (03) out of the flow-in disk (14) with an auxiliary tool (e.g. drift). NOTE The spur gear (21) is pressed into the housing (02)! The spur gear (21) cannot be removed. - Page 84 Jet Cleaner TANKO-MX NOTE Damage to the screw connections! Stainless steel screw connections may tend to seize up during assembly as a result of friction caused by high preload forces and high friction values, and can cause problems when tightening and unfastening. Lubricate the screw connections before assembly.
- Page 85 Jet Cleaner TANKO-MX 2. Push the flow-in disk (14) into the connection cover (01) so that the liner of the collar bushing (06) faces the inside of the device. 3. Insert the circlip (29) into the internal groove on the connection cover (01) and allow it to engage in place.
- Page 86 Jet Cleaner TANKO-MX 9. Screw the set screw (33) into the impeller (15) and tighten it with a hexagon socket wrench size 2.5 mm. 10. Insert the spur gear (18), together with the impeller (15) and the set screw (33), through the opening in the housing (02) and push the shaft end with the slot into the collar bushing (06).
- Page 87 Jet Cleaner TANKO-MX NOTE Assembling the planetary gear incorrectly can cause the gear wheels to jam! The gear wheels may become damaged and the cleaning head will not rotate. It must be possible to push the teeth of the spur gears (19; 20) and of spur gear (21) together ...
- Page 88 Jet Cleaner TANKO-MX 19. Push the bevel gear wheel for the housing (23) with the plain bearing (10) onto the shaft of the spur gear (22). 20. Screw the bevel gear wheel for the housing (23) into the housing (02) and tighten it with an adjustable face wrench (pin Ø...
- Page 89 Jet Cleaner TANKO-MX Note regarding Devices with Nozzle Extension (12.1): Push the jet concentrator (13) into the nozzle (12). Push the seal ring (13.3) into the threaded bore of the nozzle carrier (27) as far as it will go. ...
- Page 90 Jet Cleaner TANKO-MX NOTE Left-hand thread of the connection! Turning the incorrect direction can damage the threaded connection. Make sure that the threaded connection is turned in the correct direction “LH” (left-hand). Screw the actuator unit assembly with the shaft-axle connection (22) into the dome of the shaft- ...
- Page 91 Jet Cleaner TANKO-MX 180° 180° 180° Picture 7.4-3: Nozzle carrier can be rotated 180° NOTE Incorrect assembly of the device! In order for a device with two long nozzles to also fit through a small installation opening of the container, the nozzle carrier (27) can be mounted movably.
- Page 92 Jet Cleaner TANKO-MX 11) Push the journal of the driver shaft (25), together with the cylindrical pin (35); bevel gear wheel for the nozzle carrier (26) and spiral circlip (31), into the bushing (09) of the shaft-axle connection (24). 12) Press the collar bushing (08) into the bearing plate (28). 13) Push the bearing plate (28), together with the collar bushing (08), onto the driver shaft (25).
- Page 93 Jet Cleaner TANKO-MX 18) Screw the nozzle carrier (27) with the nozzles (12) and jet concentrator (13) onto the driver shaft (25) and tighten with the help of the mounting aid for nozzle carriers MX and a 1/2” ratchet or belt pipe.
- Page 94 Jet Cleaner TANKO-MX 3) Inspecting the Assembly 1) Hold the device firmly with one hand and turn the spur gear (18) at the shaft end with a slotted screwdriver. The actuator shaft can be rotated but only with noticeable resistance. There is an error in the assembly.
-
Page 95: Notes On Cleaning
Jet Cleaner TANKO-MX 7.4.5 Notes on Cleaning It is recommended for the device to be cleaned during maintenance. Comply with the following safety instructions prior to cleaning. WARNING Hazard from corrosive or irritant cleaning agents! Contact with the cleaning agent can generally NOT be ruled out during cleaning of the device. -
Page 96: Spare Parts And Customer Service
For technical questions or spare part requests, you can contact the Customer Service department as follows: Armaturenwerk Hötensleben GmbH Schulstraße 5 – 6 D-39393 Hötensleben, Germany Telephone: +49 39405 92-0 Fax +49 39405 92-111 E-mail info@awh.eu Internet http://www.awh.eu 88/102 Operating/Installation Instructions 2019/08 7 Maintenance... -
Page 97: Mx125 And Mx150 Spare Parts
Jet Cleaner TANKO-MX 7.5.1 MX125 and MX150 Spare Parts Picture 7.5-1: Internal structure (Example MX125) Tightening torque values for screw connections Tightening Torque Item / Item Item / Item Item / Item Thread [Nm] [lbft] 01/02 ----- ----- M56 x 1.5 110 - 120 81.1 –... - Page 98 Jet Cleaner TANKO-MX Remark: The items marked “X” or “■” are included in the wear parts package and can be ordered. The items marked “■” are required for replacing wear parts [WP]. Item Qty. Designation Remark Article No. Material [WP] Table 7.5-3 Table 7.5-3 Connection cover...
-
Page 99: Table 7.5-2: Mx125 And Mx150 Parts List (Standard)
Jet Cleaner TANKO-MX Spur gear S22-HR Ring gear with shaft 66MA000392A20 1.4404 (AISI 316L) Bevel gear wheel for 66MA000400A20 1.4404 (AISI 316L) housing Shaft-axle connection 66MA000410A20 1.4408 (AISI 316L) Driver shaft for nozzle 66MA000420A20 1.4404 (AISI 316L) carrier Bevel gear wheel for 66MA000430A20 1.4404 (AISI 316L) nozzle carrier... -
Page 100: Table 7.5-4: Mx150-G14 Standard Configuration
Jet Cleaner TANKO-MX Assignment to the Variants of the MX150 The specified assignment of individual items reflects the standard configuration of the devices. In individual cases there may be order-related discrepancies. Article No. TANKO-MX150-G14 Item Designation Remark Article No. Quantity BSP-1½“... -
Page 101: Faults
Before eliminating any malfunction, comply with the safety instructions in chapter 7 Maintenance. In case of any uncertainty or doubt, contact AWH. WARNING Danger caused by ejection of the cleaning medium! If the cleaning medium is unexpectedly ejected after a system failure (e.g. pressure drop due to interruption of the pressure supply) there is a risk of accident. -
Page 102: Faults And Remedial Action
Table 8.2-1: Operating Faults – Cause and Remedy If the specified measures are NOT successful, please contact AWH. In the event of return shipment (e.g. repair / servicing / return), a hazardous substance declaration must be enclosed with the device in accordance with the German Ordinance on Hazardous Substances (GefStoffV). -
Page 103: What To Do In Case Of An Emergency
It is for this reason that AWH can offer the operating company, solely as a precautionary measure, a few points of reference and notes to be observed and to be integrated into the operating company's hazard assessments. -
Page 104: Decommissioning
Use protective work clothing, protective gloves and safety goggles when carrying out the tasks. In case of any uncertainty or doubt, contact AWH. Removal Only experts are permitted to perform the removal from the container and the disassembly of the device for disposal. - Page 105 Jet Cleaner TANKO-MX After removal, the entire device must be properly: cleaned (see Section 7.4.5 Notes on Cleaning) – disassembled into its assembly groups and individual parts (see Sectio 7.4.3 Disassembling the – Device). Unless other arrangements have been made for return or disposal, disassembled components should be recycled: Scrap any parts made of metal –...
-
Page 106: Index
Jet Cleaner TANKO-MX Index Installation opening Container ..... 20, 39, 42, 43, 57, 58 Abbreviations ............. IV Mobile device ......... 20, 43 Assembling the Device ........75 Stationary device ....20, 39, 43, 57, 59 Installation Position .......... 39 Installing the Device ......... 39 Cleaning media .......... - Page 107 Jet Cleaner TANKO-MX Temperature Ambient temperature ........20 Safety ..............6 Operating temperature ......... 20 Safety Instructions for Commissioning ..44 Safety Instructions for Installation ....29 Tools and Tightening Torque Values ....63 Safety Instructions for Maintenance ... 52 Transport ............
-
Page 108: Appendices
Jet Cleaner TANKO-MX Appendices Annex 1: Declaration (Translation) ......................101 100/102 Operating/Installation Instructions 2019/08 Appendices... - Page 109 Armaturenwerk Hötensleben GmbH Schulstraße 5 - 6 39393 Hötensleben Phone +49 39405 92-0 +49 39405 92-111 E-Mail info@awh.eu Homepage http://www.awh.eu Declaration of incorporation as per – EC Directive - Machinery 2006/42/EC, Annex II B We hereby declare that the container cleaning device...
- Page 110 Jet Cleaner TANKO-MX 102/102 Operating/Installation Instructions 2019/08 Appendices...
-
Page 111: Notes
Jet Cleaner TANKO-MX Notes A Member of the NEUMO Ehrenberg Group... - Page 112 Armaturenwerk Hötensleben GmbH Schulstr. 5 – 6 D-39393 Hötensleben Telefon +49 39405 92-0 Telefax +49 39405 92-111 E-Mail info@awh.eu Homepage http://www.awh.eu A Member of the NEUMO Ehrenberg Group...
Need help?
Do you have a question about the TANKO MX125 and is the answer not in the manual?
Questions and answers