Table of Contents
Advertisement
Quick Links
Armaturenwerk Hötensleben
OPERATING/INSTALLATION
Armaturenwerk Hötensleben GmbH
Schulstraße 5 - 6
39393 Hötensleben, Germany
Telephone:
+ 49 (0) 39405 92-0
Fax:
+ 49 (0) 39405 92-111
E-mail:
info@awh.eu
Homepage:
http://www.awh.eu
INSTRUCTIONS
(Translation)
Container cleaning device
Jet Cleaner TANKO
A member of Neumo Ehrenberg Group
MX125
ID no.: 664BAMX0000EN - 2016/03 Rev. 0
Advertisement
Table of Contents

Related Manuals for AWH TANKO MX125

Summary of Contents for AWH TANKO MX125
- Page 1 MX125 Armaturenwerk Hötensleben GmbH Schulstraße 5 - 6 39393 Hötensleben, Germany Telephone: + 49 (0) 39405 92-0 Fax: + 49 (0) 39405 92-111 E-mail: info@awh.eu Homepage: http://www.awh.eu ID no.: 664BAMX0000EN - 2016/03 Rev. 0 A member of Neumo Ehrenberg Group...
- Page 2 Jet Cleaner TANKO-MX NOTE These instructions are an essential part of the device and must be available to operating and maintenance personnel at all times throughout its entire life cycle. The safety notes contained therein must be observed! If the device is resold, the instructions must always be transferred to the new owner.
-
Page 3: Table Of Contents
Jet Cleaner TANKO-MX CONTENTS List of Figures ........................III List of Tables ........................III Abbreviations and Units ....................IV 1 Introduction ........................1 1.1 M ..................... 1 EANS OF RESENTATION 1.1.1 Explanation of Signal Words................1 1.1.2 Explanation of the Warnings ................2 1.1.3 Pictograms and Symbols .................. - Page 4 Jet Cleaner TANKO-MX 6 Commissioning ......................34 6.1 S ................34 AFETY OTES FOR OMMISSIONING 6.2 F ................. 36 UNCTIONAL HECK RIAL 6.3 S ..................... 37 WITCH ON PROCEDURE 6.4 O ........................ 38 PERATION 7 Maintenance ........................41 7.1 S ................
- Page 5 Jet Cleaner TANKO-MX List of Figures 2.5-1: T ....................14 IGURE YPE PLATE POSITION 3.1-1: O MX125 ....................15 IGURE VERVIEW OF 3.3-1: C - MX125 ....................19 IGURE HART FLOW 5.2-1: I MX125 ............. 28 IGURE NSTALLATION DIMENSIONS OF THE DEVICE 5.2-2: I MX125...
-
Page 6: Abbreviations And Units
Jet Cleaner TANKO-MX Abbreviations and Units ATEX ATmosphère EXplosible; Synonym for the ATEX Directive of the European Union; comprises measures for explosion protection for explosive atmospheres Armaturenwerk Hötensleben GmbH BetrSichV Betriebssicherheitsverordnung (German industrial safety ordinance); ordinance concerning health and safety when using work equipment; German implementation of Directive 2009/104/EC of the European Parliament concerning the minimum safety and health requirements for the use of work equipment by workers at work. - Page 7 Jet Cleaner TANKO-MX Process connection In the context of these instructions, this colloquial term describes the interface used in cleaning technology for the connection to the process from the device to the container. Système international d’unités; the most widely circulated international system of units for physical variables.
- Page 8 Jet Cleaner TANKO-MX Units of Measure The following indicated factors are for orientation and conversion of the Si units to common units of measures for the American market. Unit of measure for pressure p [bar] All specifications of stand for positive pressure [bar] [bar ] unless otherwise expressly described.
-
Page 9: Introduction
The instructions must be kept at the location of use of the device so that it is available in legible condition at all times. If the device is resold, the instructions must always be transferred to the new owner. Download the instructions if necessary from the http://www.awh.eu/de/downloads internet page. 1.1 Means of Presentation 1.1.1 Explanation of Signal Words The warnings are introduced with a signal word which describes the extent of the hazard. -
Page 10: Explanation Of The Warnings
Jet Cleaner TANKO-MX 1.1.2 Explanation of the Warnings Section-related Warnings The section-related warnings do not just apply for one particular action but rather for all actions within a section. In addition, the pictograms and symbols indicate a specific danger. DANGER This warning warns of a hazard with a high level of risk! Failure to observe it can lead to death or severe physical injury. -
Page 11: Pictograms And Symbols
Jet Cleaner TANKO-MX Further Means of Presentation The “Info” symbol provides useful information, additional tips and recommendations. – Texts which follow this mark, are bulleted lists. Texts which follow this mark, describe measures for prevention of the danger. Texts which follow this numbering, describe the first step of a task which is followed by further numbered steps which have to be performed in the specified order. -
Page 12: Warranty And Liability
– Disasters, the effects of foreign objects and force majeure. Exclusion of Liability AWH reserves the right to make alterations to this document at any time and without prior notice. AWH provides no guarantee (neither expressed nor implied) with regard to all information in this document, including but not limited to the implied warranty of merchantability and suitability for a particular purpose. -
Page 13: Safety
Jet Cleaner TANKO-MX 2 Safety The device has been built in accordance with state-of-the-art technology and the recognized rules of safety. Nevertheless, use of the device may represent a danger to the life and limb of the operating company and third parties or a risk of impairments to the device and other objects of material value as a result of its function. -
Page 14: Intended Use
Jet Cleaner TANKO-MX 2.1 Intended Use DANGER Risk of injuries from fire/explosion when using the device in an explosive atmosphere. Use of the device in an Ex area (potentially explosive atmosphere) is PROHIBITED, UNLESS expressly intended for that purpose! There is a risk of death or severe physical injuries. ... - Page 15 – This also applies to hazardous substances that may arise during work processes. Refer to the order confirmation / parts list from AWH for the materials used in the device. The TANKO-MX is a rotating cleaning device and belongs to the group of jet cleaners. The device is driven by the cleaning agent.
- Page 16 Jet Cleaner TANKO-MX In the process, the following must always be observed: Only operate the device when installed inside an enclosed container. Never direct the cleaning jet or torrent from the device at persons. Protect the device from freezing (e.g. risk of frost from possible residual water). ...
-
Page 17: Spare Parts, Replacement Parts And Accessories
We expressly draw attention to the fact that replacement parts and accessories not supplied by AWH have NOT been checked or approved by AWH. The installation and/or the use of such products could therefore under certain circumstances result in changes with negative results to the properties of the device specified by its design and the higher-level plant. -
Page 18: Duties Of The Operating Company
Jet Cleaner TANKO-MX 2.3 Duties of the Operating Company The device is used in the commercial sector. The operating company is thus subject to the legal obligations of occupational safety. In the EEA (European Economic Area), the national implementation of Framework Directive 89/391/EEC on carrying out measures for improving safety and protecting the health of employees during work, as well as the associated individual Directives and among these in particular Directive 2009/104/EC regarding the minimum regulations for safety and health protection in connection with... - Page 19 Jet Cleaner TANKO-MX – The operating company must make sure that there is nobody is allowed to work on the device whose ability to react is impaired by drugs, alcohol, medication or similar. – The operating company must take appropriate measures to inform groups of persons who are not intended to come into direct contact with the device (e.g.
-
Page 20: Requirements For Personnel
Jet Cleaner TANKO-MX 2.4 Requirements for Personnel The device must only be operated, maintained and repaired by persons with the appropriate qualifications. These persons must be familiar with these instructions and act in accordance with them. The respective authorizations for personnel must be clearly defined. The following qualifications are designated in the instructions for various fields of activity: Expert/Specialist Personnel An expert is a person whose professional training, knowledge and experience and knowledge of... -
Page 21: Personal Protective Equipment
Jet Cleaner TANKO-MX 2.4.1 Personal Protective Equipment Personal protective equipment must be used in accordance with the respective task when working on the device in order to minimize health hazards. Protective Work Clothing Protective work clothing is tight-fitting work clothing with low resistance to tearing, with close-fitting sleeves and without protruding parts. -
Page 22: Identification Marking
Jet Cleaner TANKO-MX 2.5 Identification Marking 2.5.1 Type designation TANKO – MX125 – G14 Example: Jet Cleaner 1) Brand of the cleaning devices TANKO 2) Type: Media actuator X 3) Size: Installation opening 125 mm G for “gleitgelagert” 4) Variant: (with slide bearing) 5) Number of nozzle carriers: 1 6) Number of nozzles:... -
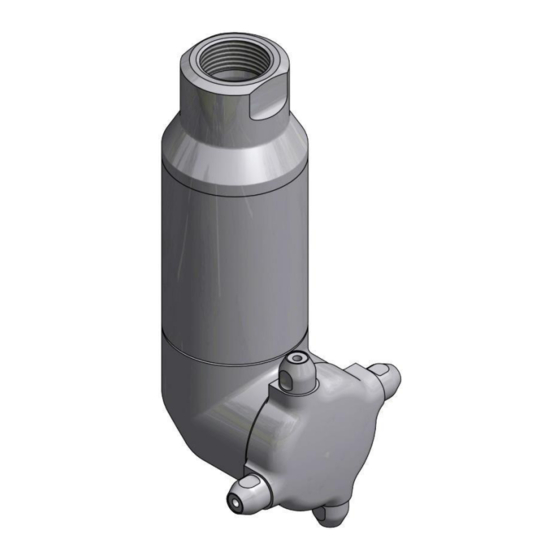
Page 23: Construction And Function
Jet Cleaner TANKO-MX 3 Construction and Function For the development of the device, importance was attached to simple shape and functional design for the operating company. The outer appearance of the device is harmonious and compact. The design has been protected to safeguard the innovation. –... - Page 24 Jet Cleaner TANKO-MX The rotation of the circulating bevel gear wheel around the axis of the fixed bevel gear wheel and the forced rotation around its own axis generates the orbital rotary movement of the nozzles around the cleaning head. The different number of teeth on the bevel gears causes the nozzle position to shift with each revolution of the cleaning head.
-
Page 25: Function Of The Mx125
Jet Cleaner TANKO-MX 3.2.1 Function of the MX125 The item numbers shown in brackets refer to the Figure 7.5-1: Internal construction of the MX125. The cleaning fluid enters through the connection cover (01) of the device and flows through the bores of the inflow disk (14) and into the actuator unit at a certain angle. -
Page 26: Technical Data
Jet Cleaner TANKO-MX 3.3 Technical Data The estimated safe service life of the device is 10 years with single-shift operation and the use of drinking water. In order to achieve this, the device must be maintained properly at the intervals specified in the section 7.4 Maintenance, and the wear parts must be replaced regularly. -
Page 27: Figure 3.3-1: Chart - Mx125 Flow
Jet Cleaner TANKO-MX Installation opening section 5.2.1 - Stationary device Ø 125 mm / 5 in - Mobile device > Ø 160 mm / 6¼ in Orbital nozzle movement Ball Ø 150 mm / 6 in Materials - In contact with media 1.4404/08 (AISI 316L) C-PTFE;... -
Page 28: Cleaning Agents
The operating company holds sole responsibility for the type of cleaning agent and how they are handled and used. It is for this reason that AWH can offer the operating company, solely as a precautionary measure (for one device in one container), a few points of reference and notes to be observed and to be integrated into the operating company's hazard assessments. - Page 29 Jet Cleaner TANKO-MX The following limitations for cleaning agents are derived from the durability of the materials used in the device. CAUTION Danger as a result of use of incorrect cleaning agents! The cleaning agents must be approved for all of the materials of the device (e.g. seals, bushings) and for the substances to be cleaned in the container that come into contact with it.
-
Page 30: Transportation And Storage
When handling, e.g. unpacking, transportation without packaging, assembly/disassembly and maintenance work, beware of protruding sharp edges. In the event of damage (including cases involving spare and wear parts) please contact AWH immediately with a damage report. Scope of delivery: –... -
Page 31: Packaging
Jet Cleaner TANKO-MX 4.1 Packaging The device is supplied fully assembled. The packaging is selected to suit the conditions of transportation. Required accessories, spare parts, operating or installation instructions and technical documents are packaged separately and enclosed with the delivery. The packaging should protect the device up until the time of installation against transport damage, corrosion and other damage. -
Page 32: Storage
Jet Cleaner TANKO-MX 4.3 Storage The packaging of the device, the components and the spare parts and wear parts is designed for a storage period of 3 months. NOTE Risk of damage as a result of incorrect storage! Incorrect storage can cause damage to the device and its components and lead to premature aging (e.g. -
Page 33: Installation
Jet Cleaner TANKO-MX 5 Installation 5.1 Safety Notes for Installation WARNING Danger as a result of static charge! Containers may become statically charged during cleaning operation. There is a risk of electric shock or electrical irritation in case of contact with the hand, which can lead to a startled reaction. - Page 34 Jet Cleaner TANKO-MX CAUTION Risk of accidents as a result of improper installation! Improper assembly, falling components or failure to adhere to the listed safety notes can cause accidents. There is a risk of minor or moderate injuries. Work on the device must be performed by experts only. ...
-
Page 35: Installation
Jet Cleaner TANKO-MX 5.2 Installation The safety notes in section 5.1 Safety Notes for Installation must be adhered to before installation of the device in the container. CAUTION Risk of a fault as a result of soiling, foreign objects or damage to the device! There is a risk of minor or moderate injuries. -
Page 36: Interfaces
Jet Cleaner TANKO-MX 5.2.1 Interfaces 5.2.1.1 MX125 Installation Dimensions and Interfaces Front view Top view (min. Ø of the installation opening) Top view Figure 5.2-1: Installation dimensions of the MX125 device 28 / Translation of the original operating/installation instructions 2016/03 5 Installation... -
Page 37: Installation Position
Jet Cleaner TANKO-MX Figure 5.2-2: Interfaces of the MX125 device Actuator / Energy Supply Media connection [MC] (connection of the downpipe [DP] to the device) Device / Container Process connection [PC] (connection of the downpipe [DP] to the container) Space for Movement / Installation Space Cleaning head with nozzles (space for orbital nozzle movement and outlet of cleaning agent) 5.2.2 Installation Position 1) Aligned vertically with the cleaning head pointing downwards (standard):... -
Page 38: Installing The Device
Jet Cleaner TANKO-MX 5.2.3 Installing the Device Installation Opening of the Container The use of the device (mobile or stationary) is the decisive factor for the required size of the installation opening. The specified installation dimensions in Table 3.3-1: Operating parameters of the device are recommended minimum dimensions for the installation opening and for installing the device in the container and removing it from the container in assembled condition. -
Page 39: Figure 5.2-3: Threaded Connection Installation
Jet Cleaner TANKO-MX Interface A The supply line connection must be configured to be compatible with the media connection [MC] of the device. The supply line for the cleaning agent has to be fastened permanently and leak-tight to the media connection [MC]. Threaded Connection NOTE Risk of damage to the device during installation. - Page 40 Jet Cleaner TANKO-MX Interface B The connection to the container must be designed to that it is compatible with the process connection [PC] for the downpipe [DP]. The process connection [PC] has to be fastened permanently and leak-tight to the connection on the container (e.g. screwed or clamped) and secured to prevent it from coming loose.
- Page 41 Jet Cleaner TANKO-MX NOTE An excessively strong cleaning jet can subject the container, the surrounding components in the container or the device itself to strong forces and cause damage! Material damage as a result of an excessively strong cleaning jet. ...
-
Page 42: Commissioning
Jet Cleaner TANKO-MX 6 Commissioning Before the device is commissioned in Germany, the operating company of the plant must adhere to the Industrial Safety Regulation (BetrSichV). In other countries, the respective national guidelines, statutes and country-specific regulations regarding occupational safety and the prevention of accidents must be adhered to. WARNING Hazardous situations when commissioning as a result of incorrect installation of the device! - Page 43 Take precautions to allow gases or vapors to escape during operation(e.g. install devices for ventilation). As a result of the variety of practical applications and uses for the cleaning device, AWH CANNOT specify a noise level for the device under load, i.e. installed in the container and operating with cleaning fluid.
-
Page 44: Functional Check / Trial Run
Jet Cleaner TANKO-MX CAUTION Insufficient lighting in the working environment! The device is NOT equipped with its own lighting. Insufficient lighting when working on the device can cause accidents. There is a risk of minor or moderate injury. Make sure that there is sufficient and even lighting in all areas of the plant in which the devices is used when work is performed on the device. -
Page 45: Switch-On Procedure
Jet Cleaner TANKO-MX 6.3 Switch-on procedure In accordance with the type of device activation and how it is integrated (e.g. manual or automatic) on the cleaning plant, the switch-on procedure has to be integrated and the following instructions have to be observed when switching on. WARNING Risk from sudden, unforeseeable or unauthorized activation of the device (e.g. -
Page 46: Operation
Jet Cleaner TANKO-MX 6.4 Operation After commissioning and performing inspection, the device can be put into operation, observing the following instructions. WARNING Risk when using outdoors! If the device is used outdoors, there is a risk of a lightning strike in case of a storm. There is a risk of death or severe physical injury. - Page 47 Jet Cleaner TANKO-MX WARNING Risk of chemical burns and burns when opening the container. The supply line is pressurized. The person may be struck by cleaning jets or come into contact with residual fluid from the supply line and device. There may also be hot vapors in the container.
- Page 48 Jet Cleaner TANKO-MX When operating the device, adhere to the following additional instructions: WARNING Persons in the container! A person may be struck by the jets from the cleaning head. There is a risk of death or severe physical injuries. ...
-
Page 49: Maintenance
Jet Cleaner TANKO-MX 7 Maintenance The following safety notes apply to all work on the device that is listed and described in this chapter and must be always adhered to. Only use original spare parts when replacing parts! A functional check has to be performed after every repair (see section 6.2 Functional Check / Trial... - Page 50 Jet Cleaner TANKO-MX WARNING Risk of chemical burns and burns when opening the container! The supply line is pressurized. The person may be struck by cleaning jets or come into contact with residual fluid from the supply line and device. There may also be hot vapors in the container.
- Page 51 Jet Cleaner TANKO-MX WARNING Risk of crushing when carrying out maintenance, cleaning and repair work! The container and the interfaces of the device (e.g. media connections) may be pressurized! There is a risk of death or severe physical injuries. Before starting work, depressurize the container and all lines.
-
Page 52: Switch-Off Procedure
Jet Cleaner TANKO-MX 7.2 Switch-off procedure In accordance with the type of device activation and how it is integrated (e.g. manual or automatic) on the cleaning plant, the switch-off procedure has to be integrated and the following instructions have to be observed when switching off. WARNING Risk from sudden, unforeseeable or unauthorized reactivation of the device (e.g. -
Page 53: Removal
Jet Cleaner TANKO-MX 7.3 Removal The safety notes in section 7.1 Safety Notes for Maintenance must be adhered to before removing the device from the container. WARNING Risk of chemical burns and burns when opening the container. The supply line is pressurized. The person may be struck by cleaning jets or come into contact with residual fluid from the supply line and device. -
Page 54: Removing The Device
Jet Cleaner TANKO-MX 7.3.1 Removing the Device Installation Opening of the Container The use of the device (mobile or stationary) is the decisive factor for the required size of the installation opening. The specified installation dimensions in Table 3.3-1: Operating parameters of the device are recommended minimum dimensions for the installation opening and for installing the device in the container and removing it from the container in assembled condition. - Page 55 Jet Cleaner TANKO-MX Interface C NOTE Excessively small installation opening for the container or components (e.g. agitators) in the container!! Nozzles collide during removal. Damage to the device. The nozzle carrier may come loose. The nozzles must NOT collide! 1.
-
Page 56: Maintenance
Jet Cleaner TANKO-MX 7.4 Maintenance To ensure trouble-free operation, high operational safety and a long service life of the cleaning device, it must be cleaned and maintained at regular intervals. We recommend that you document the maintenance work in a report. The safety notes in section 7.1 Safety Notes for Maintenance must be adhered to when carrying... - Page 57 Jet Cleaner TANKO-MX = operating hours of the device Method: V = visual inspection Interval: = daily = functional check = weekly = measurement = monthly = cleaning* ¼ = quarterly ½ = every six months = annually * The intervals for cleaning must be determined by the operating company depending on the operating conditions.
-
Page 58: Figure 7.4-1: Mx125 Maintenance Points
Jet Cleaner TANKO-MX 7.4.1.1 MX125 Maintenance Intervals Maintenance Points A Connection Media connection [MC] / connection cover process connection [PC] / housing B Plain bearings Spur gear SR with shaft / inflow disk C Connection Spur gear SR with shaft / impeller D Plain bearings Spur gear SR with shaft / planetary carrier... -
Page 59: Table 7.4-1: Mx125 Inspection And Maintenance Work
Jet Cleaner TANKO-MX Inspection and Maintenance Work The media connection [MC] / process connection [PC] and the connection cover / housing connection are established using a threaded connection. Vibrations from operation may in certain circumstances cause the connections to come loose. You must therefore regularly check that they are firmly in place. -
Page 60: Tools And Tightening Torque Values
Jet Cleaner TANKO-MX 7.4.2 Tools and Tightening Torque Values Use only proper tools which are required for performing the required work and approved for use. Normal workshop equipment is sufficient for the mechanical work on the device. The following tools are required: –... -
Page 61: Disassembling The Device
Jet Cleaner TANKO-MX 7.4.3 Disassembling the Device NOTE Risk of damage to the device as a result of improper assembly/disassembly work! Assembly/disassembly of the device which is NOT performed properly can cause damage to the device which puts the functional safety and reliability at risk when re- commissioning. - Page 62 Jet Cleaner TANKO-MX 7.4.3.1 Removing the MX125 Device The item numbers shown in brackets refer to the Figure 7.5-1: Internal construction of the MX125. On the cleaning head, there is a “bore for self-cleaning” of the device on the face of the nozzle carrier.
- Page 63 Jet Cleaner TANKO-MX Slide the sliding disk (11) from the driver shaft (25). Lever the spiral circlip (30) in front of the bearing plate (28) out of the internal groove on the shaft-axle connection (24), by inserting the flat tip of a small screwdriver on the removal notch, and screw it out in a spiral pattern.
- Page 64 Jet Cleaner TANKO-MX 12. Lever the spiral circlip (31) out of the internal groove on the driver shaft (25), by inserting the flat tip of a small screwdriver on the removal notch, and screw it out in a spiral pattern. 13.
- Page 65 Jet Cleaner TANKO-MX NOTE Left-hand thread of the connection! Turning the incorrect direction can damage the threaded connection. Make sure that the threaded connection is turned in the correct direction “LH” (left-hand). Unfasten the actuator unit assembly using an open-end wrench on the flats WAF 14 of the shaft of the spur gear (22).
- Page 66 Jet Cleaner TANKO-MX 2) Disassembly - Actuator Unit Assembly Before you can start with disassembly of the actuator unit assembly, the cleaning head assembly unit first has to be removed. NOTE Incorrect clamping in the vise can cause threaded connections to become jammed and deformed unintentionally! The threaded connection cannot be screwed and may become damaged.
- Page 67 Jet Cleaner TANKO-MX Remove the spur gear (22) together with the collar bushing (05) from the housing (02). Pull the collar bushing (05) from the spur gear (22) with a set of pliers. Remove the planetary carrier (16) assembly with spur gear (19; 20); axle for the planetary gear wheel (17);...
- Page 68 Jet Cleaner TANKO-MX 14. Remove the spur gear (18), together with the impeller (15) and the threaded pin (33) from the housing (02). 15. Unfasten the threaded pin (33) with a hexagon socket wrench size 2.5 mm and unscrew it from the impeller (15).
- Page 69 Jet Cleaner TANKO-MX 20. Remove the inflow disk (14) from the connection cover (01). 21. Push the collar bushing (03) out of the inflow disk (14) with an auxiliary tool (e.g. drift). NOTE The spur gear (21) is pressed into the housing (02)! The spur gear (21) cannot be removed.
-
Page 70: Assembling The Device
Jet Cleaner TANKO-MX 7.4.4 Assembling the Device NOTE Risk of damage to the device as a result of improper assembly/disassembly work! Assembly/disassembly of the device which is NOT performed properly can cause damage to the device which puts the functional safety and reliability at risk when re- commissioning. - Page 71 Jet Cleaner TANKO-MX NOTE Risk of dirt and foreign bodies in the device! Dirt or foreign bodies can compromise the functional safety and reliability of the device. During installation, make sure and check that there is no dirt or foreign bodies in the device (e.g.
- Page 72 Jet Cleaner TANKO-MX 7.4.4.1 Assembling the MX125 Device The item numbers shown in brackets refer to the Figure 7.5-1: Internal construction of the MX125. The tightening torque values for the screw connections required for assembly are listed in the Table 7.5-1: MX125 tightening torque values.
- Page 73 Jet Cleaner TANKO-MX Screw the connection cover (01), together with the collar bushing (06), inflow disk (14) and circlip (29) in the housing (02), and tighten it. Hold the screwed parts firmly with one hand and unfasten the vise. Fasten the screwed parts on the outer diameter of the housing (02) in the thread area of the connection cover (01) in the vise in a vertical position so that the opening is facing upwards.
- Page 74 Jet Cleaner TANKO-MX NOTE The spur gears (19; 20) have different gearing! Two different spur gears, type A and type B, must always be used. Press two collar bushings (04) into each of the spur gears (19; 20). 12. Push the axle for the planetary gear wheel (17) into the planetary carrier (16) and through the collar bushings (04) on the spur gears (19;...
- Page 75 Jet Cleaner TANKO-MX 16. Press the collar bushing (05) into the spur gear (22). NOTE Assembling the planetary gear incorrectly can cause the gear wheels to jam! The gear wheels may become damaged and the cleaning head will not rotate. ...
- Page 76 Jet Cleaner TANKO-MX Assembly - Cleaning Head Assembly Unit Before you can start with assembly of the cleaning head assembly unit, the actuator unit assembly first has to be assembled. On the cleaning head, there is a “bore for self-cleaning” of the device on the face of the nozzle carrier.
- Page 77 Jet Cleaner TANKO-MX NOTE Left-hand thread of the connection! Turning the incorrect direction can damage the threaded connection. Make sure that the threaded connection is turned in the correct direction “LH” (left-hand). Screw the actuator unit assembly with the shaft-axle connection (22) into the dome of the shaft-axle connection (24).
- Page 78 Jet Cleaner TANKO-MX 11. Push the journal of the driver shaft (25), together with the cylindrical pin (35); bevel gear wheel for the nozzle carrier (26) and spiral circlip (31), into the bushing (09) of the shaft-axle connection (24). 12. Press the collar bushing (08) into the bearing plate (28). 13.
- Page 79 Jet Cleaner TANKO-MX 18. Screw the nozzle carrier (27), with the nozzles (12) and jet concentrator (13), onto the driver shaft (25) and tighten it with a belt wrench. NOTE The threaded pin (34) may fall into the device when being screwed in! Risk of damage in the device from foreign bodies.
-
Page 80: Notes On Cleaning
Jet Cleaner TANKO-MX 7.4.5 Notes on Cleaning It is recommended for the device to be cleaned during maintenance. Comply with the following safety notes prior to cleaning. WARNING Hazard from corrosive or aggressive cleaning agents! There is a risk of death or severe physical injuries. ... -
Page 81: Spare Parts And Customer Service
For technical questions or spare part requests, you can contact Customer Service department as follows: Armaturenwerk Hötensleben GmbH Schulstraße 5 – 6 39393 Hötensleben, Germany Telephone +49 39405 92-0 Fax +49 39405 92-111 e-mail info@awh.eu Internet http://www.awh.eu 7 Maintenance Translation of the original operating/installation instructions 2016/03 73 / 86... -
Page 82: Mx125 Spare Parts
Jet Cleaner TANKO-MX 7.5.1 MX125 Spare Parts Figure 7.5-1: Internal construction of the MX125 Tightening torque values for screw connections Tightening Torque Item / Item Item / Item Item / Item Thread [Nm] [lbft] 01 / 02 ----- ----- M56 x1.5 110 - 120 81 - 88 2.1 –... - Page 83 Jet Cleaner TANKO-MX Remark: The items marked “X” or “■” are included in the wear parts package and can be ordered. The items marked “■” are required for replacing wear parts [WP]. Item Qty. Designation Remark Article No. Material Connection cover see Table 7.5-3 see Table 7.5-3 1.4404 (AISI 316L)
-
Page 84: Table 7.5-2: Mx125 Parts List (Standard)
Jet Cleaner TANKO-MX Spiral circlip W Ø 12.0 x 0.60 450603 1.4401 (AISI 316) Spiral circlip W Ø 19.0 x 1.07 450604 1.4401 (AISI 316) Threaded pin ISO 4029 M5 x 6 430159 1.4404 (AISI 316L) ■ Threaded pin ISO 4028 M5 x 10 430187 1.4404 (AISI 316L) -
Page 85: Faults
Before clearing any fault, adhere to the safety notes in chapter 7 Maintenance. In case of any uncertainty or doubt, contact AWH. 8 Faults Translation of the original operating/installation instructions 2016/03 77 / 86... -
Page 86: Faults And Remedial Action
Jet Cleaner TANKO-MX 8.2 Faults and Remedial Action Fault Cause Remedy Cleaning head and/or There is no media pressure on Open the shut-off valve for the – – nozzle carrier not the device. medium. rotating or rotating Pressure of the cleaning agent Increase the pressure (adhere –... -
Page 87: How To Act In Case Of An Emergency
It is for this reason that the AWH can offer the operating company, solely as a precautionary measure, a few points of reference and notes to be observed and to be integrated into the operating company's hazard assessments. -
Page 88: Decommissioning
Use protective work clothing, protective gloves and safety goggles when carrying out the work. In case of any uncertainty or doubt, contact AWH. Removal Removal from the container and disassembly of the device for disposal must only be performed by experts. - Page 89 Jet Cleaner TANKO-MX NOTE The cleaning device is made of stainless steel and plastic. Stainless steel is a valuable raw material and can easily be recycled. After removal, the entire device has to be properly: – cleaned (see section 7.4.5 Notes on Cleaning) and –...
-
Page 90: Index
Jet Cleaner TANKO-MX Index Assembling the Device ........62 Maintenance Intervals ........48 Cleaning Agents ........7, 20, 21 Means of Presentation ......... 1 Cleaning times Noise level MX125 cleaning times ........17 Noise level of the device ......18, 35 Commissioning .......... -
Page 91: Appendices
Jet Cleaner TANKO-MX Appendices 1: D ) ..................85 PPENDIX ECLARATION TRANSLATION Appendices Translation of the original operating/installation instructions 2016/03 83 / 86... - Page 92 Jet Cleaner TANKO-MX 84 / 86 Translation of the original operating/installation instructions 2016/03 Appendices...
- Page 93 39393 Hötensleben, Germany Telephone: + 49 (0) 39405 92-0 Fax: + 49 (0) 39405 92-111 E-mail: info@awh.eu Homepage: http://www.awh.eu Declaration of incorporation as per – EC Directive - Machinery 2006/42/EC, Annex II B We hereby declare that the container cleaning device...
- Page 94 Jet Cleaner TANKO-MX 86 / 86 Translation of the original operating/installation instructions 2016/03 Appendices...
-
Page 95: Notes
Jet Cleaner TANKO-MX Notes A member of Neumo Ehrenberg Group... - Page 96 Jet Cleaner TANKO-MX Armaturenwerk Hötensleben GmbH Schulstraße 5 – 6 39393 Hötensleben, Germany Telephone: + 49 (0) 39405 92-0 Fax: + 49 (0) 39405 92-111 E-mail: info@awh.eu Homepage: http://www.awh.eu A member of Neumo Ehrenberg Group...
Need help?
Do you have a question about the TANKO MX125 and is the answer not in the manual?
Questions and answers