Advertisement
Quick Links
Regular Installation
1
Template
2
3
4
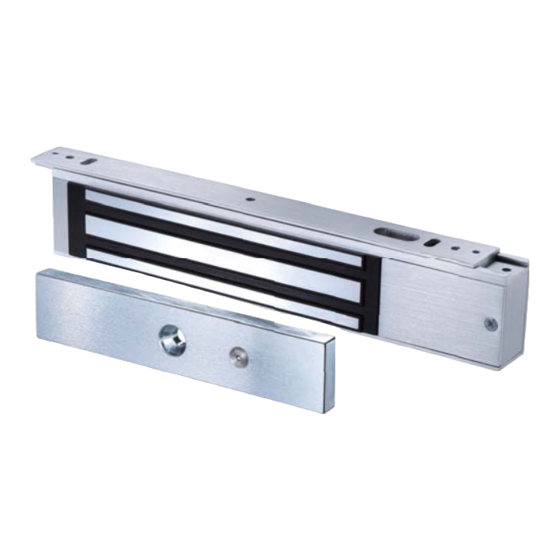
Armature Plate
5
Rubber Washer
6
Cable
Fasten the mounting plate on the
site then install electromagnet
lock with power lead cable
through mounting plate slot
hole.
Copyright © 2008 Gianni industries, inc. All rights reserved.
P-MU-AM-EM-N Ver. F
Published on 2008.06.19
Electromagnetic Lock Installation Instruction
(NH-Indoor Series)
Fold the mounting template along
the dotted line to a 90-degree angle.
Close the door, place the template
against the door and frame. Drill two
holes in the frame and three holes in
door as indicated on the template.
Drill two holes in the frame and
three holes in the door as indicated
on the template.
Mounting the armature plate to the
door . Actual installation varies
according to door style.
This will allow the armature plate to
pivot slightly around the armature
screw in order to compensate for
door misalignment.
Screw the two self-tapping screws
in the slotted holes of the mounting
plate and adjust the position of the
mounting plate.
Please make the mark on the
mounting plate and the mark on
the electromagnet lock itself to
be a straight line for alignment.
Either aligning from left side or
from right side is feasible.
Hollow Metal Door
Reinforced Door
12.7mm
8mm
6.8mm for M8-1.25 thread
D r i l l a n 8 m m h o l e
Drill an 6.8 mm dia.
t h r o u g h d o o r , f r o m
H o l e
sexnut bolt side only,
M8x12.5 thread.
enlarge the 8mm hole to
12.7mm.
Recommendation:
Micro EM-locks (300 LBS) maximum thickness of door is 44 mm.
Mini EM-locks (600 LBS) maximum thickness of door is 50 mm.
Midi EM-locks (800 LBS) maximum thickness of door is 48 mm.
Standard EM-locks (1200 LBS) maximum thickness of door is 46 mm.
7
Cable
8
Allen wrench
Power
9
Holding Force
Slide the electromagnetic lock
to fit with the mounting plate as
t h e d r a w i n g , f i x i n g s c r e w s
through the bottom of the
electromagnet lock into the
mounting plate.
Solid Door
36mm
12.7mm
8mm
Drill an 8 mm hole thru
a n d
t a p
f o r
door from sexnut bolt
s i d e o f d o o r , d r i l l
12.7mmhole, 36mm in
depth.
Once the position is correct, use
the screws to permanently mount
the mounting plate, And drill the
cable access hole.
Use the Allen wrench to screw the
Fixing screws and Brass Sleeves
t h r o u g h t h e b o t t o m o f t h e
electromagnet into the mounting
plate.
Connect the power lead, and test
the unit. Insert the anti-tamper caps
into the mounting screw access
holes.
After the electromagnet firmly
assembled with the mounting
plate, use the screws to
fasten the lock on the site
permanently.
Advertisement

Summary of Contents for Gianni Industries NH-Indoor Series
- Page 1 Either aligning from left side or electromagnet lock into the permanently. from right side is feasible. mounting plate. Copyright © 2008 Gianni industries, inc. All rights reserved. P-MU-AM-EM-N Ver. F Published on 2008.06.19...
- Page 2 (The magnet is fitted with a metal oxide varistor to prevent back EMF) the electromagnet Sensor output is not functioning Misalignment between the reed switch Check the installation of armature with supplied template. and its magnet Copyright © 2008 Gianni industries, inc. All rights reserved. P-MU-AM-EM-N Ver. F Published on 2008.06.19...