Table of Contents
Advertisement
Quick Links
Advertisement
Table of Contents

Related Manuals for DC Athletics Performance 5.0

Summary of Contents for DC Athletics Performance 5.0
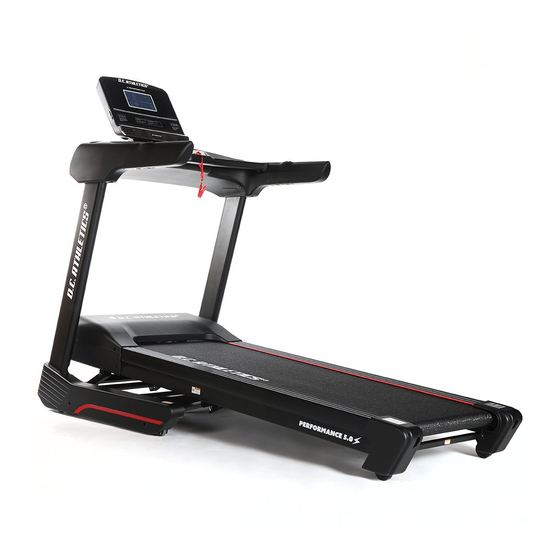
- Page 1 Performance 5.0 MANUAL...
- Page 2 WARNING Read all instructions carefully before using this product. Retain this owner’s manual for future reference: ----When using this treadmill, keep attaching the safety pull pin rope to your clothes. ----When you are running, keep your hand swinging natural, stare frontward, never look adown at your feet.
- Page 3 training and consult a doctor immediately. IMPORTANT SAFETY PRECAUSTION 1. Plug the power cord of the treadmill directly into a dedicated grounded circuit. This product must be grounded. If it has breakdown, grounding provides a path of least resistance for electric current to reduce the risk of electric shock.
-
Page 4: Assembly Steps
17. If the supply cord is damaged, it must be replaced by the manufacturer, its service agent or similarly qualified persons in order to avoid a hazard. 18. Put your feet on the side rail before using the treadmill, and always attach the safety pull pin rope to your clothing. - Page 5 STEP 2: 1. Cut down the straps when the main frame was placed well (Don’t move it any more). 2. Connect the computer lower wire(92)and computer extension lower wire (93). 3. Insert and lock the upright tube (3L/R) on the bottom frame (1) with the hex socket screws (55)(59) and the Lock washer (80)(81).
- Page 6 STEP 3: 1. Connect the computer extension upper wire (94) with the extension lower wire (93). 2. Lock the computer frame (4) on the upright tube (3L/R) with the hex socket screws (55) and Lock washer (80). NOTE: please don’t tighten the Hex socket screw (55) for the time being. - 5 -...
- Page 7 STEP 4: 1.Connect the wire of armrest (6) with the wire of computer frame(4) properly well. 2. Secure the armrest (6) to computer frame(4) with the hex socket screws (55) and Lock washer (80). 3. Separate armrest decorative cover(35L/R ) from the opening, then put on the joint of armrest (6) and computer frame(4) respectively.
- Page 8 STEP 5 : 1.Connect the wire of Computer panel (29) and Computer frame (4) properly well.( Wires of the same order are joined together as picture A shown) 2.Using Hex socket screw (59) to secure the Panel bracket (5) on Computer frame (4). 3.Using Cross tapping screw (73) to secure the Computer panel joint cover (32) to Computer panel lower cover (30).
- Page 9 STEP 6 : 1. Secure the protective cover (26L /R ) to the bottom frame(1) with Cross tapping screw(73). 2. Stuck protective cover (37L /R ) to the card slot of computer lower cover. - 8 -...
- Page 10 When you fold the machine: Put your hands on place A, lift up the machine in the direction of the arrow until you hear the sound from the cylinder (14). Note: Please unplug the power cord and make sure treadmill stopping completely before folding machine.
-
Page 11: Grounding Methods
GROUNDING METHODS This product must be grounded. If it should malfunction or breakdown, grounding provides a path of least resistance for electric current to reduce the risk of electric shock. This product is equipped with a cord having an equipment-grounding conductor and a grounding plug. -
Page 12: Function Specifications
OPERATION INSTRUCTIONS 1. Function specifications 1.1. Start Normal startup after 3s counting backwards. 1.2. Number of programs Manual Modes, 18 Preset programs, 3 User setting programs,HRC1-HRC3,FAT. 1.3. Safe lock function Remove the safety lock in any modes could rapidly slow down the treadmill till stop. “---”... -
Page 13: Key Function
1.4. LCD windows display functions: A.Speed/pulse window:Display the current running speed or current pulse. B.INCL./PROG. Window: Display the current incline or programs. C.TIME Window:Display the running time under manual mode or the countdown running time under mode and programmed mode. D.DIS./CAL./STEPS Window:display distance,calorie or steps data.Display Switch every 5 seconds. -
Page 14: Heart Rate Measurement Function
1.6 Data display range of various parameters: TIME: 0:00 – 99.59(MIN) DISTANCE: 0.00 – 99.9(KM) CALORIES: 0.0 – 999 (KC) SPEED: 1.0 – 20.0(KM/H) PULSE: 50 – 200 (BPM) 1.7. Heart rate measurement function While the treadmill is connected to the power, hold the pulse tester for 5s and the heart rate value will be displayed. -
Page 15: Preset Programs
alarm “Bi-Bi”; G. Parameters not set will increase forwards, and will be reset after reaching the upper limit of the display range; in manual mode, the machine will stop when the time accumulates to be more than 99: 59 (100min). 1.9. -
Page 16: Body Fat Test
INCLINE SPEED INCLINE 1.10. User-setting programs: Beside the 18 inner systems, the treadmill setup 3 user-defined programs: U1, U2, U3. 1. Setting the user-defined program: Continuously press "PROG" key until the expected program (U1/U2/U3) display in the standby condition, while the "time" window flash, display the setting time, press “SPEED+”, “SPEED -”to set up expected run time, press "MODE"... - Page 17 HRC program Target zone (L-H) Target zone (L-H) lowest default highest lowest default highest a) The movement time of the heart rate speed was fixed at 22 minutes. b)In standby mode, press “PROGRAME”key continually until the distance window displays “HRC”. Notes: If press “START “key directly under the HRC display window, the system will automatically recommend a heart rate control parameter for the user as following: HRC can reach a maximum speed of 9.0 km/H, age 30 years,the default setting is 160times/minute.
- Page 18 c)if press "MODE" key to enter age Settings, the speed window will display default age 30 .The user can press “SPEED+,SPEED-”key or“INCLINE+,INCLINE-”key to choose the right age which is suitable. The adjustable age range is 15-80 years old. (The details please see the HRC form) c) After the user chooses the right age, press “MODE”...
- Page 19 1.31. Others 1.13.1. When a countdown parameter run off, display "END", the alarm rings 0.5s every 2s, until the treadmill full stop, then return to manual mode. 1.13.2. In setting a parameter, it can be roop-setting, for example, time range is 5:00--99:00, when set at 99:00, press "+"...
- Page 20 Temp Sensor short circuit Over- heat protection Replace inverter Inverter fault Fan fault power voltage below 185V Make sure the voltage in the right Low-voltage protection range power voltage normal Incline motor correction Incline motor correction failure Re-check incline motor after power failure or error Inverter connection loosed Check the connection...
-
Page 21: Exercise Instructions
EXERCISE INSTRUCTIONS 1. The Warm Up Phase This stage helps get the blood flowing around the body and the muscles working properly. It will also reduce the risk of cramp and muscle injury. It is advisable to do a few stretching exercises as shown below. -
Page 22: Maintenance Instructions
more calories you will burn. Effectively this is the same as if you were training to improve your fitness, the difference is the goal. MAINTENANCE INSTRUCTIONS WALKING BELT CENTERING AND TENSION ADJUSTMENT DO NOT OVERTIGHTEN the walking belt. This may cause reduced motor performance and excessive roller wear. - Page 23 WARNING: ALWAYS UNPLUG THE TREADMILL FROM THE ELECTRICAL OUTLET BEFORE CLEANING OR SERVICING THE UNIT. CLEANING General cleaning or the unit will greatly prolong the treadmill. Keep treadmill clean by dusting regularly. Be sure to clean the exposed part of the deck on either side of the walking belt and also the side rails. This reduces the build up of foreign material underneath the walking belt.
-
Page 24: Exploded Drawing
EXPLODED DRAWING - 23 -... -
Page 25: Parts List
PARTS LIST Part Part Description Description Bottom frame Hex socket screw M8*50 Hex socket screw M8*45 Main frame 3 L/R Upright tube Hex socket screw M8*40 Hex socket screw M8*15 Computer frame Hex head cap screw M10*35 Panel bracket Hex head cap screw M8*25 Armrest Hexagon socket head cap Incline frame... - Page 26 Nylon nut M8 Computer panel joint cover Nylon nut Armrest upper cover C shape Clasp Armrest lower cover 35L/R Armrest decorative cover Computer Shortcut key 36L/R PU foam grip Computer lower wire 37L/R Protective cover Computer extension lower wire Running board Computer extension upper wire Running belt Computer upper wire...
Need help?
Do you have a question about the Performance 5.0 and is the answer not in the manual?
Questions and answers