Table of Contents
Advertisement
Quick Links
Advertisement
Table of Contents

Subscribe to Our Youtube Channel
Related Manuals for MIR AI Camera


Summary of Contents for MIR AI Camera
- Page 1 Getting started (en) Date: 09/2019 Revision: v.1.0...
- Page 2 Copyright © 2019 by Mobile Industrial Robots A/S. Contact the manufacturer: Mobile Industrial Robots A/S Emil Neckelmanns Vej 15F DK-5220 Odense SØ www.mir-robots.com Phone: +45 20 377 577 Email: support@mir-robots.com CVR: 35251235 MiR AI Camera Getting started (en) 09/2019 - v.1.0 ©Copyright 2019: Mobile Industrial Robots A/S.
-
Page 3: Table Of Contents
4.1 Collection phase 4.2 Pre-processing phase 4.3 Validation phase 4.4 Training phase 4.5 Upload the data model 4.6 Setting up triggers and actions 4. Troubleshooting MiR AI Camera Getting started (en) 09/2019 - v.1.0 ©Copyright 2019: Mobile Industrial Robots A/S. -
Page 4: About This Document
1. About this document 1. About this document This document describes how to install and use your MiR AI Camera. It provides the information about the following topics: • Mounting your MiR AI Camera. • Training the camera to identify certain objects. - Page 5 This page contains troubleshooting guides to solve common issues with MiR products. • MiR AI Camera product page http://www.mobile-industrial-robots.com/en/products/mir-add-ons/mir-ai-camera This page contains specifications, pictures, and brochures for MiR AI Camera. MiR AI Camera Getting started (en) 09/2019 - v.1.0 ©Copyright 2019: Mobile Industrial Robots A/S.
-
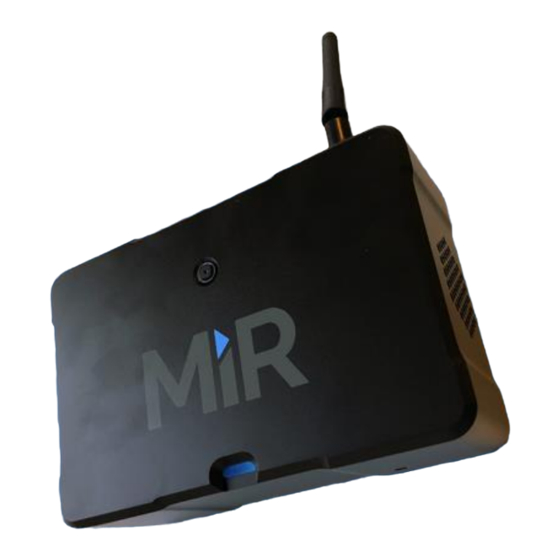
Page 6: Product Presentation
2. Product presentation 2. Product presentation MiR AI Camera is intended to be used to improve the flow of MiR robots. It provides MiRFleet with additional information that it can use to guide MiR robots more effectively for example, by initiating missions when carts are ready to be transported or by avoiding sending robots through obstructed, narrow doorways and into crowded areas. -
Page 7: Mirfleet And Operating Requirements
To reset the camera, you must hold down the Reset button for ten seconds. 2.2 MiRFleet and operating requirements The MiR AI Camera is a product that must be connected to MiRFleet to be used as intended. The list below describes the requirements for being able to use MiR AI Camera with your MiRFleet. -
Page 8: Getting Started
Installation guide for MiR server 3.2 Suggested use It is important before installing MiR AI Camera to consider what you aim to use it for. This section describes some of the possible uses of MiR AI Camera, and where it should be mounted in each case. - Page 9 For example, if the doorway is large enough to allow a person and robot through at the same time, it should be considered only to set MiR AI Camera to lock the area if carts or other robots are approaching the doorway.
-
Page 10: Mounting And Powering Up Mir Ai Camera
3. Getting started 3.1. In this example, MiR AI Camera is focusing on a loading rack. In the first image, the camera detects nothing in its field of view. In the second image, it has detected a crate and initiates a mission to send a robot over to pick up the crate. - Page 11 Detach the camera mount from the MiR AI Camera if they are not already separated. Place camera mount in the position you want the MiR AI Camera to be mounted. Make sure the mounting plate is placed flat against the surface.
-
Page 12: Connecting To Mir Ai Camera
Screw the M4 screws into the wall to fix the camera mount in place. Fix MiR AI Camera to the camera mount. Tighten the bolt at the end of the mount, and ensure that the camera is fastened securely. - Page 13 If your camera is mounted in a position that does not enable you to connect it to the network through Ethernet, the following steps describe how to connect through WiFi instead. Turn on your MiR AI Camera. If the WiFi antenna is mounted, MiR AI Camera creates a WiFi hotspot, and the indicator light changes to yellow.
- Page 14 When the camera is connected to the same network as MiRFleet the indicator light changes to green. The AI camera hotpot vanishes, and the camera is now available in the MiRFleet interface. MiR AI Camera Getting started (en) 09/2019 - v.1.0 ©Copyright 2019: Mobile Industrial Robots A/S.
-
Page 15: Adding Cameras To Mirfleet
3. Getting started Check that MiRFleet has connected to the camera by signing into MiRFleet and going to Setup > AI cameras. Your AI camera should appear under New cameras. It can take a little time for MiRFleet to detect the camera. - Page 16 To add the camera, select Add. In the displayed page, it is possible to see the MiR AI Camera's serial number and soft- ware version. You are also able to edit the camera's name and activate the camera. It is recommended to name the cameras based on their position or function, such as Hallway or Cart pickup.
- Page 17 You can also remove cameras from MiRFleet after adding them. This is done by going into the camera's settings page and selecting Remove. NOTICE When you remove an AI camera from MiRFleet, the AI camera is auto- matically factory reset. MiR AI Camera Getting started (en) 09/2019 - v.1.0 ©Copyright 2019: Mobile Industrial Robots A/S.
-
Page 18: Comissioning
4.1 Collection phase For MiR AI Camera to detect specific objects, it must first be trained using a collection of sample images of those objects. The objects you would like the camera to be able to detect are referred to as target objects. - Page 19 Follow the steps below to begin the Collection phase, and download the data necessary to begin the next phase: Go to Setup > AI camera and select AI settings. MiR AI Camera Getting started (en) 09/2019 - v.1.0 ©Copyright 2019: Mobile Industrial Robots A/S.
- Page 20 The remaining time of the collection phase is displayed. When the displayed time has passed, return to the MiRFleet interface and navigate to AI settings again to download the data. MiR AI Camera Getting started (en) 09/2019 - v.1.0 ©Copyright 2019: Mobile Industrial Robots A/S.
-
Page 21: Pre-Processing Phase
Open your preferred web browser and go to https://training.mir-robots-ai.com to access the MiR AI Training Tool. If you have not used MiR AI Training Tool before, select Register user. MiR AI Camera Getting started (en) 09/2019 - v.1.0 ©Copyright 2019: Mobile Industrial Robots A/S. - Page 22 4. Comissioning Insert your email and create a password. Select Register when you are done, and sign in with your new user. MiR AI Camera Getting started (en) 09/2019 - v.1.0 ©Copyright 2019: Mobile Industrial Robots A/S.
- Page 23 To start a new session, you will need to add credits. Credits are used to limit the number of data models you create for your MiR AI Camera from your training sessions. You use a credit each time you train a new data model in any of your training sessions.
- Page 24 4. Comissioning Type in the code that accompanied your MiR AI Camera. You will receive the number of credits that is linked to that code. To upload a new set of collected data select Upload new session. MiR AI Camera Getting started (en) 09/2019 - v.1.0 ©Copyright 2019: Mobile Industrial Robots A/S.
- Page 25 Choose file and browse for the data file you saved at the end of the Collection phase, con- taining all the collected images. Select it and upload it to the site. MiR AI Camera Getting started (en) 09/2019 - v.1.0 ©Copyright 2019: Mobile Industrial Robots A/S.
-
Page 26: Validation Phase
The candidate target object is framed by a green box. To start the process, you must create a new label for a target object you would like MiR AI Camera to detect. After creating a new label, you validate which images include the same target object and should be used for training. - Page 27 Correct labeling Incorrect labeling People All people go under one collective Creating individual labels for label. certain people. Example: person Example: Sarah, John, workers, intruders, guests MiR AI Camera Getting started (en) 09/2019 - v.1.0 ©Copyright 2019: Mobile Industrial Robots A/S.
- Page 28 It is important that only images where the green box correctly frames the target object are validated for training. Figure 4.1 illus- trates examples of valid and invalid framing of target objects. MiR AI Camera Getting started (en) 09/2019 - v.1.0 ©Copyright 2019: Mobile Industrial Robots A/S.
- Page 29 Invalid The frame includes only very little of the target object. 4.2. Descriptions of the framing examples in Figure 4.1. MiR AI Camera Getting started (en) 09/2019 - v.1.0 ©Copyright 2019: Mobile Industrial Robots A/S.
- Page 30 In MiR AI Training Tool, select Start labeling for the session where you would like to begin labeling. MiR AI Camera Getting started (en) 09/2019 - v.1.0 ©Copyright 2019: Mobile Industrial Robots A/S.
- Page 31 A dialog box similar to the following image is displayed. The large image is the one you selected, and the three smaller images are images that MiR AI Training Tool identifies as containing the same target object. MiR AI Camera Getting started (en) 09/2019 - v.1.0 ©Copyright 2019: Mobile Industrial Robots A/S.
- Page 32 In this case, all the images should be val- idated and have the label mir200_roeq. Select Save labels when you have finished. MiR AI Camera Getting started (en) 09/2019 - v.1.0 ©Copyright 2019: Mobile Industrial Robots A/S.
-
Page 33: Training Phase
The Training phase can begin once you have labeled your images. You are able to begin the training without labeling all images, but it is recommended to label as many images as MiR AI Camera Getting started (en) 09/2019 - v.1.0 ©Copyright 2019: Mobile Industrial Robots A/S. -
Page 34: Upload The Data Model
MiR AI Camera. This can take several hours to complete, but it is not necessary for MiR AI Training Tool to be open on your PC throughout the training. Once the training is complete, you will receive an e-mail, and can continue to set up your MiR AI Camera through MiRFleet. - Page 35 4. Comissioning Connect your PC to the MiRFleet network, and sign in to the interface. Navigate to Setup > AI cameras, and select AI settings. MiR AI Camera Getting started (en) 09/2019 - v.1.0 ©Copyright 2019: Mobile Industrial Robots A/S.
-
Page 36: Setting Up Triggers And Actions
4.6 Setting up triggers and actions Each MiR AI Camera can be set up to send different actions to MiR robots, depending on the detected object. There are two types of actions you can trigger: Lock zone or Fleet mission. - Page 37 4. Comissioning If you want to create a zone that MiR AI Camera can lock, but does not oth- erwise limit the number of robots that can be within the zone, make sure to increase the Robot limit to the number of robots you have in your fleet. You can change this value when editing a selected zone in the map editor.
- Page 38 Select Add trigger to create a new trigger You can now select a detected object and a trigger action. To add an object, select the Edit icon. MiR AI Camera Getting started (en) 09/2019 - v.1.0 ©Copyright 2019: Mobile Industrial Robots A/S.
- Page 39 AI camera settings. • Lock zone enables you to choose a Limit-robots zone and lock it, so no MiR robots may enter if the camera detects the linked object. MiR AI Camera Getting started (en) 09/2019 - v.1.0 ©Copyright 2019: Mobile Industrial Robots A/S.
- Page 40 Another example, using a Lock zone action, sets the camera to lock a zone in a narrow hallway when the camera detects a person. MiR AI Camera Getting started (en) 09/2019 - v.1.0 ©Copyright 2019: Mobile Industrial Robots A/S.
- Page 41 You can create as many triggers as you need. Once you have finished creating triggers, save your changes by selecting Save. The camera is now ready to trigger actions when it detects specific target objects. MiR AI Camera Getting started (en) 09/2019 - v.1.0 ©Copyright 2019: Mobile Industrial Robots A/S.
-
Page 42: Troubleshooting
• Objects have changed appearance If the objects you have trained your MiR AI Camera to detect have changed appearance significantly, MiR AI Camera may no longer be able to recognize them. Run the Collection phase again and make sure the new objects are included. - Page 43 Collection phase, the MiR AI Camera may not be able to detect target objects correctly in that area. Run the Collection phase again where images of the new area are included.
Need help?
Do you have a question about the AI Camera and is the answer not in the manual?
Questions and answers