
Related Manuals for Fanotec Nodal Ninja 6 Series


Summary of Contents for Fanotec Nodal Ninja 6 Series
- Page 1 Nodal Ninja 3 MK3 Operating Manual v.1.1 Nodal Ninja 6 OPERATING MANUAL November 24, 2020 Copyright © 2020 Nodal Ninja...
-
Page 2: Table Of Contents
Nodal Ninja 6 Operating Manual v.1.2 Contents Introduction............Features of the NN6 Series ........Bullet Point Features Include: ............6 Basic Step by Step Setup Instructions....Basic steps in setting up your Nodal Ninja........7 NN6 Upper Rotator..........Exploded View of NN6 Parts ....... Configurations ............. - Page 3 Nodal Ninja 6 Operating Manual v.1.2 Finding the No-Parallax Point of a Lens.... Lower rail setting: ..............Upper rail setting:..............Abbreviations ............Warranty ............... Copyright Information ........Resources.............. Disclaimer ............. Copyright © 2020 Nodal Ninja...
-
Page 4: Introduction
Without parallax, a photographer can seamlessly stitch multiple photographs together, forming a larger, higher resolution composite image. The Nodal Ninja 6 series heads are well suited for entry-level as well as semi- professional and even professional use. Copyright © 2020 Nodal Ninja... -
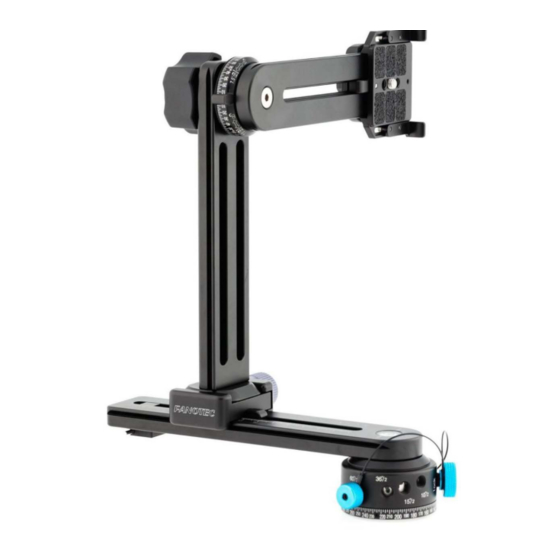
Page 5: Features Of The Nn6 Series
Nodal Ninja 6 Operating Manual v.1.2 Features of the NN6 Series Arca-Swiss upper rail Easy to read reference markers Adjustable camera mounting plate Lever locks in 7.5 degree positions 1/4 camera mounting thread Unlock for compression locking with easy grip knob Upper rotator easy Anti-skid rubber grip tightening knob... -
Page 6: Bullet Point Features Include
Nodal Ninja 6 Operating Manual v.1.2 Fanotec began the development of Nodal Ninja in 2004. The latest generation heads are created using state of the art computer-controlled cutting (CNC) machines resulting in greater precision, uniformity, and cross- compatibility. Small, sleek, and very attractive. By comparison to other panoramic heads, the NN6 is still lightweight, compact, and very durable. -
Page 7: Basic Step By Step Setup Instructions
Nodal Ninja 6 Operating Manual v.1.2 ● Attractive finish – “non-glare” matt black. ● Full parts and labor lifetime warranty against any manufacturer defects. Basic Step by Step Setup Instructions When purchased as a complete package, all Nodal Ninjas are pre-assembled at the factory. - Page 8 Nodal Ninja 6 Operating Manual v.1.2 Step 1 Mount rotator to the tripod. Every Nodal Ninja uses a 3/8” female mounting system. We also include Mount rotator a 3/8”-1/4” thread adapter for free to tripod. to accommodate mounts using ¼” male threads.
- Page 9 Nodal Ninja 6 Operating Manual v.1.2 Step 4 Flip or rotate upper assembly rail 180°. Flip up the upper rail. Tighten upper rotator knob. Step 5 After the rail is rotated to a vertical position, tighten using the upper rail rotator knob turning clockwise.
- Page 10 Nodal Ninja 6 Operating Manual v.1.2 Step 7 Loosen the 4 set screws of the anti-twist plates slightly using the provided hex key. Loosen the screws of anti-twist plates slightly using the hex key. Lift up the anti- twist plates. Step 8 Lift or slide upwards the anti-twist plates.
- Page 11 Nodal Ninja 6 Operating Manual v.1.2 Step 10 Mount your camera/lens onto the camera mounting plate and secure by gently tightening the camera mounting knob being careful not to overtighten. Check the camera is aligned to upper rail by looking from bottom view of camera.
- Page 12 Nodal Ninja 6 Operating Manual v.1.2 Step 12 Once you are satisfied with the camera/lens alignment, finish by tightening the “camera” mounting knob securely. Next, loosen the set screws of the anti- twist plates with the provided hex key. Loosen the screw Press the anti-twist plates of anti-twist against the back of camera...
- Page 13 Nodal Ninja 6 Operating Manual v.1.2 Step 14 Loosen upper rotator knob and rotate upper rail so camera/lens is pointed towards the horizon. Next, while holding the camera, loosen the camera mounting knob and slide the camera to the no-parallax point (NPP) of the lens, after which tighten securely Slide the stop plate...
- Page 14 Nodal Ninja 6 Operating Manual v.1.2 Holding camera! Step 16 While holding the camera, loosen the vertical rail mounting knob just enough to allow the vertical assembly to slide back and Loosen the vertical rail forth on the lower mounting knob slightly. horizontal rail.
-
Page 15: Nn6 Upper Rotator
Nodal Ninja 6 Operating Manual v.1.2 This concludes the basic setup. The example we showed was the NN3 MK3 with Rotator Mini V2 (SKU# F3302-1). This setup guide can also be used for the NN6 and other models as well – some steps may vary slightly. NN6 Upper Rotator One unique feature of the NN6 is its upper rotator. -
Page 16: Exploded View Of Nn6 Parts
Nodal Ninja 6 Operating Manual v.1.2 Exploded View of NN6 Parts The NN6 comes preassembled from the factory. This is a basic breakdown of the major components. Copyright © 2020 Nodal Ninja... - Page 17 Nodal Ninja 6 Operating Manual v.1.2 This is a more detailed view of the build components of the NN6. Copyright © 2020 Nodal Ninja...
-
Page 18: Configurations
SKU# F6001 https://www.fanotec.com/contact/20 Each of the products listed in the manual (noted by SKU’s) is provided as packages. These packages give the user everything an... -
Page 19: Nn6 + Nadir Adapter W/Lower Rotator Rd10
Nodal Ninja 6 Operating Manual v.1.2 NN6 + Nadir Adapter w/Lower Rotator RD10 ● SKU# F6002 ● Load limit: 3.5lb (1.59kg) ● Weight: 2lb (920g) ● Upper rail length: 190mm ● Lower rail length: 200mm ● Level: Amateur - Pro ●... -
Page 20: Nn6 W/Lower Rotator Rd10
Nodal Ninja 6 Operating Manual v.1.2 NN6 w/Lower Rotator RD10 ● SKU# F6001 ● Load limit: 3.5lb (1.59kg) ● Weight: 2lb (920g) ● Upper rail length: 190mm ● Lower rail length: 200mm ● Level: Amateur - Pro ● Lenses: 8mm - 200mm focal length (DSLR) ●... -
Page 21: Nn6 W/No Lower Rotator + Nadir Adapter
Using the Nadir Adapter. ○ Arca-Swiss Style Right Angle Dual Clamp SKU# F9131 Fanotec rotators ○ Advanced Rotator Handle designed to fit the NN6: SKU# F1115 ○ Arca-Swiss Style Quick ○ Mecha E1 w/DC1 Controller... -
Page 22: Nn6 W/No Lower Rotator
Using the Nadir ○ Arca-Swiss Style Stop Plate Adapter. SKU# F2106 ○ Arca-Swiss Style Right Angle Dual Clamp SKU# F9131 Fanotec rotators ○ Advanced Rotator Handle designed to fit the NN6: SKU# F1115 ○ Arca-Swiss Style Quick ○ Mecha E1 w/DC1 Controller... -
Page 23: Additional Configurations
Nodal Ninja 6 Operating Manual v.1.2 Additional Configurations Added components for shooting Stereoscopic or 3D Panoramas. Dual Camera Multi-row Attachment SKU# F6043 A lightweight setup dedicated for multi-row stereo panoramic photography consists of our new LP140 (140 mm lens plate), 2 QRC-38DS (clamp with strap mount and dovetail for clamping), and one right angle connector for lens plate and NN3 MK3 or NN6. -
Page 24: Dual Axis Mecha E2 C1 With Nn6 And Nadir Adapter Sku# F9908
Nodal Ninja 6 Operating Manual v.1.2 Automation or hands-free operation. Dual Axis MECHA E2 C1 with NN6 and Nadir Adapter SKU# F9908 An automated solution for full-size DSLR’s and lenses. We use parts from NN6, together with 2 MECHA E2 Rotators and 2 C1 Controllers, which are wirelessly linked together. -
Page 25: Other Models
Nodal Ninja 6 Operating Manual v.1.2 Other Models Buying a panoramic tripod head can be like trying to match a pair of shoes. With 3 basic series (NN3, NN6, and M series) to include automation and aerial poles, we can pretty much satisfy most needs. We would encourage you to reach out to a local authorized dealer to explain your needs so they can fit you into a proper head that best suits your requirements. -
Page 26: Specifications
Nodal Ninja 6 Operating Manual v.1.2 And for aerial photography we have a lineup of lightweight and super strong Carbon Fiber Poles to include: ○ Travel Pole extends to 9ft (3m) ○ Pole Series 2 extends to 19ft (6m) ○ Pole Series 3 extends to 30ft (9m) Specifications NN6 + Nadir Adapter w/Lower Rotator RD10 (SKU# F6002) ●... -
Page 27: Accessories
Nodal Ninja 6 Operating Manual v.1.2 Accessories There is a growing line of accessories to explore for the NN6. Many of these accessories are cross-compatible with the NN3 “MK3” series. While we cannot go into depth on all accessories we will show you some of the more popular accessories and how they are used. -
Page 28: Using The Nadir Adapter
Nodal Ninja 6 Operating Manual v.1.2 Using the Nadir Adapter SKU# F6026 The NA provides for a quick and easy way to shoot the Nadir (down shot) without having to remove the camera from the Nodal Ninja. This is very handy especially if bracketing your shots or needing longer exposures. -
Page 29: U5 30Mm Tripod Offset Bracket
Nodal Ninja 6 Operating Manual v.1.2 7. Optional - rotate tripod/camera/lens 90° around the center point and offset slightly. Taking this added shot is handy where this actual footprint may be desired, such as with tiled or mosaic flooring. U5 30mm Tripod Offset Bracket SKU# F3315 Unlike the older style T-Adapters which were designed for older Nodal Ninja’s this CNC... - Page 30 Nodal Ninja 6 Operating Manual v.1.2 1. Mount bracket to the base of the camera. 2. Loosen bracket set screw. 3. Slide bracket so the camera mount is positioned with the center axis of the lens. 4. Adjust tabs on Camera Mounting Plate as needed. 5.
-
Page 31: Small Camera Mounting Knob
Nodal Ninja 6 Operating Manual v.1.2 Small Camera Mounting Knob SKU# F6040 The Small Camera Mounting Knob (SCMK) is included with the purchase of a complete package. The SCMK is useful for extra adjustment room on the upper rail as when using smaller cameras with pancake style lenses. - Page 32 Nodal Ninja 6 Operating Manual v.1.2 Remove the camera and camera mounting plate. Remove the stop plate. Remove the standard camera mounting knob from the end of rail. Change the drag screw to the top, if needed. Install the small camera mounting knob from the end of rail.
- Page 33 Nodal Ninja 6 Operating Manual v.1.2 Reinstall the camera mounting plate and camera. Tighten the knob. While holding the Reinstall the stop plate camera, loosen the from the end of rail. knob half to one turn. Slide the camera to the NPP position.
-
Page 34: Finding The No-Parallax Point Of A Lens
Nodal Ninja 6 Operating Manual v.1.2 Finding the No-Parallax Point of a Lens Wiki definition of Entrance Pupil: “The geometric location of the entrance pupil is the vertex of the camera's angle of view and consequently its center of perspective, perspective point, viewpoint, projection center, or no-parallax point. -
Page 35: Upper Rail Setting
Nodal Ninja 6 Operating Manual v.1.2 2. Loosen the vertical rail mounting knob (or Nadir Adapter knob) enough to slide the upper assembly so the lower rotator is positioned in the center of the viewfinder. 3. Tighten and set with lower rail stop. Note: Once the lower rail setting is set, this will never change with the camera body regardless of the lens or focal lengths used. - Page 36 Nodal Ninja 6 Operating Manual v.1.2 3. Place two objects with vertical reference lines in front of the camera lens – one about 3 ft (1m) and the other placed further back about 6ft (3m). Anything can be used for vertical referencing such as a door jam with a window frame in the background, fence posts, etc.
-
Page 37: Abbreviations
Nodal Ninja 6 Operating Manual v.1.2 Abbreviations In this manual, you will see abbreviations being used as well as some popular commonly used nomenclature being shortened. Below is a list of some of the most commonly used abbreviations. Variable SKU options MECHA First Generation Controller Number of Detent Options (followed by a number (e.g. - Page 38 Nodal Ninja 6 Operating Manual v.1.2 Nodal Ninja No-Parallax Point Advanced Rotator (ball bearings) with number of detents Advanced Rotator (ball bearings) with 10 selectable detent RD10 options Internal Identification Number denoting specific packages and/or parts T Shaped Adapter Adapter with Copyright ©...
-
Page 39: Warranty
○ In the unlikely event, an item is recalled due to safety factors Fanotec will bear full responsibility to the consumer to replace it. ○ Warranty service is available through any authorized Fanotec service center. -
Page 40: Copyright Information
This manual was written by Bill Bailey, CEO Nodal Ninja USA 2004-2019, on behalf of Nick Fan of Fanotec. Nodal Ninja is owned & operated by Fanotec. Both Nodal Ninja and Fanotec are registered trade names. All rights reserved. No part of this publication... -
Page 41: Resources
Nodal Ninja 6 Operating Manual v.1.2 Resources https://wiki.panotools.org/Entrance_Pupil_Database https://forum.nodalninja.com https://www.facebook.com/NodalNinja https://www.youtube.com/user/NodalNinja Finding the NPP of a lens without a pano head: ○ Google YouTube “Nodal Ninja finding the No Parallax Point of a lens” ○ Finding NPP without a pano head http://michel.thoby.free.fr/Banknotes_intro.html https://docsbay.net/how-to-take-a-perfect-nadir-image-for-spherical- panoramas-without-taking-the-camera-from-the-panohead... -
Page 42: Disclaimer
Fanotec makes no representations or warranties concerning this manual or for the products described herein, and shall not be liable for any damages, losses, costs or expenses, direct, indirect, or incidental, consequential or special, arising out of, or related to the use of this material or the products described herein.
Need help?
Do you have a question about the Nodal Ninja 6 Series and is the answer not in the manual?
Questions and answers