
Subscribe to Our Youtube Channel
Related Manuals for dymax PC-3D


Summary of Contents for dymax PC-3D
- Page 1 Discontinued System OPERATIONS MANUAL PC-3D UV CURING LIGHT SOURCE TM-022 PN 35934 Rev 05/12/98...
-
Page 2: Table Of Contents
TABLE OF CONTENTS Description Page Safety ..................1 Description ................4 Specifications ................. 5 Unpacking and Inspection ............6 Installation ................8 Lamp Replacement/Installation ..........9 Maintenance ................10 Troubleshooting Guide ............11 Spare Parts ................14 Options .................. 15 Warranty ................ -
Page 3: Safety
SAFETY Explanation of WARNINGS, CAUTIONS, AND NOTES: WARNING A WARNING indicates when failing to follow the instructions could result in injury to personnel. CAUTION A CAUTION indicates when failing to follow the instructions could result in damage to equipment. NOTE A NOTE is used to highlight an important procedure, practice or condition. - Page 4 SAFETY Safety Precautions Must Be Observed By All Personnel Working Near or Around Ultraviolet (UV) Light UV Terminology The portion of the Electromagnetic spectrum which falls between x-rays and visible light is called Ultraviolet or UV. Ultraviolet (UV) radiation can be classified into three categories: UVC, UVB, and UVA.
- Page 5 SAFETY WARNING EYE PROTECTION Always wear eye protection when working with or near UV equipment. Use goggles, safety spectacles (glasses), or a face shield to protect your eyes. • Goggles completely surround and protect your eyes. Many goggles will also fit over regular glasses.
-
Page 6: Description
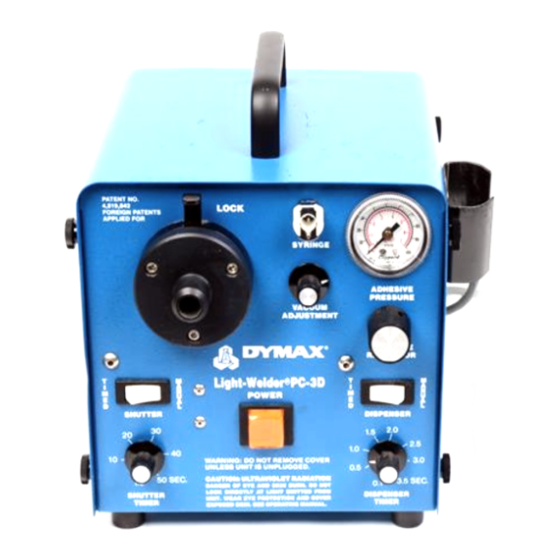
® The Light-Welder PC-3D is a combined, special purpose UV curing light source with an adhesive dispenser. UV light is generated by the lamp in the housing and transmitted through a flexible light guide. The light guide can be hand-held or machine mounted for automated applications. -
Page 7: Specifications
20 Radiometer. CAUTION With the filter installed, the PC-3D lamp emits only UV-A light and low amounts of UV-B and UV-C ultraviolet light. Without the filter, UV-A, UV-B, UV-C, and visible light are emitted. Never look directly at the light source while the unit is in use. -
Page 8: Unpacking And Inspection
❑ 1 - Quick Disconnect 1/8” Male NTB Air Connector * ❑ 3 - 10 mL Syringe Adapter Seal * * These parts make up the PC-3D Accessory Kit P/N 35950 NOTE REPORT ANY SHORTAGE TO DYMAX CORPORATION CUSTOMER SERVICE:... - Page 9 PC-3D INSTALLATION 1. Install Lamp (follow directions in the LAMP REPLACEMENT/INSTALLATION SECTION, Page 9). 2. Connect power cord to rear of unit. 3. Connect light guide to bezel mount by pressing down on lock and inserting guide. Connect syringe adapter to connector on front panel.
- Page 10 PC-3D INSTALLATION 11. Operate shutter by pressing right side of foot switch. With the timer switch in the manual position, the shutter operates directly from the foot switch. In the timed position, the shutter opening is determined by the setting of the potentiometer;...
- Page 11 PC-3D LAMP REPLACEMENT/INSTALLATION WARNING BEFORE REPLACING THE LAMP, THE UNIT MUST BE “OFF” FOR A MINIMUM OF 5 MINUTES. THIS WILL ALLOW DANGEROUS CHARGES, WHICH ARE PRESENT FOR PROPER LAMP OPERATION, TO BLEED OFF. LAMP REPLACEMENT PROCEDURE 1. Allow the unit to cool before removing the lamp/reflector assembly.
-
Page 12: Maintenance
PC-3D MAINTENANCE LIGHT GUIDE Ends of the guide should be kept clean to transmit as much light as possible. Cured adhesive accidentally deposited on the output optical surface of the light guide can be removed with razor blade. Avoid sharp bends with the light guide since this reduces light output and damages the light guide. - Page 13 PC-3D TROUBLESHOOTING CAUTION ONLY QUALIFIED MAINTENANCE PERSONNEL SHOULD ATTEMPT THE FOLLOWING PROCEDURES: Problem: Lamp will not ignite Possible Cause Testing Corrective Action Improperly Fastened Visually inspect all Secure all connections Connections input/output connections (i.e. power cord, lamp). Lamp Beyond Useful Life...
- Page 14 Figure 1.2 - Auxiliary voltage). If good, check solenoid resistance ( ohms). Timer Malfunctioned If shutter operates in Replace defective timer manual mode but not in timed mode, timer is defective. TM-022 PN 35934 Rev 05/12/98...
- Page 15 Transmission Loss in Light Compare light guide output Replace light guide Guide Too Great against new light guide (or use the Dymax Light guide Simulator - P/N 36987) to determine transmission loss. Transmission Loss in Filter Compare filter output...
- Page 16 during operation (refer to Figure 1.2 - Auxiliary voltage). If good, check solenoid resistance ( 850 ohms). Dispense Timer If adhesive dispenses in Replace defective timer Malfunctioned manual mode but not in the timed mode, timer is defective. TM-022 PN 35934 Rev 05/12/98...
- Page 17 PC-3D TROUBLESHOOTING Open circuit voltage from lamp output Test Configuration: Remove Power Remove Lamp from Unit Measurement Taken Across Lamp Output from Unit Oscilloscope Setting: DC Coupling 20 ms / Div 500V / Div Probe Connected Across Lamp Output (* Use High Voltage Probe *) ...
-
Page 18: Spare Parts
PC-3D SPARE PARTS Item Part Number Lamp/Reflector ..........35003 Fuse: 3 Amp 250 Vac ........35254 2 Amp 250 Vac ........35636 5 Amp 250 Vac ........35574 Filter (Light Guide) ........35354 Light Guide, 1 Meter ........35102 Solenoid Assembly ........35928 Blocking Diode .......... -
Page 19: Options
Light Guide, 3 mm x 1 meter ....36619 UV Goggles: Yellow ........35284 Amber .........35285 Smoke .........35286 Face Shield ..........35186 PC-3D Accessory Kit ......35950 10 mL Syringe Adapter Seal ....36213 10 mL Empty Syringes ......35329 10 mL Syringe Adapter Assembly ...35654 30 mL Empty Syringes ......35330 30 mL Syringe Adapter Assembly ...35953... -
Page 20: Warranty
Many dispensing and curing system applications are unique. Dymax does not warrant the fitness of the product for the intended application. Any warranty applicable to the product, its application and use is strictly limited to that contained in Dymax’s standard Conditions of Sale. Dymax recommends that any intended application be evaluated and tested by the user to insure that desired performance criteria are satisfied. - Page 21 TM-022 PN 35934 Rev 05/12/98...
Need help?
Do you have a question about the PC-3D and is the answer not in the manual?
Questions and answers