Table of Contents
Advertisement
Advertisement
Table of Contents

Related Manuals for Evtec sospeso & Charge CHAdeMO

Summary of Contents for Evtec sospeso & Charge CHAdeMO
- Page 1 Owner`s Manual sospeso&charge...
-
Page 2: Table Of Contents
Manual version 0.6 EN Content Safety Instructions ..............3 General safety instructions ............3 Definitions - Symbols ..............5 View of the device ................7 sospeso&charge CHAdeMO ............7 sospeso&charge Combo2 ............8 sospeso&charge 2in1 ..............8 Operating panel ................10 Start-up .................. -
Page 4: Safety Instructions
Safety Instructions This document provides instructions for the sospeso&charge charger and should not be used for any other product. Before installation or use of this product, you should review this manual carefully and con- sult with a licensed contractor, licensed electrician, or trained instal- lation expert to make sure of compliance with local building codes and safety standards. - Page 5 This manual does not cover instructions on operation, maintenance and troubleshooting. Instead, please refer to the corresponding manuals. WARNING ELECTRICAL THIS EQUIPMENT SHOULD BE INSTALLED, ADJUSTED, AND SERVICED BY QUALIFIED ELECTRICAL PERSONNEL FAMILIAR WITH THE CONSTRUCTION AND OPERATION OF THIS TYPE OF EQUIPMENT AND THE HAZARDS INVOLVED.
-
Page 6: Definitions - Symbols
Definitions - Symbols WARNING ELECTRICAL THIS SYMBOL INDICATES HIGH VOLTAGE. IT CALLS YOUR ATTENTION TO ITEMS OR OPERATIONS THAT COULD BE DANGEROUS TO YOU AND OTHER PERSONS OPERATING THIS EQUIPMENT. READ THE MESSAGE AND FOLLOW THE INSTRUCTIONS CAREFULLY. WARNING INDICATES A POTENTIALLY HAZARDOUS SITUATION WHICH, IF NOT AVOIDED, CAN RESULT IN SERIOUS INJURY OR DEATH. - Page 7 ATTENTION INDICATES AN ACTION OR OPERATION TO ENSURE USER SAFETY. PROHIBITED INDICATES AN ACTION OR PROCEDURE THAT IS NOT ALLOWED.
-
Page 8: View Of The Device
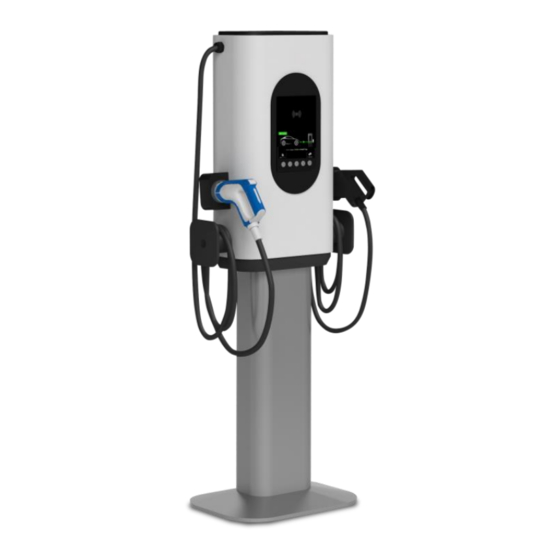
View of the device sospeso&charge CHAdeMO Operating panel, Emergency stop switch, Plug holder CHAdeMO plug (DC quick charger plug for your electric vehicle. Cable holder, Grid connection, Front cover Vehicle inlet with the following identifier is compatible with CHAdeMO charging. -
Page 9: Sospeso&Charge Combo2
sospeso&charge Combo2 Operating panel, Emergency stop switch, Plug holder CCS plug (DC quick charger plug for your electric vehicle), Cable holder, Grid connection, Front cover Vehicle inlet with the following identifier is compatible with CCS charging. -
Page 10: Sospeso&Charge 2In1
sospeso&charge 2in1 Operating panel, Emergency stop switch, Plug holder CHAdeMO plug (DC quick charger plug for your electric vehicle, CCS plug , Cable holder Grid connection, Front cover Vehicle inlet with the following identifier Vehicle inlet with the following identifier is compatible with CHAdeMO charging. -
Page 11: Operating Panel
Operating panel RFID Card reader Display Selection keys On the main screen the plug overview is being displayed as shown in the picture above (the display may vary slightly depending on the version of the device or if other cars are connected). -
Page 12: Start-Up
Start-up • When unpacking, check if the device is damaged. If in doubt, con- sult the manufacturer or distributor of the device. Do not use the device if it is damaged. • Remove all the packaging materials before use. • If any installation or maintenance work is required to connect the device, this must be done by a qualified installer or another quali- fied individual. -
Page 13: Check System Working
physical or mental ability, should not use this device without the supervision or instruction of a responsible person. Check System Working Power on the Charger. Now it takes about 1min until the system is ready. You can verify correct startup by looking at the display: •... - Page 14 You are now in the main screen and can carry out a “Charging pro- cess” p. 11. If nothing appears on the display, check whether the mains voltage is on. If there is an error message on the display, you can find help in the section “Troubleshooting”...
-
Page 15: Charging Process
Charging process Select Language The device language may be selected by the operator of the charg- ing station. By clicking the “Languages” button in the main menu the user can select the language individu- ally for each charging progress. -
Page 16: Select Charging Technology (Plug Selection)
Select charging technology (plug selection) Please note that charging from 80% to 100% can take longer than the quick charging process from 0% to 80% (to protect the vehicle batteries against overloading). Depending on which version of the charging station you have, you can choose between one or two charging technologies. -
Page 17: Start Dc Ccs V2X Charging Operation
Start DC CCS V2X charging operation With the DC CCS V2X process, the batteries of your vehicle are charged and discharged with direct current (DC). The quick charging process charges the batteries of your vehicle up to 100%. The charg- ing operation can also be terminated manually before it is completed. - Page 18 The bidirectional charging process will now start. The V2X charging progress is being displayed. Depending on the temperature condi- tions and vehicle configuration, the cooling system in your vehicle, and the one in the charging station, will start running.
-
Page 19: Start Dc Chademo V2X Charging Operation
Start DC CHAdeMO V2X charging operation With the DC CHAdeMO V2X charging process, the batteries of your vehicle are charged with DC. The quick charging process charges the batteries of your vehicle up to 80%. 1. Make sure that the charging station is prepared as de- scribed in the section "Start-up"... - Page 20 The bidirectional charging process will now start. The V2X charging progress is being displayed. Depending on the temperature condi- tions and vehicle configuration, the cooling system in your vehicle, and the one in the charging station, will start running.
-
Page 21: Explanations Of The Display In V2X Dc Charging Mode
Explanations of the display in V2X DC charging mode «Time» (in the example «39‘‘») indicates in hours, minutes and sec- onds of the elapsed time since starting the V2X charging process. «Energy» (in the example «0.01kWh») indicates how many kilowatt hours have already been charged or discharged (when negative) from the battery of your vehicle during the current V2X charging process. -
Page 22: Switch To Charging Only From The V2X Charging Process
Switch to charging only from the V2X charging process The V2X charging process may be changed by the operator of the charging station. By clicking the “charge only” button in the main menu the user can select to switch to a solely unidirectional charging process. -
Page 23: Complete The Charging Process Or End It Before It Is Completed
Complete the charging process or end it before it is completed After the charging period has finished, the charging station auto- matically stops charging. Then a display similar to the following one will appear:... - Page 24 To end (when completed)… a..the DC CCS charging process, remove the CCS plug from your vehicle. Insert the CCS plug into the plug holder. b..the DC CHAdeMO charging process, remove the CHAdeMO plug from your vehicle, by pressing the release button at the top of the CHAdeMO plug and carefully pull the plug out of the socket.
- Page 25 When not completed If you want to stop an active charging process before it has fully completed, then follow the steps below: 1. Select the charging technology that you want to stop, 2. Select Charging Technology (plug selection)“ p. 10. 3.
-
Page 26: Troubleshooting
Troubleshooting In the following chapter you will find assistance for troubleshooting if the display shows an error. To trouble shoot the plug of the involved charging technology has to be disconnected from the car. -
Page 27: Error Description
Error description Display text Error description / action ERROR 0000000001 Internal error in communication with power POWER UNIT MISSING unit Contact service ›› Disconnect all plugs from vehicle; discon- nect device from grid; wait 30 seconds; re- connect. If the same error occurs again: call service ERROR 0000000002 Error plug interlock CONNECTOR LOCK... - Page 28 ERROR 0000000020 Short circuit of High Voltage wires HV SHORT CIRCUIT ›› Check vehicle and connection cable; note Contact service vehicle errors. If the same error occurs again: call service. ERROR 0000000040 Ground fault: resistance between High Volt- HV GROUND FAULT age system and Ground is too small Contact service ››...
- Page 29 ERROR 0000001000 Error signal supply on vehicle side SIGNAL SUPPLY EV ›› Disconnect all plugs from vehicle; discon- Check vehicle status nect device from grid; wait 30 seconds; re- connect. If the same error occurs again: call service ERROR 0000002000 Plug temperature detected above threshold PLUG TEMPERATURE SEN ››...
- Page 30 ERROR 0000040000 No response from vehicle NO CAN COMMUNICATION ›› Check CHAdeMO plug on vehicle side; Check plug connectn check vehicle state using vehicle’s user manual. ERROR 0000080000 Erroneous data from vehicle (Target Battery TARGET VOLT MAX BAT Voltage > Maximum Battery Voltage) Check vehicle status ››...
- Page 31 ERROR 0004000000 Message from vehicle: communication error EV CONTROL COMMUNIC. ›› Check EV cables; Check vehicle Check vehicle status ERROR 0008000000 Message from vehicle: charging permission EV CHARGING PERMISSN denied Check vehicle status ›› Check EV cables; Check vehicle ERROR 0010000000 Message from vehicle: internal error EV CAN FAULT FLAGS ››...
- Page 32 ›› Check charging cable; Replace cable if ERROR 0400000000 PP RESISTOR WRONG needed. Check cable ›› Disconnect all plugs from vehicle; wait 30 ERROR 0800000000 AUX RELAIS ERROR seconds; reconnect. No connection... If the same error occurs again: call service...
-
Page 33: Technical Specifications
Technical Specifications General Operating temperature -25°C to +40°C (with derating above +40°C) Storage temperature -40°C to +85°C Relative humidity 5% to 95% (without condensation) Protection IP54 (indoor / outdoor use) Dimensions (D x W x H) 435 x 266 x 859 mm Mass 39kg Specifications... -
Page 34: Support
Support EVTEG AG Phone: +41 41 260 88 38 E-Mail: evtec@evtec.ch For service or maintenance requests: EVTEC Support Phone: +41 41 322 23 86 E-Mail: support@evtec.ch Online Support: support.evtec.ch Address: EVTEC AG Rengglochstrasse 19 6012 Kriens-Obernau Switzerland www.evtec.ch... -
Page 35: Instructions For Disposal
Instructions for disposal Recycling the charging station The charging station is made out of different materials, but most im- portantly, it contains electro-mechanical and electronic components. It must therefore be disposed in accordance with the regulations for the individual materials. If you have any questions, please contact your local council office.
Need help?
Do you have a question about the sospeso & Charge CHAdeMO and is the answer not in the manual?
Questions and answers