Table of Contents
Advertisement
Advertisement
Table of Contents

Related Manuals for Evtec move&charge CHAdeMO

Summary of Contents for Evtec move&charge CHAdeMO
- Page 1 User Manual move&charge...
- Page 2 Introduction Thank you for your trust and your decision in favour of our fast chargers. move&charge 3in1 has been developed as a flexible DC and AC fast charge device following the Electric safety, EMC, CHAdeMO and Combined Charging (CCS) protocol. It was designed to be compatible with CEE three-phase plug (IEC-60309-2) without additional installation cost.
-
Page 3: Table Of Contents
Manual version 3.0 EN Suitable for ECP Version 2.x Content Safety Instructions ....................3 View of the device ....................5 Overview Screen ....................12 Home Screen..................... 12 Authentication Screen ..................12 Charge Screen ....................12 Home Screen during charging session ............... 13 Gewählte Technologie ohne Steckerverbindung .......... -
Page 4: Safety Instructions
Safety Instructions For your safety and for the optimal use of the device, read this user manual carefully before installing and using the device. To avoid any unnecessary errors and accidents, it is important that all persons using the device are familiar with its operation and the safety regulations. - Page 5 • The components inside the device are always live when the device is in use. Under no circumstances should you open the device when it is connected to the network/mains. Furthermore, all plugs must be unplugged and stored on the cable holders (CCS, type 2, CHAdeMO).
-
Page 6: View Of The Device
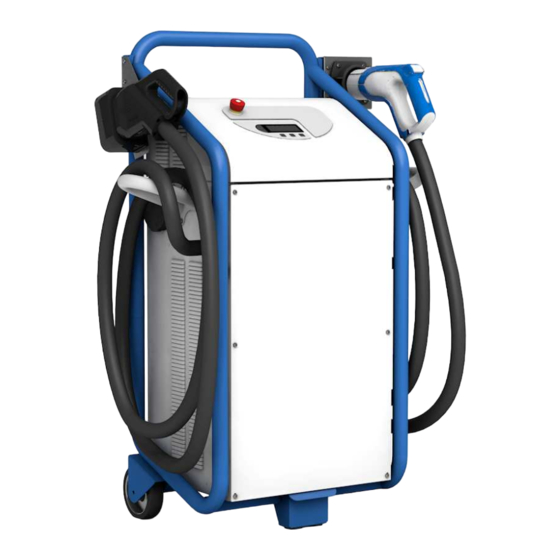
View of the device move&charge CHAdeMO Operating panel, Emergency stop switch, Plug holder Optional: AC type2 charging socket (AC interface for your charging cable: Renault, Smart, Tesla, etc), CHAdeMO plug (DC quick charger plug for your electric vehicle: Citroen, Mitsubishi, Nissan, Peugeot, Subaru, Toyota, etc.), Cable holder, Grid connection, Front cover... - Page 7 move&charge Combo2 Operating panel, Emergency stop switch, Plug holder Optional: AC type2 charging socket (AC interface for your charging cable: Renault, Smart, Tesla, etc), CCS plug (DC quick charger plug for your electric vehicle: BMW, GM, VW etc.), Cable holder, Grid connection, Front cover User Manual | move&charge | coffee&charge | 6...
- Page 8 move&charge 3in1 Operating panel, Emergency stop switch, Plug holder AC type2 charging socket (AC interface for your charging cable: Renault, Smart, Tesla, etc), CCS plug (DC quick charger plug for your electric vehicle: BMW, GM, VW etc.), CHAdeMO plug (DC quick charger plug for your electric vehicle: Citroen, Mitsubishi, Nissan, Peugeot, Subaru, Toyota, etc.), Front cover...
- Page 9 coffee&charge CHAdeMO Operating panel, Emergency stop switch, Plug holder AC type2 charging socket (AC interface for your charging cable: Renault, Smart, Tesla, etc); CHAdeMO plug (DC quick charger plug for your electric vehicle: Citroen, Mitsubishi, Nissan, Peugeot, Subaru, Toyota, etc.), Maintenance flap, Front cover User Manual | move&charge | coffee&charge | 8...
- Page 10 coffee&charge Combo2 Operating panel, Emergency stop switch, Plug holder AC type2 charging socket (AC interface for your charging cable: Renault, Smart, Tesla, etc); CCS plug (DC quick charger plug for your electric vehicle: BMW, GM, VW etc.), Maintenance flap, Front cover...
- Page 11 coffee&charge 3in1 Operating panel, Emergency stop switch, Plug holder AC type2 charging socket (AC interface for your charging cable: Renault, Smart, Tesla, etc); CHAdeMO plug (DC quick charger plug for your electric vehicle: Citroen, Mitsubishi, Nissan, Peugeot, Subaru, Toyota, etc.), CCS plug (DC quick charger plug for your electric vehicle: BMW, GM, VW etc.), Maintenance flap,...
- Page 12 Operating panel Display, Charging plug display, Charge indicator, Error indicator, Selection keys up / down, Start key, Stop key, Diamond key (home screen)
-
Page 13: Overview Screen
Overview Screen Home Screen Please select plug ▶DC CCS >DC CHAdeMO >AC Type 2 Authentication Screen Please Authenticate with RFID card / key oder by mobile app Charge Screen Remaining 00:36:30 Energy 0.01kWh Power 20.1kW █████░░░░░░░░░░░░░░▕ User Manual | move&charge | coffee&charge | 12... -
Page 14: Home Screen During Charging Session
Home Screen during charging session Please select plug ▶DC CCS :plugged >DC CHAdeMO >AC Type 2 Gewählte Technologie ohne Steckerverbindung DC CHADEMO Pls. connect vehicle Sprachwahl... -
Page 15: Start-Up
Start-up The unit can be connected to a CEE 32A connector (IEC 60309-2, 400 V AC, 45-65 Hz) or CEE 63A connector due to the ordered cable configuration. At a 63A connector two cars can be charged simulta- neously, one at a DC connector and an additional one at the Type 2 socket (two user operation). -
Page 16: Charging Process
Charging process Connect the vehicle Depending on the configuration there are three charging technologies available. The charging technology will be automatically detected by connecting the vehicle by means of the matching connector to the charging station. Select charging technology (during charging session) After the charging session started the screen is set back to the home screen. -
Page 17: Authentication Of The Charging Session
1. By plugging the car the connector is automically selected. The used plugs are indicated. For checking the status during the charging session, use the Selection keys to select the charging technology you currently use. 2. Confirm your selection by pressing the Start key . The different charging processes are described in the following chap- ters. - Page 18 Checking user ID Identifcation Connecting to server Acceptance Card not valid Unidentified user...
-
Page 19: Start Dc Ccs Charging Operation
Start DC CCS charging operation With the DC CCS process, the batteries of your vehicle are charged with DC. The quick charging process charges the batteries of your vehicle up to 100%. The charging operation can also be terminated manually before it is completed. 1. -
Page 20: Start Dc Chademo Charging Operation
Start DC CHAdeMO charging operation With the DC CHAdeMO process, the batteries of your vehicle are charged with DC. The quick charging process charges the batteries of your vehicle up to 80%. 1. Make sure that the charging station is prepared as described in the section "Start-up"... - Page 21 4. The charging station checks the connection and establishes a communication line with your vehicle (the green charging plug indicator lights up). This takes about 10 seconds. 5. The charging process will now start. The charging indicator will be flashing on the control panel. The LED display on the CHAdeMO plug will light up red.
-
Page 22: Start Ac Type 2 Charging Operation
Start AC Type 2 charging operation With the AC charging, the batteries of your vehicle are charged with an alternating current. The charge power depends on the onboard charger. 1. Make sure that the charging station is prepared as described in the section "Start-up"... - Page 23 The charging indicator will be flashing on the control panel. Depending on the temperature conditions and vehicle config- uration, the cooling system in your vehicle, and the one in the charging station, will start running. User Manual | move&charge | coffee&charge | 22...
-
Page 24: Explanations Of The Display In Ac Charging Mode
Explanations of the display in AC charging mode Charge Time 00:00:01 Cancel with █ button “Charging period” (in the example “00:00:01”) indicates the charg- ing time that has elapsed up to now in hours, minutes and seconds. The charge power adjusts itself depending on the charging phase, cooling capacity and the power consumption of the vehicle batteries that is currently possible. -
Page 25: Complete The Charging Process Or End It Before It Is Completed
Complete the charging process or end it before it is completed After the charging period has finished, the charging station automati- cally stops charging. The blue charge indicator goes out. Please do NOT use the Emergency stop switch to stop the charging operation, ONLY USE IT IN AN EMERGENCY to cancel a charging process! To end (when completed)…... - Page 26 c. …the AC Type 2 charging process, remove the charging ca- ble from your vehicle. Then you can pull the plug out of the type 2 AC charging socket on the charging station. If you want to stop an active charging process before it has fully completed, then follow the steps below: 1.
- Page 27 3. To end the charging process when it is fully completed, pro- ceed as described on the previous page p. 24. User Manual | move&charge | coffee&charge | 26...
-
Page 28: Settings
Settings The following section describes how you can change the settings of the charging station. To change any of the settings, you must first go to the Service menu of the charging station. Only qualified personnel may adjust the settings in the Ser- vice menu. -
Page 29: Navigation In The Service Menu
▶Device > Plugs > RFID > OCPP > Service Menu In the Service menu, you can now navigate (“Navigation in the Ser- vice menu” p. 28) to the menu item you want and call up the rele- vant function (“Function Text Input” p. -
Page 30: Function Text Input
Function Text Input For entering text and numbers. The text to be edited will be shown on the display along with the cursor to change the character on top of the current position. LicenseKey F1E2D3 Mode hold ◆: 123 Text input with deactivated cursor ^ in the Input mode for numbers 123 so that you can activate ▲... - Page 31 By selecting the Input mode, you can choose the current character set (uppercase, lowercase, numbers, special characters). CsAddress 21/255 http://www.domain.co ▲ Mode hold ◆: .,! Text input with activated cursor ▲ in the Input mode for lower case letters .,! Hold the Diamond key so that the Input mode changes: Input mode...
-
Page 32: Function Value Selection
Function Value Selection To select a value from a predefined list. Language ▶Italiano Value selection for “Language” with current value showing “Italiano” Functions Select value Selection keys Stop key Exit Function... -
Page 33: Selecting The Language Settings
Selecting the language settings You can set the default language in the Service menu, and determine whether the user of the charging station can select the language. Setting the default language 1. Make sure that you are in the Service menu (see “Settings”... - Page 34 (“Function Value Selection” p. 31). 5. You can now alter other Settings or exit the Service menu by pressing the Stop key . Please note the display on the screen to ensure that the changes have been applied. Set the Language selection for the user 1.
- Page 35 PlugLanguage 3. Next select 4. Using the Selection keys you can set whether the user may change the default language or not (“Function Value Se- lection” page 31). true = User can change the default language false = User cannot change the default language 5.
-
Page 36: Adjust The Device To The Actual Mains Power
Adjust the device to the actual mains power Adjustments to the power capacity should only be carried out by trained personnel. Note that if the power output of the mains decreases, then the charge time increases. The following section describes how you can change the permitted mains power: 1. - Page 37 6. Now set the current you want (“Function Text Input” p. 29 Mode 123) and exit the Settings window using the Stop key User Manual | move&charge | coffee&charge | 36...
-
Page 38: Rfid Train Whitelist
RFID Train Whitelist Create Whitelist locally 1. Make sure that you are in the Service menu (see “Settings” p. 27). 2. Now move the arrow ▶ on the display to RFID by using the Selection keys and confirm your selection with the Start key (“Navigation in Service Menu”... - Page 39 TrainWhitelist The stored RFID cards can be deleted under by holding down the Start key . (See previous section “Create Whitelist Local- ly”). User Manual | move&charge | coffee&charge | 38...
-
Page 40: Enter License Key
Enter License Key To add a license key follow the steps below: 1. Make sure that you are in the Service menu (see “Settings” p. 27). 2. Now move the arrow ▶ on the display to Device by using the Selection keys and confirm your selection with the Start key... - Page 41 User Manual | move&charge | coffee&charge | 40...
-
Page 42: Troubleshooting
Troubleshooting In the following chapter you will find assistance for troubleshooting (red indicator on operating panel). To fix errors, the plug of the af- fected charging technology must be disconnected from the vehicle respectively. For AC charging please also disconnect Type 2 cable from Type 2 socket at the fast charger. - Page 43 ERROR 0000000008 Error while switching off High Voltage after SWITCH HV OFF A TEST system check. ›› Disconnect all plugs from vehicle; dis- connect device from grid; wait 30 sec- onds; reconnect. If the same error occurs again: call service Internal error ERROR 0000000010 PU OCCUPIED...
- Page 44 ERROR 0000000200 High Voltage system under or over voltage HV UNDER OVERVOLTAGE ›› Disconnect device from grid; call service. ERROR 0000000400 Power unit RCD/OCP tripped RCDOCP POWER CIRCUIT ›› Check if charging device has optical Switch on RCDOCP damages; If no damages are visible reactivate RCD/OCP Control circuit RCD/OCP tripped ERROR 0000000800...
- Page 45 ERROR 0000008000 Internal error at measurement unit MEASUREMENT UNIT ›› Disconnect all plugs from vehicle; dis- connect device from grid; wait 30 sec- onds; reconnect. If the same error occurs again: call service ERROR 0000010000 Communication lines error COMMUNICATION LINES ››...
- Page 46 ERROR 0000400000 Vehicle High Voltage battery illegally pow- VEHICLE RELAY CLOSED ered up Check vehicle status ›› Check vehicle. Vehicle High Voltage battery cannot be ERROR 0000800000 SWITCH EV BATTERY ON powered up Check vehicle status ›› Check vehicle. ERROR 0001000000 Timeout while waiting for desired current TIMEOUT CURRENT CMD command from vehicle...
- Page 47 ERROR 0040000000 Vehicle’s voltage range exceeds charger’s EV CAN VOLTAGE RANGE ›› Check vehicle. Check vehicle status Message from vehicle: gear lever not in ERROR 0080000000 EV CAN SHIFT LEVER «P» Vehicle not in P ›› Put gear lever into «P»; consult vehicle’s user manual.
-
Page 48: Residual Current Circuit Breaker
Residual current circuit breaker If the error 0000000400 or 0000000800 occurs, the residual current circuit breaker (RCD/LS) for the power module, and/or for the control unit has triggered. Proceed as follows to correct the error. Before you carry out the following steps, make sure that... no plug from the charging column is connected to the vehicle. - Page 49 3. Turn the FI/LS switch back on. User Manual | move&charge | coffee&charge | 48...
- Page 50 Energy meter, FI/LS Control unit, FI/LS Power module, FI/LS AC Type 2 socket 4. Close the Maintenance flap again. 5. Start up the device p. 2.
-
Page 51: Technical Data
Technical Data General Operating temperature -20°C to +45°C Storage temperature -40°C to +85°C Relative humidity 5% to 95% (non-condensing) Protection class IP54 (Indoor and outdoor use) Standards Electrical safety IEC 61851-1 IEC 61439-2 EN 61000-6-1,-2, -3, 4 EN 61000-3-2 CHAdeMO Rev 0.9.1 (certified) Combined Charging DIN 70121... - Page 52 DC-output DC plug Plug 1 Plug 2 Combined CHAdeMO: Charging JEVS G105 System (CCS): IEC 62196- Max. DC output power 20kW / 23kW DC output voltage range 170-500 V (under load 50-500 V Max. DC output current 50 A 56 A Power factor >...
- Page 53 Options Access/Payment OCPP 1.5 systems Payment by smartphone Coin slot machine CHF / EUR / other Token system Authentication RFID system Collision protection Brushed chrome steel frame Attachment Steel construction for the foun- dation opi 2020 Surface mounting kit Adapter cable Type 2 socket –...
-
Page 54: Certificates
Certificates... - Page 55 User Manual | move&charge | coffee&charge | 54...
-
Page 56: Instructions For Disposal
Instructions for disposal Recycling the charging station The charging station is made out of different materials, but most im- portantly, it contains electro-mechanical and electronic components. It must therefore be disposed in accordance with the regulations for the individual materials. If you have any questions, please contact your local council office. - Page 58 Contact Manufacturer: EVTEC AG Rengglochstrasse 19 6012 Kriens-Obernau Schweiz Tel. 0041 41 260 88 38 evtec@evtec.ch www.evtec.ch Sales / Service Germany: EVTEC AG Rengglochstrasse 19 6012 Kriens-Obernau Schweiz Tel. 0041 41 260 88 38 evtec@evtec.ch www.evtec.ch...
Need help?
Do you have a question about the move&charge CHAdeMO and is the answer not in the manual?
Questions and answers