Table of Contents
Advertisement
Available languages
Available languages
Quick Links
MANUALE DI ISTRUZIONI
MANUAL DE INSTRUCCIONES
BENUTZERhANDBUCh
USER MANUAL
Art. 301 / Art. 302
Pompa a carriola a batteria 40 l e 60 l
Bomba de carretilla con batería 40 l y 60 l
Schubkarrenpumpe mit Batterie 40 l und 60 l
Wheelbarrow Battery Pump 40 l and 60 l
Via Industria 1/7 Industriestraße - I-39011 Lana (BZ)
Tel. +39 0473 563277 - Fax +39 0473 563482
info@stockergarden.com - www.stockergarden.com
Advertisement
Chapters
Table of Contents

Subscribe to Our Youtube Channel
Related Manuals for Stocker 301

Summary of Contents for Stocker 301
- Page 1 MANUALE DI ISTRUZIONI MANUAL DE INSTRUCCIONES BENUTZERhANDBUCh USER MANUAL Art. 301 / Art. 302 Pompa a carriola a batteria 40 l e 60 l Bomba de carretilla con batería 40 l y 60 l Schubkarrenpumpe mit Batterie 40 l und 60 l Wheelbarrow Battery Pump 40 l and 60 l Via Industria 1/7 Industriestraße - I-39011 Lana (BZ)
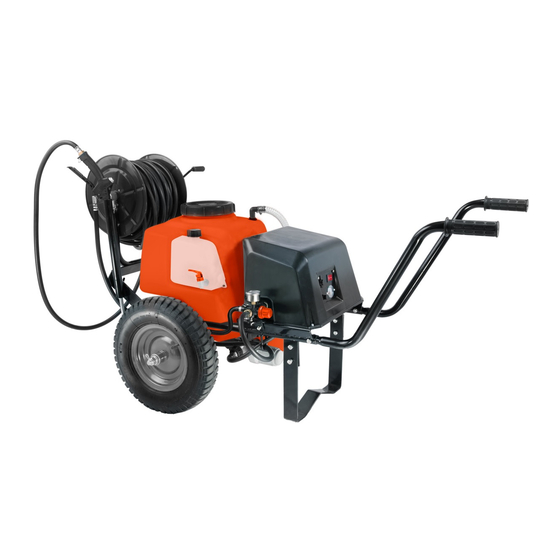
- Page 2 Art. 301 / Art. 302 Componenti e ricambi Art. 301/20 Art. 302/1 Componentes y recambios Serbatoio 40 l Serbatoio 60 l Bestandteile Tanque 40 l Tanque 60 l Tank 40 l Tank 60 l Components and spare parts Tank 40 l...
-
Page 3: Table Of Contents
Art. 301 / Art. 302 Art. 301 / Art. 302 Pompa a carriola a batteria 40 l e 60 l Pompa a carriola a batteria 40 l e 60 l Indice Descrizione generale ....................4 Fornitura ........................5 Avvertenze di sicurezza .................. - Page 4 Art. 301 / Art. 302 Art. 301 / Art. 302 Pompa a carriola a batteria 40 l e 60 l Pompa a carriola a batteria 40 l e 60 l Descrizione generale Fornitura La pompa a carriola può essere utilizzata da persone adulte per la vaporizzazione di acqua,...
- Page 5 Art. 301 / Art. 302 Art. 301 / Art. 302 Pompa a carriola a batteria 40 l e 60 l Pompa a carriola a batteria 40 l e 60 l Avvertenze di sicurezza Avvertenze di sicurezza Siete tenuti a leggere questo manuale di istruzioni e a...
-
Page 6: Avvertenze Di Sicurezza
Art. 301 / Art. 302 Art. 301 / Art. 302 Pompa a carriola a batteria 40 l e 60 l Pompa a carriola a batteria 40 l e 60 l Avvertenze di sicurezza Parametri tecnici Articolo Art. 301 Art. 302 Quantità... -
Page 7: Componenti E Ricambi
Art. 301 / Art. 302 Art. 301 / Art. 302 Pompa a carriola a batteria 40 l e 60 l Pompa a carriola a batteria 40 l e 60 l Componenti e ricambi Componenti e ricambi Per una migliore visualizzazione dei vari componenti e dei ricambi, si invita a prendere visione... -
Page 8: Montaggio
Art. 301 / Art. 302 Art. 301 / Art. 302 Pompa a carriola a batteria 40 l e 60 l Pompa a carriola a batteria 40 l e 60 l Montaggio Montaggio dei manici Inserire il manico (42) nell’apposito invito sul telaio e fissarlo utilizzando due bulloni lunghi (21) Attenzione: i numeri indicati fra parentesi si riferiscono ai componenti indicati sulla scheda con dado autobloccante (38). -
Page 9: Montaggio Dell'avvolgitubo
Collegamento del sistema idraulico Quando la luce dell’indicatore di carica diventa verde significa che la batteria è carica completa- mente. Utilizzare soltanto batterie e caricabatteria forniti da Stocker. Passare il tubo di collegamento tra bobina e regolatore di pressione (78) attraverso gli appositi Voltmetro passanti posti sotto al telaio del carrello. -
Page 10: Riempimento
Art. 301 / Art. 302 Art. 301 / Art. 302 Pompa a carriola a batteria 40 l e 60 l Pompa a carriola a batteria 40 l e 60 l Utilizzo Utilizzo Riempimento Start- Stop automatico del motore Prima dell’utilizzo, togliere il tappo del serbatoio e riempirlo... -
Page 11: Pulizia E Manutenzione
Art. 301 / Art. 302 Art. 301 / Art. 302 Pompa a carriola a batteria 40 l e 60 l Pompa a carriola a batteria 40 l e 60 l Pulizia e manutenzione Problematiche Al termine di ogni utilizzo la pompa deve essere pulita per evitare corrosioni e blocchi dello... - Page 12 Art. 301 / Art. 302 Art. 301 / Art. 302 Bomba de carretilla con batería 40 l y 60 l Bomba de carretilla con batería 40 l y 60 l Índice Descripción general ....................22 Suministro ........................23 Precauciones ......................24 Parámetros técnicos...
-
Page 13: Descripción General
Art. 301 / Art. 302 Art. 301 / Art. 302 Bomba de carretilla con batería 40 l y 60 l Bomba de carretilla con batería 40 l y 60 l Descripción general Suministro La bomba de carretilla puede ser utilizada por adultos para la vaporización del agua, productos Depósito... -
Page 14: Precauciones
Art. 301 / Art. 302 Art. 301 / Art. 302 Bomba de carretilla con batería 40 l y 60 l Bomba de carretilla con batería 40 l y 60 l Precauciones Precauciones Usted tiene la responsabilidad de leer este manual de... -
Page 15: Parámetros Técnicos
Art. 301 / Art. 302 Art. 301 / Art. 302 Bomba de carretilla con batería 40 l y 60 l Bomba de carretilla con batería 40 l y 60 l Precauciones Parámetros técnicos Artículo Art. 301 Art. 302 Realize una prueba con agua limpia para verificar que todas las juntas funcionen correctamente y que el pulverizado sea Cantidad de llenado máx. -
Page 16: Componentes Y Recambios
Art. 301 / Art. 302 Art. 301 / Art. 302 Bomba de carretilla con batería 40 l y 60 l Bomba de carretilla con batería 40 l y 60 l Componentes y recambios Componentes y recambios Para una mejor visualización de los distintos componentes y piezas de repuesto, consulte la hoja... -
Page 17: Montaje
Art. 301 / Art. 302 Art. 301 / Art. 302 Bomba de carretilla con batería 40 l y 60 l Bomba de carretilla con batería 40 l y 60 l Montaje Montaje de los mangos Insertar el mango (42) en la específica invitación en el bastidor y fijarlo utilizando dos tornillos Atención: los números indicados entre paréntesis se refieren a los componentes indicados en la... -
Page 18: Montaje Del Enrollador De La Manguera
Art. 301 / Art. 302 Art. 301 / Art. 302 Bomba de carretilla con batería 40 l y 60 l Bomba de carretilla con batería 40 l y 60 l Montaje del enrollador de la manguera Utilizo Montar el portamanguera (85) sobre el soporte (79) fijándolo con pernos, arandelas y pasadores Cargar la batería... -
Page 19: Llenado
Art. 301 / Art. 302 Art. 301 / Art. 302 Bomba de carretilla con batería 40 l y 60 l Bomba de carretilla con batería 40 l y 60 l Utilizo Utilizo Llenado Start-stop automático del motor Antes de usar, retire la tapa del tanque y llénela a través del filtro Con la bomba encendida: para garantizar un mejor uso de la batería, el motor se acciona... -
Page 20: Limpieza Y Mantenimiento
Art. 301 / Art. 302 Art. 301 / Art. 302 Bomba de carretilla con batería 40 l y 60 l Bomba de carretilla con batería 40 l y 60 l Limpieza y mantenimiento Solución de problemas Al final de cada uso, la bomba debe ser limpiada para evitar corrosión y atascos en el... - Page 21 • Ablassschraube ....................54 • Filterreinigung ...................... 54 Aufbewahrung ......................54 10. Störungsbehebung ....................55 Für weitere Informationen zum Produkt senden Sie uns bitte eine E-Mail an info@stockergarden.com. Abonnieren Sie unseren Newsletter um aktuelle Informationen von Stocker zu erhalten: www.stockergarden.com/newsletter...
-
Page 22: Allgemeine Beschreibung
Bedieners wurde ein 1,8-Liter-Tank integriert, der bei Befüllung mit Wasser die Möglichkeit bietet, nach dem Gebrauch die Hände zu waschen. Für weitere Informationen zum Produkt senden Sie uns bitte eine E-Mail an info@stockergarden.com. Abonnieren Sie unseren Newsletter um aktuelle Informationen von Stocker zu erhalten: www.stockergarden.com/newsletter... -
Page 23: Sicherheitshinweise
C. Die Schubkarrenpumpe sollte nicht bei einer Temperatur über 45°C oder unter -10° C verwendet werden. Für weitere Informationen zum Produkt senden Sie uns bitte eine E-Mail an info@stockergarden.com. Abonnieren Sie unseren Newsletter um aktuelle Informationen von Stocker zu erhalten: www.stockergarden.com/newsletter... -
Page 24: Technische Daten
Stocker produziert werden. *berechnet mit mitgelieferter Düse und ohne Düse bei maximalem Druck. Für weitere Informationen zum Produkt senden Sie uns bitte eine E-Mail an info@stockergarden.com. Abonnieren Sie unseren Newsletter um aktuelle Informationen von Stocker zu erhalten: www.stockergarden.com/newsletter... -
Page 25: Bestandteile
4 + 5x3 + 6x3 + 7x2 + 8 + 9 Verschraubungen und Metallbändern) welchem sich der Verteilerschlauch, vor/über dem Tank, befindet. Siehe Abbildung. Für weitere Informationen zum Produkt senden Sie uns bitte eine E-Mail an info@stockergarden.com. Abonnieren Sie unseren Newsletter um aktuelle Informationen von Stocker zu erhalten: www.stockergarden.com/newsletter... -
Page 26: Montage
Fixieren sie die Halterung (79) mit zwei Schrauben an die dafür vorgesehene Aussparung (siehe Foto) und verwenden sie den Sprengring (30). Montagereihenfolge Für weitere Informationen zum Produkt senden Sie uns bitte eine E-Mail an info@stockergarden.com. Abonnieren Sie unseren Newsletter um aktuelle Informationen von Stocker zu erhalten: www.stockergarden.com/newsletter... -
Page 27: Schlauchtrommel Montieren
Achtung: Während des Ladens Zeigt das Voltmeter einen Wert von 14 V an. Bei Benutzung der Schubkarrenpumpe wird ein Wert zwischen 12 und 14 V angezeigt. Für weitere Informationen zum Produkt senden Sie uns bitte eine E-Mail an info@stockergarden.com. Abonnieren Sie unseren Newsletter um aktuelle Informationen von Stocker zu erhalten: www.stockergarden.com/newsletter... -
Page 28: Füllung
Teils der Düse ist es möglich, die Strahlform vom Spray auf einen herkömmlichen Strahl einzustellen. Für weitere Informationen zum Produkt senden Sie uns bitte eine E-Mail an info@stockergarden.com. Abonnieren Sie unseren Newsletter um aktuelle Informationen von Stocker zu erhalten: www.stockergarden.com/newsletter... -
Page 29: Reinigung Und Instandhaltung
Lassen Sie sie nicht zu lange unbenutzt, da dies die Batterie beschädigen kann. Die Pumpe sollte nicht an Temperaturen unter 15°C ausgesetzt werden. Für weitere Informationen zum Produkt senden Sie uns bitte eine E-Mail an info@stockergarden.com. Abonnieren Sie unseren Newsletter um aktuelle Informationen von Stocker zu erhalten: www.stockergarden.com/newsletter... - Page 30 Art. 301 / Art. 302 Art. 301 / Art. 302 Wheelbarrow Battery Pump 40 l and 60 l Wheelbarrow Battery Pump 40 l and 60 l Index General description ....................58 Included parts ......................59 Safety instructions ....................60 Technical data ......................
- Page 31 Art. 301 / Art. 302 Art. 301 / Art. 302 Wheelbarrow Battery Pump 40 l and 60 l Wheelbarrow Battery Pump 40 l and 60 l General description Included parts This wheelbarrow sprayer is designed for spraying plant protection products in the stipulated Tank concentrations.
- Page 32 Art. 301 / Art. 302 Art. 301 / Art. 302 Wheelbarrow Battery Pump 40 l and 60 l Wheelbarrow Battery Pump 40 l and 60 l Safety instructions Safety instructions You are required to read this manual and follow the The residual chemical shall be kept in a container instead of instructions for purpose of proper operation.
- Page 33 The battery must always be stored in a dry place, away from extreme temperatures and protected from sunlight. It cannot be replaced with batteries not produced by Stocker. *with included nozzle on pulverization setting and without nozzle at maximum operating pressure.
- Page 34 Art. 301 / Art. 302 Art. 301 / Art. 302 Wheelbarrow Battery Pump 40 l and 60 l Wheelbarrow Battery Pump 40 l and 60 l Components and spare parts Components and spare parts For a better visualization of the various components and spare parts, please consult the sheet...
- Page 35 Art. 301 / Art. 302 Art. 301 / Art. 302 Wheelbarrow Battery Pump 40 l and 60 l Wheelbarrow Battery Pump 40 l and 60 l Assembly Assembly of the handles Place the handles (42) onto the dedicated pilot hole on the chassis and fasten it with 2 long bolts Please note: The numbers in brackets refer to the components indicated on the sheet attached (21) and a self-locking nut (38).
- Page 36 When the charging indicator light turns green it means the battery is fully charged. Only use batteries and chargers supplied by Stocker. Connection of the hydraulic-system Voltmeter...
- Page 37 Art. 301 / Art. 302 Art. 301 / Art. 302 Wheelbarrow Battery Pump 40 l and 60 l Wheelbarrow Battery Pump 40 l and 60 l Usage Usage Filling Engine’s automatic Start&Stop Before use, remove the tank cap and fill the tank through the With the pump switched on: to ensure an optimal use of the battery, the engine only starts by holding filter with the chosen liquid substances, then reposition the cap.
- Page 38 Art. 301 / Art. 302 Art. 301 / Art. 302 Wheelbarrow Battery Pump 40 l and 60 l Wheelbarrow Battery Pump 40 l and 60 l Cleaning and maintenance Troubleshooting After each use, the pump must be cleaned to prevent corrosion and sprayer blocks caused by...
Need help?
Do you have a question about the 301 and is the answer not in the manual?
Questions and answers