Advertisement
Quick Links
Advertisement

Related Manuals for sparkfun ProtoSnap MiniBot


Summary of Contents for sparkfun ProtoSnap MiniBot
- Page 1 MINI BOT Assembly Guide to SparkFun’s ProtoSnap MiniBot...
-
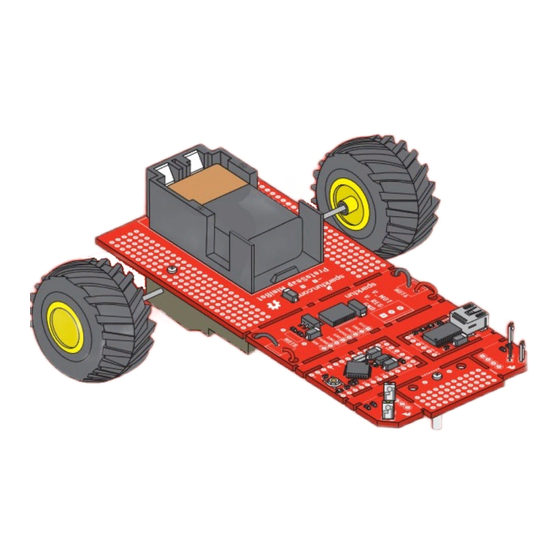
Page 2: Inventory Of Parts
Inventory of Parts The ProtoSnap MiniBot is the newest addition to SparkFun's line of ProtoSnap products. The MiniBot is a complete robotics platform that allows you to build a small, wheeled robot using the included parts and your own tools. The MiniBot can be used in conjunction with the Arduino programming platform, allowing you to program the platform to suit your individual needs. -
Page 3: Soldering Tips
Required Tools: (not included in kit) Soldering Tips Soldering Iron Wire Cutters Spool of Solder Wire Strippers * Suggested, not required. * Suggested, not required. Sponge for Soldering Iron Hobby Knife Quick Soldering Tips: Don’t: Use the very tip of the iron. Use the side of the tip of the iron, “The Sweet Spot.”... -
Page 4: Start Here
Start Here: Your First Component Locate the Infrared Transmitter *The transmitter is color coded yellow. Locate the silkcreen footprint on the board and place transmitter through the board. Make sure the lens bump faces foward. Push the legs through the board until the component is flush with top side. - Page 5 Flip the board over. Hold the soldering iron’s “Sweet Spot” so it touches both the leg and the metal ring. Hold for 2 seconds. Feed solder into the joint. Pull solder away first. Then iron next. Your solder joints should look like this - a tiny volcano.
- Page 6 Your Infrared Transmitter should look like this. Locate the silkcreen footprint and place the second transmitter through the board. Repeat the same process to solder the second transmitter flush to the board. After you complete this the board should now look like the image below. Page 5...
- Page 7 Locate the Infrared Receiver *The receiver is color coded red. 2 14 Locate the silkcreen footprints on the board for each receiver. * The receiver needs to sit higher than the transmitter. Solder the two receivers so they sit just higher than the transmitters.
- Page 8 Congratulations! You’ve successfully soldered the infrared components. Now use the same method to place and solder the rest of the components in the kit! BE CAREFUL, THE FOLLOWING STEPS INVOLVE THE TOP AND BOTTOM SIDE OF THE BOARD. THIS ARROW INDICATES WORKING ON THE TOP SIDE OF THE BOARD. THIS ARROW INDICATES WORKING ON THE BOTTOM SIDE OF THE BOARD.
- Page 9 Peel one side of the the double stick tape in the center of the footprint. Once placed, peel off the top side to prepare for the battery holder. Place the battery holder on top of the tape. This will hold it in place as you solder it in from the bottom side.
- Page 10 Flip Board Over to Bottom Side For this kit you will need to assemble the gearbox first. You can find the directions for the gearbox inside the Tamiya box. It is important that you assemble the instructions marked “A”. Locate the footprint for the gearbox on the bottom side of the board. Use the screws and nuts that came with the gearbox to secure into place.
- Page 11 First we need to pre-tin the motor terminals. Add solder to the two metal connection points on each motor (4 total) Strip two pieces of red wire and two pieces of black wire using the wire strippers. Solder the red wire to the top and the black wire to the bottom connector for each motor.
- Page 12 Flip Board Over to Top Side Pull wires through top side of board. Measure approximately 1” length from board. Prepare to cut with wire cutters. Use wire cutters to cut the 1” length on all four wires. Use wire strippers to strip each wire end. Page 11...
- Page 13 Feed each wire back through the nearest hole to the bottom side. Flip board over and solder into place. Page 12...
- Page 14 Attach the plastic standoff Place the screw through the center hole. From the bottom twist the standoff until all parts are flush. Add additional screw to bottom of standoff to reduce drag and improve durability. Congratulations, you are done! Place the 9 volt battery into its holder to turn your MiniBot “on”.
- Page 15 Top: Bottom: Page 14...
- Page 16 What is ProtoSnap? ProtoSnap is a new line of SparkFun products that make starting out in electronics easier and more intuitive. Each ProtoSnap product is composed of several different components that come pre-wired to be used easily. When you have reached the limits of your ProtoSnap in its current form, you can snap apart the individual components and repurpose them for other projects.
Need help?
Do you have a question about the ProtoSnap MiniBot and is the answer not in the manual?
Questions and answers